The ability to include photos and comments on a virtual map might seem whimsical, but it has some practical applications.
Google Maps and Google Earth have made location photography much more accessible, and by using a combination of the two applications it's easy to organise a collection of photos into a presentation that's both entertaining and informative.
Maps and Earth are closely linked – it's not too much of a simplification to say that Google Earth is really just Google Maps wrapped around a virtual sphere with some added layers of information.
The file formats are pretty closely linked, too, making working with both apps simple. We're going to start working with Maps and then add extra features which are exclusive to Earth.
Make a map
To start the process, you'll need a Google account. Once you're logged in, click on 'Maps' and then 'My Maps'. Select 'Create New Map', and give it a name and description.
To start adding details, click on the 'Edit' button. You'll see some new icons appear at the top left of the Map window. From left to right, these are the Drag tool, the Placemarker dropper, the Path marker and the Area marker.
Get daily insight, inspiration and deals in your inbox
Sign up for breaking news, reviews, opinion, top tech deals, and more.
Clicking on 'Drag' returns Maps to the usual drag-and-zoom mode. The other tools are used to add information to the current map.
Add some photos
There are three ways to add photos and markers. If you want to produce a version of your map for the web, the best two options are the Placemarker system in Google Maps and the Panoramio photo library.
With Panoramio, anyone can add a photo to any location, and it will appear as a small clickable blue square in both Earth and Maps. The catch is that image content is filtered by Google, meaning it can take up to a month to get a photo added.
If these aren't showstoppers for you, Panoramio will make your photos visible to all Google users. If you're in a hurry, the Placemarker approach will get things done faster.
Add a placemarker
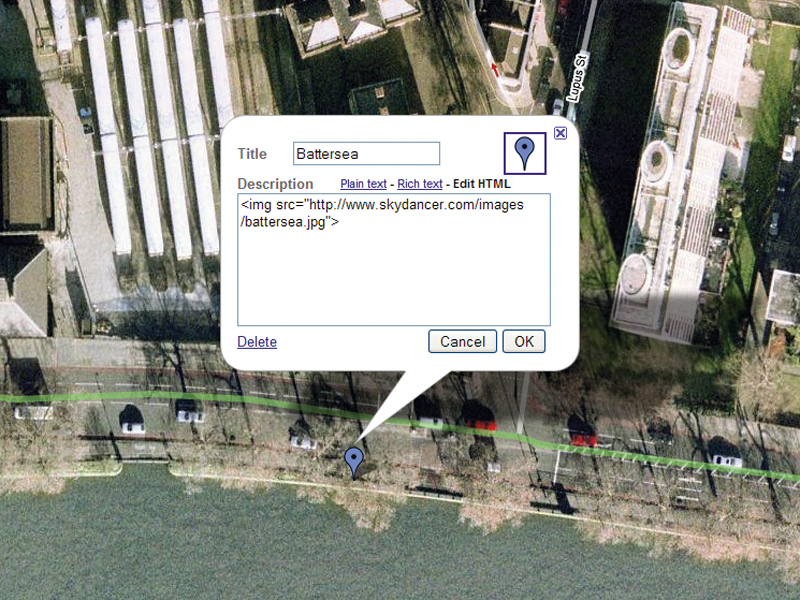
In Maps, navigate to your location, and click on the dropshaped Placemarker icon at the top left. Your mouse will turn into a floating copy of the icon. Drop it at the location on the map you want to highlight, and then drag it for fine-tuning.
Once done, you'll see a dialog box appear for the marker. If you left-click on the icon at the top right, you can choose one of the other marker shapes. Fill in the Title box with a useful name and then click on 'Edit HTML'.
To add a photo here, type in a standard HTML '' link. If you want to add bigger photos, you'll have to design your own placemarker balloons – see the 'Pin slideshows and video' box for some hints. Note that you can also add areas and trails using the other edit icons.
An obvious application is creating driving directions – paint on the lines or areas you want to highlight and they'll be added to your map.
Share your map
When you've added your photos, placemarkers and other features, you can save the entire list as a map and embed it in a web page to create a static clickable tour, complete with placemarkers that anyone can view.
At the top right of the Maps page, click on 'Link'. It's a good idea to customise the size of your preview, so click on 'Customise and preview embedded map' and experiment with the straightforward options there. When you're done, copy and paste the HTML into a web editor, add whatever notes, headers and other details you want around it and upload it to a web page.
You can also export your map to Google Earth. To do this, ensure you're in Edit mode and click on the 'View in Google Earth' link at the top right. Your browser may be set up to load the file directly into Google Earth; alternatively, you can save it to disk for sharing by email or as a download.
Most Popular


