


Laptops might have been designed with portability and long battery life in mind, but they weren't designed for comfort.
Use a laptop on your coffee table for more than five minutes and you're transformed into a warped and twisted, hunchbacked visage of a human being.
What you need is something that raises and angles your fine laptop into a more human-friendly angle. And while we do thank a clever clogs for pointing out a book shoved under the back of the laptop would do just that, it's hardly what we'd call an elegant solution.
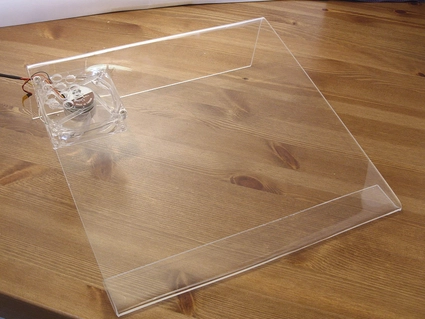
As it happens, it's easy enough to grab an acrylic sheet and bend the two ends to produce an effective custom laptop stand. You just need to vary the height of the back-end to adjust the angle. It's also very easy to add cooling, via an extra case fan powered off a USB port.
An A3-sized acrylic sheet should be fine for most laptops. We've opted for a 3mm thick sheet that costs less than £3, but for laptops over 3kg, use a sheet 4mm thick.
What you will need
- A3 acrylic sheet
- Case fan
- USB cable
- Protective gloves
- Hot-air paint stripper
- Soldering kit
- Clamps
- Workbench
- Wire wool

1. At its heart this project is superbly easy, but due to the hot-air gun, we'd recommend a workbench.

2. Make sure you get a decent-sized acrylic sheet. We'll need about 7 to 10cm for the rear fold and 3 to 5cm for the front fold then 20 to 30cm for the main section (depending on the size of your laptop). As it turns out an A3 sheet is about right and widely available on eBay.

3. Measure and clamp the sheet in place and peel any protective plastic well out of the way. Pop on protective gloves and use the heat gun on a 'cool' 300°C setting. Evenly heat the sheet where you want the fold. This will take a good few minutes.

4. Once you've made the back fold, do the same for the front. We bent this completely back on itself to make a comfortable fold if we rest it on our legs.

5. That could be it right there, but we're going to add extra cooling. Flip the laptop over and mark out where the cooling vents are. Make sure you drill/cut slowly otherwise you'll crack the plastic.

6. Take an existing USB cable and strip a off suitable length.

7. Choose a low-power fan as it'll only be supplied with 5v of power from your laptop's USB port (rather than the 12v our fan says it needs). Solder the black and red connections together.

8. To make a neat finish, counter sink screw holes in the plastic, so the fan screws will be flush.

9. Our final touch is to add a strip of silicon rubber to stop the laptop from slipping. Alternatively, you could use rubber pads.

10. And we're done!