iTunes subscriptions: how to manage on iPhone, iPad or Mac
Take control of recurring Apple charges

There are many apps on the iTunes App Store and Mac App Store that rely on recurring in-app purchases in order for you to get the most from them. In the case of Newsstand and other online services, these in-app purchases take the form of subscriptions. So how do you know what subscriptions you've subscribed to, and how do you manage, cancel, or reactivate them? Apple makes it fairly easy if you know where to look.
In this article, we'll walk you through this process of managing in-app subscriptions so that you'll only pay for what you're using, and show you how to cancel the rest easily. Continue reading to find out the details.
Viewing Subscriptions on Mac
Both Mac App Store and iTunes subscriptions can be viewed in the desktop version of iTunes on a Mac or Windows computer. To access them, open iTunes, follow these steps:
1.Click your name beside the search bar.
2.Select Account Info, then sign in when prompted.
3.Locate the Settings section.
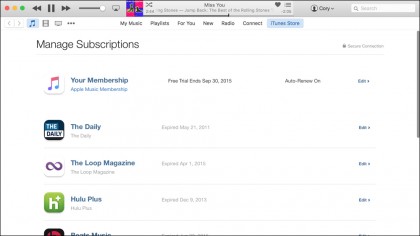
4.Click "Manage" next to "Subscriptions."
Get daily insight, inspiration and deals in your inbox
Sign up for breaking news, reviews, opinion, top tech deals, and more.

This list will contain all of the active and inactive subscriptions associated with your Apple ID. "Expired" will be listed next to services that are no longer active in your account, while active services will list the next renewal date.
Viewing Subscriptions on iOS
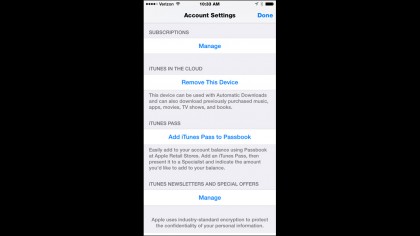
You can manage your subscriptions from an iOS device as well. The easiest way to do so is to access the iTunes Store, scroll to the bottom of the main page and click on the Apple ID button, then click View Apple ID. After entering your password, scroll down to the Subscriptions section and hit Manage.

Canceling recurring Subscriptions
If you wish to cancel a recurring subscription, then click the "Edit" button to the right of the service listed in the "Manage Subscriptions" view.

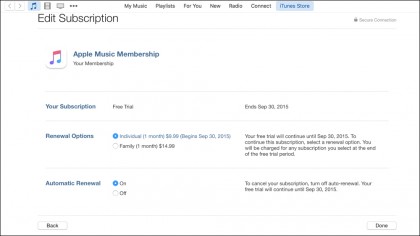
Once in this new "Edit Subscription" view, select "Off" for the Automatic Renewal option, then click Done to save the changes.
This will cause the subscription to expire whenever it goes to renew. Instead of renewing, it'll be placed in an inactive state. You can do this for any subscriptions which you are not currently using in order to save money each month.
- Stay safe online - download and install the best Mac VPN