There are many reasons for wanting to share your screen with someone on Discord. For example, if you want to demonstrate how to do something, it can be far quicker to show someone rather than trying to explain the process step by step in text or in a meeting. You may also like the idea of showing off your gaming prowess. These scenarios – and plenty of others – can be catered for if you know how to screen share on Discord.
There are two broad approaches to screen sharing, and we’ll look at both of them here. The first is to simply share everything, making it possible for whoever you are chatting with to see everything that you see on your screen. The second option is to limit sharing to a particular window, which is ideal for showing someone how to do something in an app, or browser window, or for sharing footage of a gaming session. Let’s see how it’s done.
Quick steps for how to share your screen on Discord
- Join a server
- Select screen sharing
- Choose to share a tab, window, or everything
Tools and Requirements
- Discord app
- Discord account
- Internet connection
Step by step guide on how to share your screen on Discord
1. Server considerations

The first thing to do is to ensure that you've joined a voice channel on a server that provides you with screen-sharing permissions. If you have the relevant permission, you'll see a Share Your Screen button.
It is worth pointing out that it may not always be possible to share your screen. This is not because of problems or technical limitations, but because permissions may have been put in place on a particular voice channel that blocks such activity.
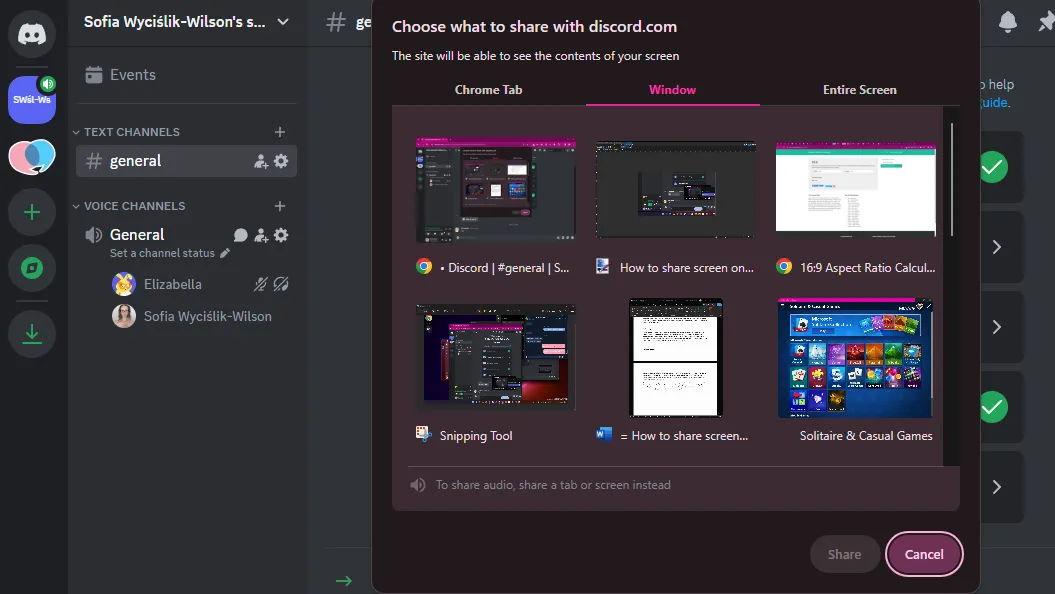
2. Screen sharing options

To start screen sharing, you need to click this Share your Screen button; you can then specify precisely what to share. You can choose to share a browser tab from Chrome (or whatever browser you use), a window (and this can be an app or a game), or you can opt to share your entire screen. If you have multiple monitors, you will have to select which one you would like to display to others.
3. Audio sharing

If you opt to share a window, you are only able to share video, but there is the option of sharing audio as well in the case of tabs and screens. You may not always want to share audio as well as video, but on those occasions that you do, remember that you will have to select Chrome Tab or Entire Screen as your source. You can then enable Also share tab audio or Also share system audio before hitting the Share button.
4. Monitoring your stream

Once screen sharing is underway, you can use the video preview window to keep an eye on things. The preview not only shows you precisely what other people are able to see – and it's good to monitor this in case you inadvertently share something you don't want to – but also shows you how many people are connected to the stream. The preview window can be dragged around if you need to move it to a preferred position.
5. Stopping your stream

When you want or need to stop sharing your screen, there are various ways to do so. In the stream preview overlay, there is a Stop Streaming button (the one that features an X), but you can also click the Stream Settings cog button and select Stop Streaming. Other options are to click the Stop sharing button in the floating toolbar on your screen or click the Share Your Screen button you used to start things and select the Stop Streaming option from this menu.
Final Thoughts
Screen sharing can be not only astonishingly useful, but it is something that also has super potential to offer some fun. The fact that you can opt to share your screen with an individual, or with an entire server allows for great flexibility, and you’re in control the entire time. You can always stop sharing your screen with a quick press of a button.
Your reasons for sharing your screen may mean that doing so via Discord is the best option – but it is important to remember that this is far from being the only way to approach screen sharing. It is something that can be achieved in the likes of Microsoft Teams and Zoom, and there are also other options such as CoScreen for macOS and Windows, or Surfly for the web.
You might also like...
