15 Automator and AppleScripts You Can’t Live Without
Computers were designed to do repetitive tasks efficiently and consistently, so why then are we still sitting around and renaming files on our computer by hand? Why are we still relying on our memory to remind us of our friend’s birthdays? There’s got to be a better way, and there is with Automator and AppleScript.
Sure, these things may sound like something out of an episode of The Jetsons, but with today’s Macs, not only is automating repetitive tasks readily available, but it’s also easy to do. That’s why we would like to present you with 15 Automator and AppleScripts that you can’t live without.
Because we have over 15 different Automator workflows and AppleScripts that we will be presenting to you, we have also made the project files available as a download from our website by clicking here. If you get stuck at any point, or simply don’t feel like building out the projects, refer to these fully completed workflow and script files.
Intro to Automator
Automator allows you to automate tasks using a drag and drop interface that makes programming these tasks easier for beginners.
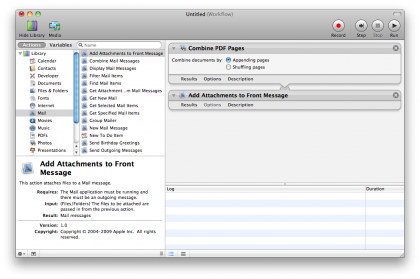
Automator is an application that Apple has distributed with Mac OS X since version 10.4 (Tiger). Automator allows anyone to easily create “workflows” that mimics a repetitive task. To create a workflow, you drag and drop Automator actions from the actions listing (on the left-hand side of the application) to the workflow area (on the right-hand side of the application). These actions can then be stacked on top of one another, like puzzle pieces, until the desired workflow has been completed with all of the necessary steps.

You may be overwhelmed with Automator at first, but you’ll soon be creating new Workflows in no time.
Each Automator action has a certain input and output functionality (e.x. You may feed keyboard input into an action and get a text file on your Desktop as the output). To get the details of the Automator actions, select them in the actions listing and read the information in the description view – a small panel underneath the actions listing. The description view will also tell you the necessary action input(s) and what the action will be outputting.
You can run a workflow from within Automator by clicking on the “Run” button in the top-right corner of the application, or save the workflow out as an Automator file or stand-alone application. To save the workflow as an Automator .workflow file, use the Standard save dialog (File > Save).

A workflow file will allow you to open the workflow again in Automator, while an application format will let you run the workflow as you would any other app on your Mac.
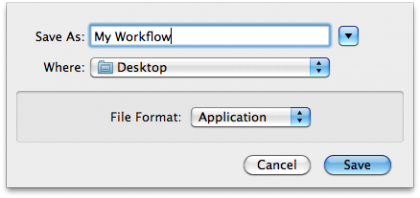
To save the workflow as a stand-alone application that will work just like other Mac OS X apps, click File > Save As. A new save dialog will open, allowing you to type in the name and specify a save location. But before clicking on the Save button, select “Application” from the File Format drop-down menu. This will allow the workflow to run outside of Automator, just like any native app.
These are the basic features and save options behind Automator. In the following workflow tutorials, you will use what you learned here to build 10 Automator actions that can help save you time when using your Mac. Remember, if you get stuck, you can download the project files by clicking here.
Get daily insight, inspiration and deals in your inbox
Sign up for breaking news, reviews, opinion, top tech deals, and more.