How to install and configure graphics drivers in Linux
AMD drivers can be a little trickier depending on whether you want to use proprietary drivers or not. By default, Ubuntu uses the open-source Radeon drivers when it detects an AMD graphics card in the system.
These drivers are maintained by a team employed by AMD and are more up to speed than the Nvidia open-source drivers. In many games, you may not even notice a difference between the two. However, the closed-source Catalyst driver (also known as the fglrx driver) is made available for those who would like to use it.
To begin installation of the Catalyst driver, you have two options: First, you can go visit the AMD website and enter your graphic card details. If you're not sure which graphics card you are using, you can find out using this command at the terminal: $ lspci –vvnn | grep VGA.

Second, you can install the graphics driver via command line. Some Linux gamers prefer this method as it can be less prone to error, but we'll cover both.
Depending on the graphics card you're using, the AMD website will supply you with the appropriate driver version. However, if you're handed a legacy driver version (often the case with older cards), it may be better to stick with the opensource radeon driver, which tends to support older cards better.
We would recommend sticking with the open-source driver if you are using a graphics card older than the HD 6xxx series. Note: if you're switching from another graphics card, say from Nvidia, make sure to uninstall the driver for the previous card before proceeding.

To start a manual installation of Catalyst, you must make sure you have dh-make libraries installed. To do so, use the following command (Note: Catalyst (fglrx) isn't supported on Ubuntu 16.04. You're required to use the open source drivers):
Sign up for breaking news, reviews, opinion, top tech deals, and more.
$ sudo apt-get install dh-make dh-modaliases execstack libc6-i386 lib32gcc1
While still in the terminal, navigate to the folder where you downloaded the driver, and run the install package.
For Ubuntu 14.04:
$ sh amd-driver-installer-catalyst-13-4-x86.x86_64.run --buildpkg Ubuntu/trusty
For Ubuntu 12.04:
$ sh amd-driver-installer-catalyst-13-4-x86.x86_64.run --buildpkg Ubuntu/precise
In Ubuntu 12.04, a package manager window may open and install some dependencies, if they are required, and create three Deb packages.
To install the newly created .deb files, use $ sudo dpkg –i flgrx*.deb . After that, run $ sudo amdconfig –initial to configure the installation. After this command is finished, reboot the system. If all went well, the fglrx (Catalyst) driver will be installed and working on your system.
To confirm that the drivers are working open a terminal and type $ flgrxinfo. You should get terminal output that looks something similar to the following:
display: :0 screen: 0
OpenGL vendor string: Advanced Micro Devices, Inc.
OpenGL renderer string: AMD Radeon HD 6700 Series
OpenGL version string: 4.2.11733 Compatibility Profile
Context
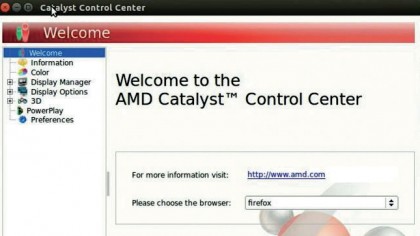
If you need to make configuration changes via AMD Catalyst Control Center you can find it in the Application
menu or by using $ gksudo amdcccle.
Now that we've covered how to install a driver using downloaded drivers from AMD's website, let's cover how to install the drivers using Ubuntu repositories (repos) and the command line interface. The first thing we want to do is make a backup copy of the xorg.conf configuration file (if you have it) in case this ends up failing and we need to restore the previous version.
This file is where all of the configuration information for your input devices and output devices resides, such as video cards, monitors, keyboards and mice:
$ sudo cp /etc/X11/xorg.conf /etc/X11/xorg.conf.BAK
Next, you need to purge the current fglrx files and install the Linux generic headers (if you haven't already). Use the following two commands to complete these tasks and then reboot before proceeding to the next step.
$ sudo apt-get purge fglrx*
$ sudo apt-get install linux-headers-generic
After rebooting, install the drivers from the Ubuntu repos using the following commands.
For Ubuntu 12.04:
$ sudo apt-get install fglrx fglrx-amdcccle
For Ubuntu 14.04:
$ sudo apt-get install fglrx
Now this next step is very important so follow the details closely. Before rebooting, generate a new xorg.conf file. This absolutely must be done before rebooting or you will run into some massive headaches trying to fix this problem without being able to see anything on the screen. Use the following command to generate the file:
$ sudo amdconfig –adapter=all –initial
Now once you've completed this step, reboot and check the installation using the same fglrxinfo command we discussed earlier and check the output. After that, you are done. Congratulations, you are now running Catalyst drivers on your Linux system.

AMD troubleshooting
However you may see a message that looks like this:
Xlib: extension "XFree86-DRI" missing on display ":1.0
If you do, don't panic, as it doesn't necessarily indicate a major problem. However, just to be safe, in order to fix it, open the /etc/X11/xorg.conf file again and add the following line to Section: Module :
load "dri"
One other component you might want to enable is video hardware acceleration using your AMD graphics card. To do so you'll need to add four packages after installing the driver:
$ sudo apt-get install xvba-va-driver libva-glx1 libva-egl1 vainfo
To check that the packages have been installed correctly, you can use the $ sudo vainfo command and should get similar output to the following:
libva: VA-API version 0.32.0
Xlib: extension "XFree86-DRI" missing on display ":0".
libva: va_getDriverName() returns 0
libva: Trying to open /usr/lib/x86_64-linux-gnu/dri/fglrx_drv_
video.so
libva: va_openDriver() returns 0
vainfo: VA-API version: 0.32 (libva 1.0.15)
vainfo: Driver version: Splitted-Desktop Systems XvBA
backend for VA-API - 0.7.8
vainfo: Supported profile and entrypoints
VAProfileH264High : VAEntrypointVLD
VAProfileVC1Advanced : VAEntrypointVLD
We should briefly cover Intel's graphics driver for its range of integrated graphics. The open-source driver for Intel's chipsets comes as part of the xserver-xorg-video-intel driver package, which is installed on all Ubuntu systems by default, so there is no need to perform an installation with those.
However, if they aren't there for whatever reason, you simply need to run the following command to install them again:
$ sudo apt-get install xserver-xorg-video-intel
Remember that many of these methods are not completely foolproof, so always backup your xorg.conf file before beginning any driver changes. There are some methods safer than others, yet some can be riskier yet provide more freedom in your installation.
You should assess the risks and benefits of each method and decide which method of installation and which driver in particular suits your preferences and needs as well as the unique nature of your personal Linux system setup. Although we've mainly covered Ubuntu installations in this tutorial, these methods are somewhat adaptable to other Linux distributions as well, but we'd encourage you to read the documentation of your particular distro before proceeding.
More troubleshooting tips
If your driver installation failed for whatever reason and your computer will no longer boot, there's a fix in recovery mode available that can help. While turning on the system, press the escape button at the Grub bootloader, and choose 'recovery mode' for your kernel.
Drop down to 'root shell' and run the ATI uninstaller using the following commands. Note, don't mistype any of them as they could break your system, especially the rm –rf command.
$ cd /usr/share/ati/
$ sh ./fglrx-uninstall.sh
$ cd
$ rm -rf /etc/ati/
$ apt-get remove -purge xorg-driver-fglrx fglrxamdcccle
Next, run the following command to restore your xorg.conf file to its default settings:
$ dpkg-reconfigure -phigh xserver-xorg
Now your computer should be able to boot with the default radeon drivers the next time that you boot up. If it doesn't, open the xorg.conf file using a file editor such as vi or nano and where it says Device make sure the driver field says 'radeon'.
That should cover about all of the main methods of graphics driver installation on Linux. Whichever path you end up choosing, each has its own merits. The wonderful thing about Linux is you have choice, whether it be in how you set up your desktop or which video drivers you choose.
The world of Linux gaming is expanding rapidly, and there may come a day soon where you will not need a Windows machine to play all of the latest games. Until then, we hope this guide allows you to, at least, get started and enjoy the hundreds of titles that are supported.
- Enjoyed this article? Expand your knowledge of Linux, get more from your code, and discover the latest open source developments inside Linux Format. Read our sampler today and take advantage of the offer inside.
- 1
- 2
Current page: How to install AMD drivers in Linux
Prev Page How to install Nvidia drivers in Linux