How to save web receipts to iCloud
Digital wallet
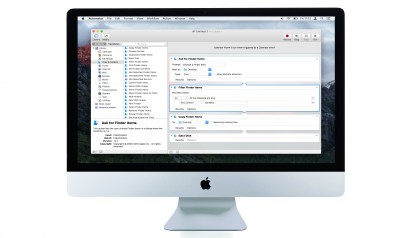
Send receipts to a folder on iCloud Drive
These days, you probably do a lot of shopping online, in part because it saves you paying the mark-up charged by many high street stores.
You can choose at your leisure without traipsing around town, then sit back and wait for your shopping to arrive. All of your confirmations, invoices and receipts will be neatly stored in your email inbox or appear on a checkout screen in your web browser, from which you can save them for reference. If you ever need to make a claim or return an item, you'll know exactly where to find the necessary 'paperwork', which is rarely the case when you're stashing till slips into folders and envelopes.
However, it's easy to let things slide, and tempting to leave everything floating in your inbox, or to drag out PDFs into what seems – at the time – an entirely logical folder, until you realise you can't find it again when you need it.
Moreover, not all receipts come as a PDF, or any kind of attachment at all. Some are text in the body of an email, while others are shown on a web page after you finish your purchase.
What do you do then? The PDF pop-up menu in OS X's Print dialog provides you with a way to save a PDF of a web page, an email or any other printable document to a dedicated Web Receipts folder. The trouble with this is that it gives you no control over the location of the Web Receipts folder, which is automatically placed within Documents in your user account, out of reach of your iOS devices and, typically, your other Macs, too.
iCloud Drive
You could just create a folder on iCloud Drive and save PDFs there manually, but that gets tedious. Alternatively, you could create a special shortcut, a symbolic link, to relocate OS X's own Web Receipts folder to iCloud Drive, making its contents available on all of your Macs, in iOS 9's iCloud Drive app (turn it on in Settings > iCloud > iCloud Drive > Show on Home Screen), and wherever you can sign in to iCloud.com.
Here, though, we're going to construct a new workflow from scratch, which will appear as a new command in the Print dialog's PDF menu. This route gives you full control over how your saved PDFs are named and where they are saved.
So, for example, you may want to create separate commands that save your business and personal receipts in different folders.
Introducing Automator
We'll do this using an Automator workflow, specifically in the app's Print Plugin template. Of course, you can use this to process many more things than just web receipts – you could adapt the technique shown here to save any other kind of printable document, encrypt your PDF file, email it, and so on.
Technically, working with Automator is programming, just not in the traditional sense of writing code. While Apple has a dedicated method for writing apps for iOS and OS X, called Xcode, Automator is its programming tool for the rest of us.
Think of it as a digital game of Jenga, only in reverse. Rather than pulling the Jenga tower to bits, you'll be stacking it up, with each brick that you add being a specific action that you're asking your Mac to perform. Like a Jenga tower, though, get one action wrong and the whole workflow will fail to produce your intended result.
Think of each action as a macro, just like the step-by-step routines you may have used to accomplish the same task on multiple occasions in Photoshop or Microsoft Word.
Automator workflows are smarter than regular macros, as they're not restricted to running inside particular apps. Although we'll build one that processes output from OS X's printing system, turning it into a PDF and then performing additional tasks on the resultant file, you can also create workflows that act like a standalone app, or that keep an eye on a particular folder and perform actions on any files dropped into it.
Workflows can also process images imported from a camera using the Image Capture utility, perform a task when you give a particular instruction to OS X's dictation system, or run when a calendar event's alarm goes off.
Apple has already done a lot of the grunt work for you by providing a library of useful actions. Each one calls upon the services of an app, such as Finder, Calendar or Mail, to give you direct access to its core features, such as renaming a file, setting up an event, or sending a new message.
Each action in your workflow takes some input, which could be a web address, a name or, in our case, a PDF of a receipt we've received by email or been presented with in a web page, performs some actions on it, and then either gives you the result or passes it to the next action in the chain for further work.
It's up to you to pick out the actions that will help accomplish your overall task and add them to a workflow in the appropriate order.
You can have as many actions as you like, but each must understand the output of the preceding one. For example, you couldn't get an event from your calendar in one action and perform colour correction on it in the next, as there'd be no colours to work with.
Our workflow
In the six steps that follow we're going to create a Print Plugin workflow that's accessed when you choose File > Print or press Command + P.
It will use the message that's selected in Mail or the web page displayed in the browser as its input but, rather than sending it straight to the printer, it'll first convert it into a PDF, give it a unique name so it doesn't overwrite any other stored documents, and put it on iCloud Drive for safekeeping.
Our workflow doesn't need any third-party actions, only those provided with Yosemite and El Capitan. These systems are required to access iCloud Drive; if you're running an earlier version of OS X, you could amend the closing steps to save the file to a folder that syncs with a service like Dropbox or OneDrive, or to a NAS (network attached storage) drive in your home or office.
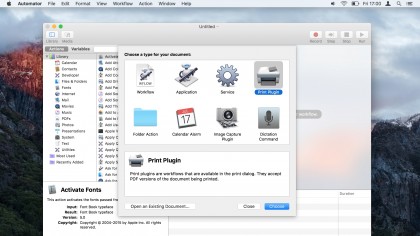
1. Make a print plug-in
In Automator, choose File > New, select Print Plugin, then click Choose. This type of workflow extends OS X's Print dialog; if you use Chrome as your web browser, press Option + Command + P to use that dialog instead of Chrome's custom one.
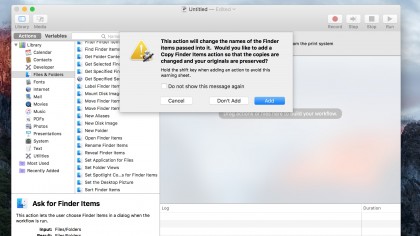
2. Use a unique filename
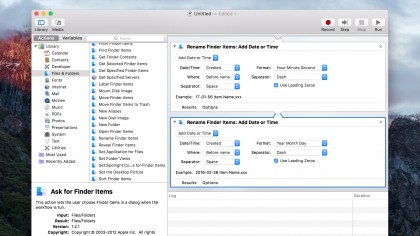
By default, when our workflow saves a PDF to a folder, it'll overwrite any file of the same name already there. To avoid this, select Files & Folders or Finder in the first column, then drag Rename Finder Items action from the second to the third.
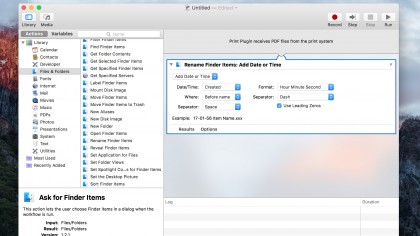
3. Add the time
Click Don't Add when asked if you'd like to add a Copy Finder Items action as well. In the Rename Finder Items action, set Format to Hour Minute Second, Separator to Dash, and Where to Before Name. Also turn on Use Leading Zeros.
4. Add the date
Add another Rename Finder Items action below the existing one and again click Don't Add. This time set Format to Year Month Day, and the other options as you did in step 3.
Your receipts will be uniquely named down to the second.
5. Create a folder
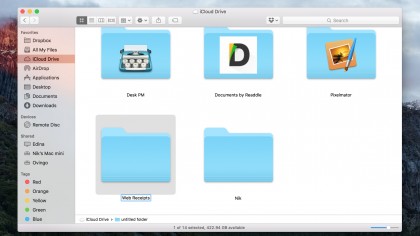
In Finder, press Shift + Command + I to go to iCloud Drive. Create a folder called Web Receipts, then return to Automator, drag the Move Finder Items action into your workflow, and use the pop-up menu to select the folder you just created.
6. Save and test
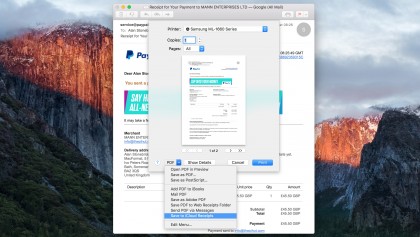
Save the workflow, calling it Save to iCloud Receipts. In Mail, find a receipt and press Command + P. Click PDF at the dialog's bottom-left corner, then your workflow's name.
A PDF of the receipt will be saved to the folder you created on iCloud Drive.
- Enjoyed this article? Get more tutorials, guides, and tips on how to get the most from your Apple devices inside MacFormat. Take advantage of an exclusive offer in our sampler today.
Nik is an Esperanto-speaking, pencil-bothering, manual typewriter fan who also happens to have a soft spot for tech after sufficient years in the business to know what that disk icon on the save button actually means. Never happier than when out in his campervan, coffee in one hand, ebook in the other, listening to the rain on the roof.