How to use a file shredder to destroy your Mac's digital documents
Shred your files
OS X does include easy-to-use tools to remove data securely so that it can't be recovered. It's important to note that while these tools are effective on hard drives, SSDs use a more complicated process to handle deletion, which makes the tools covered here largely ineffective (Apple even disables some of them for SSDs).
If you have an SSD, FileVault encryption is a better way to protect your data, but make sure you read up on what you're getting into with it.
1. Delete a sensitive file securely
Your first line of defence against the privacy concerns created by data remanence is built into Finder: Secure Empty Trash. When it's time to get rid of a file containing sensitive information, Secure Empty Trash makes it easy to do so in a way that drastically reduces a snoop's ability to recover it.
Secure Empty Trash works similarly to emptying the Trash normally, but includes a key extra step. Before unlinking your files, Secure Empty overwrites them with meaningless, randomly generated data.
This means that, should anyone try to recover your files, they'll find a block of unusable information where your data used to be. Another way to look at Secure Empty is that it removes the time lag between the Trash being emptied and your files being overwritten: instead of waiting for new files to take their place, they are overwritten immediately with arbitrary data, which is in turn eventually replaced with a new file.
To do this, move the file in question to the Trash as usual. After making sure, as always, that you really do want to get rid of everything in the Trash, go to the Finder menu and select 'Secure Empty Trash…'. You can also access Secure Empty Trash by right-clicking on the Trash icon in the Dock and holding down the Command key on the keyboard.
Click the Secure Empty Trash button on the confirmation dialog that appears, and the process will begin. You'll notice that it takes much longer than emptying the Trash normally, which is because OS X is doing a lot more work in the background.
Get daily insight, inspiration and deals in your inbox
Sign up for breaking news, reviews, opinion, top tech deals, and more.

2. Always empty the Trash securely
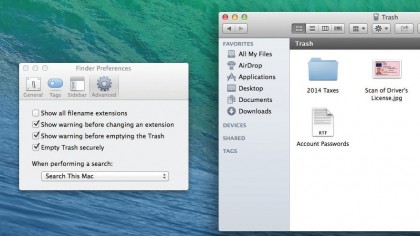
If you deal with sensitive information frequently or simply prefer the peace of mind that Secure Empty Trash provides, you can configure Finder to use it by default.
Head to the Finder menu and select Preferences…. Go to the Advanced tab and enable the last checkbox, labelled 'Empty Trash securely'. Secure Empty Trash will become the default, and you won't be able to empty the Trash non-securely without first disabling the preference.

3. Securely erase files you've already deleted
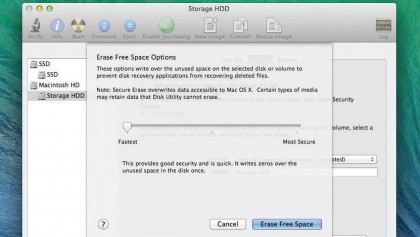
If you've previously deleted files by emptying the Trash non-securely and want to make sure that your privacy is protected, OS X will help you erase them completely. Start by opening Disk Utility, found in Applications/Utilities.
Select the drive and partition in question (probably your boot disk unless the files were on another hard drive) from the list on the left, and navigate to the Erase tab.
Click 'Erase Free Space' and, in the sheet that appears, put the slider in the left (Faster) position (we'll discuss the More Secure options in a moment). Click Erase Free Space to start the process. This will securely erase all the free space on your hard drive – including deleted files and their data remanence – but leave your files intact.
Even so, it is, of course, best to make a backup first, just in case. Note that securely erasing free space will take more time than erasing non-securely does, just like Secure Empty Trash. Erasing free space securely works just like emptying the Trash securely: the data in question – in this case, all the free, unlinked data on your hard drive – is replaced with meaningless data, which is itself marked as free and is eventually replaced with new files.
The difference is that, in the case of erasing free space, the process can be repeated multiple times. That's what the slider in Disk Utility controls: number of repetitions. In the middle position, half way between Faster and More Secure, your data is replaced with garbage, which is replaced with other garbage, which is replaced with new garbage a third time, which is then marked as free.
In the right (More Secure) position, the process repeats seven times. Secure Empty Trash overwrites your data once, but Disk Utility offers more aggressive options due to concerns that one pass is not enough to fully protect data from recovery. These stem largely from a 1996 security study that found that one could sometimes still recover data that had been overwritten once.
Current research, though, shows that changes in hard drive technology since the original study make one pass enough. That said, if you prefer multiple passes, you'll need to use Erase Free Space periodically, because Secure Empty Trash cannot be configured to overwrite data more than once.
4. Securely erase an entire disk
Disk Utility can also help you erase the entire contents of a disk or partition securely. After choosing the disk on the left and selecting the Erase tab, click the Security Options button.
The slider that appears is similar to the one found in Erase Free Space: choose the far-left position for zero random overwrites (non-secure), the second-left position for one overwrite (just like Secure Empty Trash), the second-right position for three, and the far-right for seven.
The entire contents of the disk will be erased and your data will be securely overwritten the specified number of times.
- Enjoyed this article? Get more tutorials, guides, and tips on how to get the most from your Apple devices inside MacFormat. Take advantage of an exclusive offer in our sampler today.