How to Build a Retro Gaming PC
Build your dream retro rig

So, you want to recreate an authentic retro PC gaming experience; how hard can it be? Well, while building a modern-day PC can be complicated, recreating a machine from 25 years ago can be even more cumbersome.
Thankfully, we've whipped up a quick guide to get you started on your retro gaming quest. Although, it's worth mentioning that old parts don't always come cheap, so keep that in mind while we explore the realm of second-hand PC parts.
Let's kickstart this guide by working out what era of PC we want to replicate. While this might seem like a difficult decision to make, the best way to do it is to think about the kind of games you actually want to play.
For example, if you really want to play early 3D platformers like Tomb Raider, you'll be able to use the game's recommended system requirements to narrow down your options.
With that in mind, if we wanted a PC that could run Lara's first outing, we'd need a build with an SVGA Video Card and a Pentium 60MHz Processor.
- Best retro games consoles: the top nostalgic gaming revivals
- How to play the best retro games: revisiting 8-bit of your gaming past
- How to run your old PC games on Windows 10: the classics never die
Should you build a retro gaming PC?
Now, I know what you're thinking; why should you build a retro PC?
Well, while various classic titles from the '90s and early 2000s are available on Steam and GOG, there's no guarantee that the experience will be smooth on a modern machine.
Get daily insight, inspiration and deals in your inbox
Sign up for breaking news, reviews, opinion, top tech deals, and more.
Therefore, if you're after a reliable retro PC experience, your best bet is to use hardware that belongs to your desired era of choice.
Ultimately, this is what will both help you decide exactly what spec of PC you should build and the kind of nostalgic experience you're aiming to craft.

What to buy
Classic graphics and primitive processors
As you'd perhaps expect, there's an overwhelming number of graphics cards out there on the used market. However, fear not, as for this particular build, we will be looking at early 3D capable VGA Cards specifically, which should narrow down our options.
If you had a gaming PC back in the '90s, you'll likely remember cards like 3dfx's Voodoo series, which dominated the market for a period of time.
However, other options from the likes of ATI and Nvidia did exist. Therefore, you should be able to find a model of card that suits both your technical needs and budget requirements.
Of course, your rig in progress is going to need some brains as well as gaming brawn. Therefore, you'll need to source a processor that's in line with the spec of your machine.
Since your build is most likely going to be from the late '90s/early 2000s, you'll probably want to opt for something like an Intel Pentium 2, which is capable of speeds up to a whopping 450 MHz. Trust us; it was impressive back in the '90s.
Naturally, the next item on our archaic agenda is memory. Don't worry, though; RAM thankfully hasn't changed that much since the golden era of PC gaming.
Basically, you'll want to fill your motherboard’s DIMM slots with 512MB of PC100 RAM. Why 512MB? While you could potentially get away with more, classic operating systems like Windows 98 are a bit temperamental.
Operating systems, drives and sound devices
Speaking of operating systems, you're going to need one! While we've explicitly mentioned Windows 98 above, you could also opt for the likes of Windows XP, which should still be compatible with both Windows and DOS games.
If you're installing a physical copy of windows, you'll also need an appropriate optical drive. By installing a Floppy/CD/DVD drive, you'll be able to both install whatever version of Windows you've chosen and any physical PC games.
As for what you'll be installing Windows on, you could try and get a hold of an old IDE hard drive that's typical of what would be used at the time. However, we'd highly recommend using an adapter that lets you use a Compact Flash card instead.
Not only will it be faster and quieter, but it'll also save you from trying to scavenge a working drive from somewhere. It's harder than you'd think!
PC sound capabilities are something we take for granted these days. However, for this build, you're going to need to source a dedicated sound card. Weird right?
Well, perhaps not. A good sound card is going to bring the bleeps and bloops of your video games to life, whether it's early 3D games or pixellated DOS classics.

Displays and accessories
Now that we've got the main components of the way, let's talk accessories. For starters, you'll want to get a hold of a monitor.
While, in theory, you could use a modern monitor with VGA compatibility, you might want to consider an old CRT display, y'know, just to maintain a certain level of antiquated authenticity.
All sarcasm aside, there's something magical about how a CRT handles older resolutions, graphics and color pallets, so getting a hold of one is worthwhile.
Once you've decided on a monitor, it's now time to pick out your time capsules housing. While picking a case is usually first on any PC builder's agenda, leaving it till last can prevent various headaches.
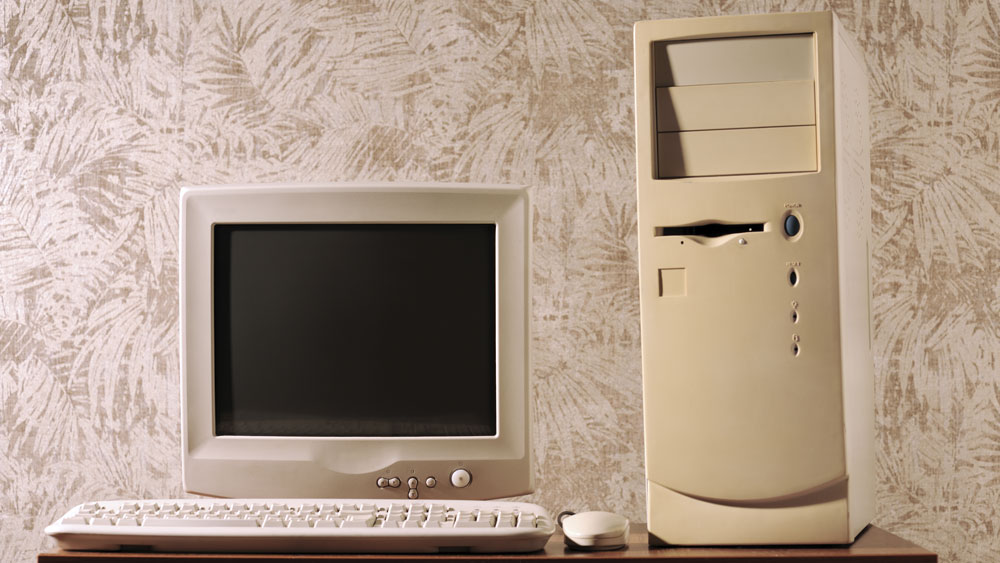
From an aesthetic point of view, it allows you to pick a case that matches your CRT monitor, whether you're going for a classic beige or a sleek mid-2000's black pallet.
More importantly, however, picking a case last also allows you to plan in terms of space. After all, you'll need to make sure whatever case you choose has enough room for all those fancy retro components.
Okay, let's wrap up our shopping list with some odds and ends. Since most CRT monitors lack audio output, we're going to need a snazzy pair of two-way speakers.
Naturally, most speakers are compatible with even the oldest of sound cards since they're usually equipped with 3.5mm output jacks.
However, if you want to achieve the ultimate '90s beige PC setup, you might want to take a trip to eBay in search of an old set. I mean, who wouldn't want two weird shaped turn of the century speakers flanking you at your desk?
Anyway, now all you need is a compatible PS/2 keyboard and mouse, and we’re ready to piece this retro PC puzzle together.
How to build
Assembling your retro dream machine
Before we start assembling our retro gaming relic, there's one more component that's central to the whole build - the motherboard.
In fact, just like with modern PC builds, you'll have to ensure you pick parts based on your motherboard's compatibility. By making sure your board matches your processor's socket type (for example, 440BX chipset) and has enough PCI slots, you should be able to avoid any mid-build tears.
If you're using this guide as a literal step by step instruction, you'll probably be sitting in front of a bunch of old computer components. If that's the case, here are some steps that should help you get everything up and running.

1. Prepare your case
Just like with any PC build, organization is key. Therefore, you'll want to ensure your case has all the appropriate standoffs, screws and enough space to fit your components. If your case doesn't already come with a power supply, you'll also have to consider the additional purchase. Then, unscrew any blank IO plates from the back of the case.
2. Check your components
Before assembling, check that all your components come with all the cables, screws and extras required. For example, double-check that you have any required cables for your processor, PCI cards and accessories.
3. Install your processor
Installing a processor can be the scariest part of any PC build. However, If you're using the likes of a Pentium 2, it's actually quite a simple process. Unlike modern CPU's, these processors come as part of a single unit, which can be slotted into the motherboard. To do this, identify the board's CPU module slot. Then, snap it in place, with the unit's fan facing away from the motherboard's interface.
You'll also have to connect the fan's power supply cable to the board. This should be labelled, but it is commonly found on the edge of the PCB. Once you've ensured the CPU module is secure, it's time to move onto the next step.
4. Moving onto memory
Let's move onto your chosen RAM modules. First, locate your chosen motherboard's DIMM sockets. Then, release the slot's lock latches at each side, if applicable. At this stage, you should be able to carefully slot each of your modules into one of the available sockets. The pins on your DIMM stick should be keyed, which will help you identify which way they should be fitted.
5. Installing the motherboard
Now that the brains of your retro PC are installed let’s get the motherboard into the case. You’ll want to start by lining up the motherboard to the cases IO plate at the back whilst ensuring it can both slot in and sit neatly within the case’s allocated space. If you find that the plate at the back doesn’t line up, you might need to source the correct IO shield for your motherboard. Once everything all lines up, secure your board to the case using the appropriate screws.
6. Sound and graphics
Okay, let's install some of the fun parts of this PC, starting with the graphics card. If you're using an AGP card, the appropriate slot should be both brown and indented away from the board's PCI slots. Once you've located the appropriate interface, whether AGP or PCI, carefully slot the card into the board.
Thankfully, soundcards are installed in a similar way to the graphics card. Therefore, you should be able to identify a free PCI slot on your board and fit the card into place. This actually applies to any other PCI cards you may have, whether it's a network card or even a TV tuner. Of course, once you've got all your desired cards installed, make sure to fit each card's appropriate IO shield to the back of the case.
7. Drive installation
Almost done! Now we just need to install those optical and storage drives we mentioned earlier. For this, you're going to need to grab an IDE cable, which will connect both your hard drive and disk drive to the motherboard. Before doing so, slot both your disc and hard drive into their respective bays. You'll notice that your IDE cable has two connectors, referred to as "controller" and "agent" channels.
For this project, you'll want to connect your hard drive to the "controller" connector at the end of the cable while fitting the "agent" channel to your optical drive. If you have more than two IDE devices, you should be able to repeat this process.
8. Finishing up
Before we can finally fire up our nostalgia station, you'll want to double-check all your components are securely installed and that all the appropriate power connectors are connected to the motherboard. This includes things like the case's power button at the front. Once you're set, it's finally time to take your new old school PC for a test drive!
What to expect
Performance expectations
If you've based your retro PC build on a specific game, then you should be able to enjoy smooth performance and gameplay. You might even find that games run better on this older machine, thanks to increased compatibility.
For example, Edios' classic 3D caper, The Legacy of Kain: Soul Reaver, suffers from numerous issues when running on a modern Windows 10 machine. Yet, if played on a system with the original recommended requirements, the result would likely be a vastly superior experience.
That being said, homing in on a specific set of recommended specs is something of an Achilles heel, especially when it comes to playing a broader range of titles.
After all, Moore's Law is very much a thing, and there's a reason why we've upgraded our tech since the '90s. That being said, if you pay attention to minimum spec requirements and choose games that belong to the same era as your assembled PC, you should be able to get the most out of your retro rig.

Phil is the hardware editor at GamesRadar+ responsible for covering retro gaming shenanigans, but also likes to put the latest gaming handhelds, graphics cards, and monitors to the test. In a previous life, they served as a member of the PCGamesN team, providing PC hardware news, reviews, and insights. They also spent a chunk of time contributing words to the likes of the BBC, The Daily Star, GameByte, and Den of Geek.
