How to disable Cortana in Windows 10
Say goodbye to Cortana for good

Cortana in Windows 10 never really lived up to its legendary name. Even away from the desktop, gradually Cortana has been killed off, with mobile access and the Invoke smart speaker consigned to the tech scrap heap.
Cortana is still shipped in Windows 10, though, so for folks who actually get some use from it, there is at least an outlet. But for the rest, Cortana is just another piece of bloat they don’t want. And, while knowing how to speed up Windows 10 is a necessary skill if you're a Windows 10 user, you'll still want to minimize all the bloatware that cause slowdows.
It’s not easy to disable Cortana completely, but where there’s a will, there’s usually a way. Here’s what you need to do.
- Here's how to screenshot on Windows 10
- Have yet to switch? Here's how to upgrade to Windows 10 for free
How to hide Cortana from the Windows 10 taskbar
If all you want is to get rid of the Cortana button from the Windows 10 taskbar, there’s a simple fix. It won’t disable Cortana, but it’ll hide it from plain sight.
‘Right click’ anywhere on the taskbar and click ‘Show Cortana button’. If Cortana was previously displayed, the button will now be gone. If you ever want to bring it back, do the same process again.

How to disable Cortana in Windows 10
Unfortunately, Cortana can’t easily be uninstalled from your Windows 10 PC. As a built-in feature, Microsoft has disabled this possibility.
The good news is you’re not out of luck. There are a couple of methods you can use to disable Cortana, but the first one is universal whether you’re on Windows 10 Home or Pro.
Get daily insight, inspiration and deals in your inbox
Sign up for breaking news, reviews, opinion, top tech deals, and more.
It should be noted before beginning that this involves making changes to the registry, and care should always be taken. Making changes to things you don’t understand could lead to some pretty dire consequences on your PC, so always tread carefully.
1. Open the Registry Editor
The first thing you need to do to disable Cortana in Windows 10 is to open up the Registry Editor. You’ll find this in the ‘Windows Administrative Tools’ folder in the Start Menu.
Alternatively, use the Windows 10 search box and just type ‘Registry Editor’. When asked if you want to allow this app to make changes to your device, click ‘Yes’.

2. Locate the necessary registry entry
For the first part, you’ll need to be in the sidebar filled with folders. First, locate the folder ‘HKEY_LOCAL_MACHINE’ and then expand the ‘SOFTWARE’ folder.
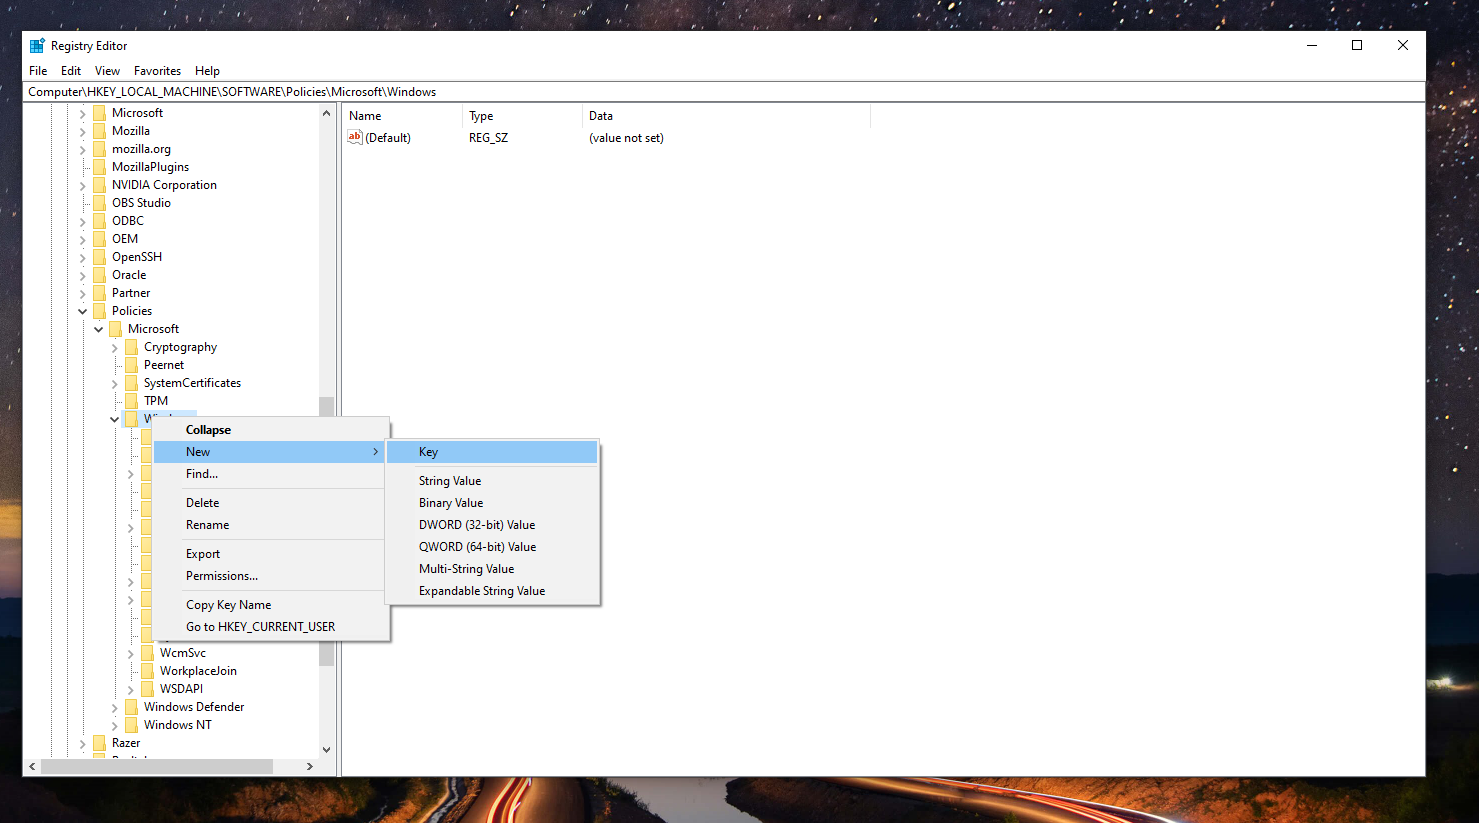
From here you need to locate ‘Policies’, then ‘Microsoft’, then ‘Windows’. Inside the ‘Windows’ folder (also known as a Key) you might already have another labeled ‘Windows Search’. If you don’t, then first you’ll need to make one.
Right-click on the ‘Windows’ folder, then select ‘New’ followed by ‘Key’. Name it ‘Windows Search’.

3. Disable Cortana in the registry
The next step is where you’ll actually disable Cortana in Windows 10. Once again, you need to first create a new entry in the registry.
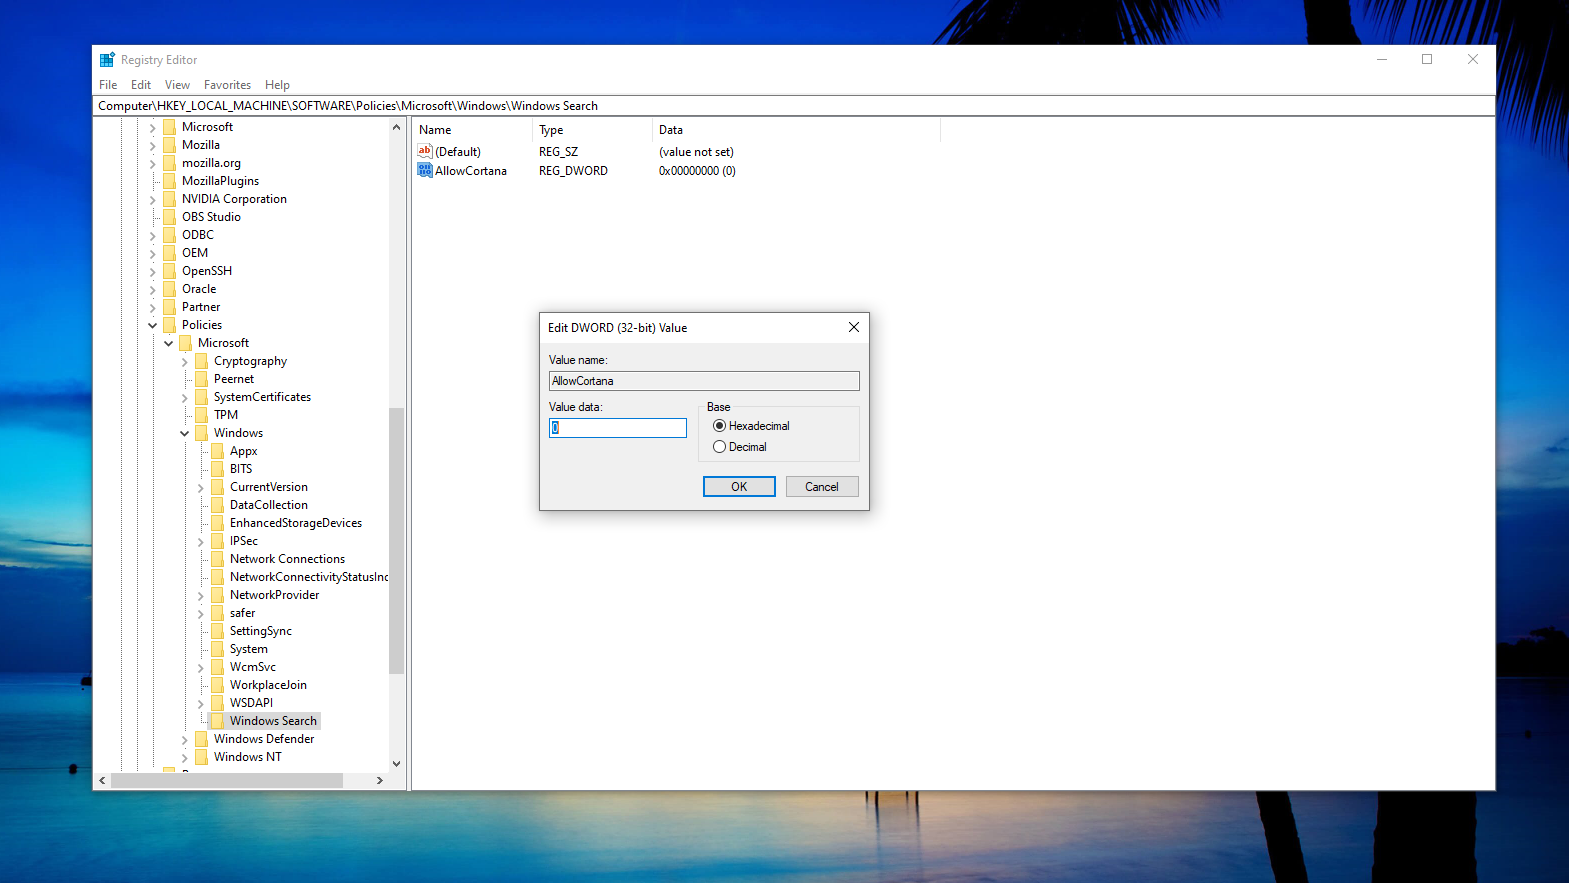
Right-click on the ‘Windows Search’ folder you created in the previous step, select ‘New’ and this time choose ‘DWORD (32-bit) Value’ and name it ‘AllowCortana’.
Double click on this new item and ensure its value is set to ‘0’. Click ‘OK’ and close the Registry Editor. You’ll now need to restart your PC for it to take effect.
Once rebooted, Cortana will be disabled. You can check this by right-clicking on the taskbar and you’ll no longer see the ‘Show Cortana Button’ option that was once there. It will still show in the list of apps in the Start Menu, but it’s now completely disabled as you’ll see when you try to open it.
If you ever want to enable Cortana again, follow the same steps and in ‘AllowCortana’ change the value to ‘1’.
4. How to disable Cortana in Windows 10 Pro with Group Policy Editor
If you’re using Windows 10 Pro, the above method will also work but there is an alternative not possible in Windows 10 Home. Cortana can be disabled with the Group Policy Editor in Windows 10 Pro, removing the need to make any changes to the registry.
Open the Group Policy Editor by pressing ‘Win + R’ to open the Run box and then enter ‘gpedit.msc’. Next, navigate to the necessary folder by first going to ‘Computer Configuration’, then ‘Administrative Templates’, ‘Windows Components’ and finally ‘Search’.
Moving over to the right-hand pane, locate the entry called ‘Allow Cortana’ and double-click to open. Set it to ‘Disabled’ then click ‘OK’ and close the Group Policy Editor.
As with the registry method, you’ll now need to reboot your PC for the changes to take effect.
Summary
It’s unfortunate that Cortana never really achieved its full potential, as smart assistants like Siri, Google Assistant, and Alexa have become an integral part of daily life for millions.
There are plenty of reasons someone might want to disable Cortana on their Windows 10 PC, and fortunately, even though Microsoft doesn’t want you to, there’s a way around it.
- Best laptop 2021: our pick of the 15 best laptops you can buy this year