Learning how to make Contact Posters in iOS 17 lets you customize how you appear to your contacts when you call them (and vice versa), making calls expressive and visually appealing.
iOS 17’s Contact Posters extend your iPhone’s personalization beyond wallpapers and ringtones. They offer a new avenue to express yourself and choose how others appear on your phone when they call you.
In this guide, we’ll walk you through creating Contact Posters on the iPhone, so your calls become a treat for the eyes. And for those whose smartphones are struggling to keep up with today’s hefty requirements, consider our roundup of the best iPhones.
Tools and requirements
- An iPhone with iOS 17 or later
Steps for how to make Contact Posters in iOS 17
- Open the Phone app and tap Contacts.
- Tap My Card (at the top) or another person’s contact.
- Tap Contact Photo & Poster > Tap 'Edit'.
- Press the + icon (bottom right corner).
- Choose your poster type from the available options: Camera, Photos, Memoji, and Monogram.
- Customize the poster > Tap Done > Tap Continue > Tap 'Continue' or 'Choose a Different Photo' or 'Skip'.
Step-by-step guide to make Contact Posters in iOS 17
1. Phone app > Contact

Open the Phone app on your iPhone and tap Contacts at the bottom.
Tap My Card at the top to make a Contact Poster for yourself. To make a Poster for someone else, tap their contact name.
2. Tap Contact Photo & Poster

Tap Contact Photo & Poster.
Ensure Name & Photo Sharing is toggled on and tap Name to edit your display name. Tap 'Share Automatically' and choose between 'Contacts Only' and 'Always Ask' from the dropdown. The former automatically shares your updated name, photo, and poster with your contacts, while the latter prompts you before your contact card is shared.
Tap Edit once ready.
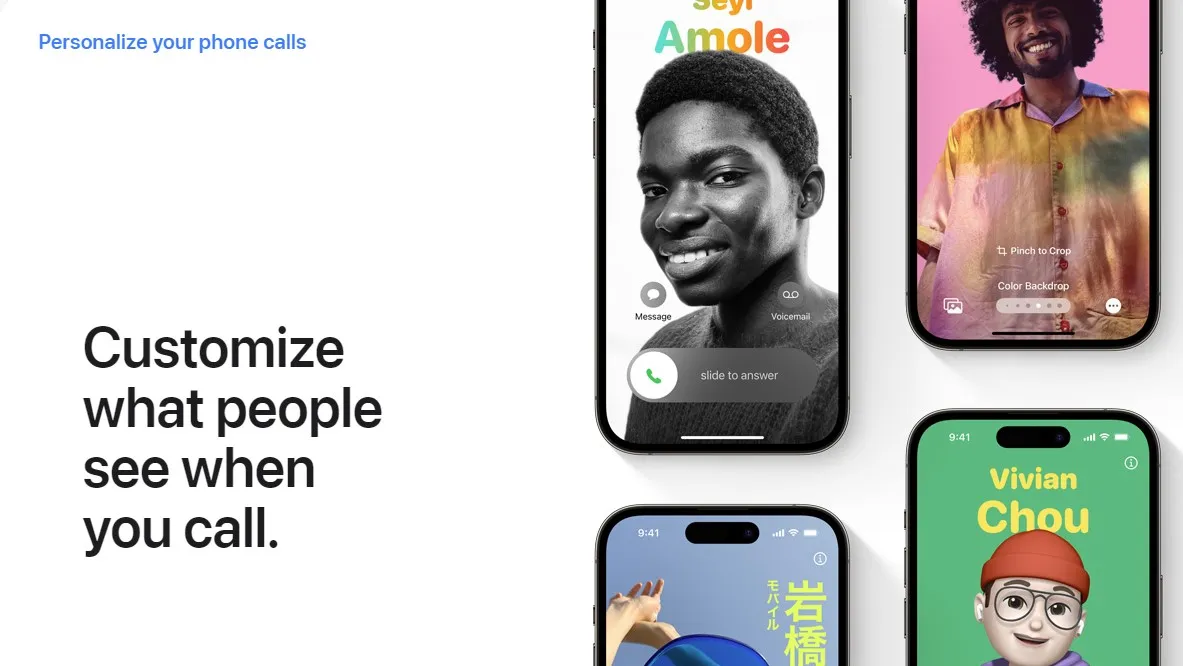
3. Create a Poster

If you already have a Poster, tap the + icon at the bottom right to create a new one. If you or the contact don’t have a Poster, you’ll land directly on the 'Choose Your Poster' screen.
Choose your Poster type from the options lined at the bottom: Camera, Photos, Memoji, and Monogram.
4. Customize your Poster

Your customization options will vary depending on the Poster type you chose, but name customization remains the same — tap your name at the top to adjust the font style, thickness, and color.
With Camera and Photos, you can capture a new image to use as a Poster or pick an existing photo. After selecting the image, swipe right to check the different filters. The Duotone and Color Wash filters also let you choose the style color (tap the color icon at the bottom right). Pinch the image to adjust the framing and tap the three horizontal dots at the bottom right to enable/disable the Depth Effect.
Memoji lets you represent yourself using an animated avatar. From the bottom slider, choose one of your existing memojis or one of Apple’s, or create a new one by tapping the plus icon at the bottom left corner. If you don’t prefer the expressions available, tap the camera icon towards the mid-left to activate the front camera. Then, tap the large blue dot towards the right side of the screen to capture your expression, and tap Next to move forward. Select the color icon at the bottom left corner to adjust the background color, and tap the layer icon at the bottom right corner to enable/disable the Depth Effect.
Monogram has space only for two letters, which could be your initial(s), numbers, or symbols. Tap the letter icon at the bottom right to type in your monogram, and tap the color icon at the bottom left to pick a background color. Adjusting the font style and thickness for your full name at the top automatically applies the adjustment to the monogram too.
Tap 'Done' once you’re ready.
5. Preview Poster and Contact Photo

Tap 'Continue' if you’re satisfied with your Poster preview. You’ll now see a preview of your Contact Photo — press 'Continue' if you like it. If not, tap 'Choose a Different Photo' or 'Skip' to revisit it later.
Final thoughts
Contact Posters in iOS 17 add a refreshing layer of personalization to iPhones, giving you many options to play around with and express yourself uniquely. Following the steps above, you can easily create eye-catching call screens for yourself and your favorite contacts.
For more iOS guides, check out how to use Check In on iOS 17, how to use the new NameDrop feature on iOS 17, and how to program the iPhone 15 Pro Action Button to trigger ChatGPT.