How to turn a router into a range extender
We show you how to extend your network using an existing router
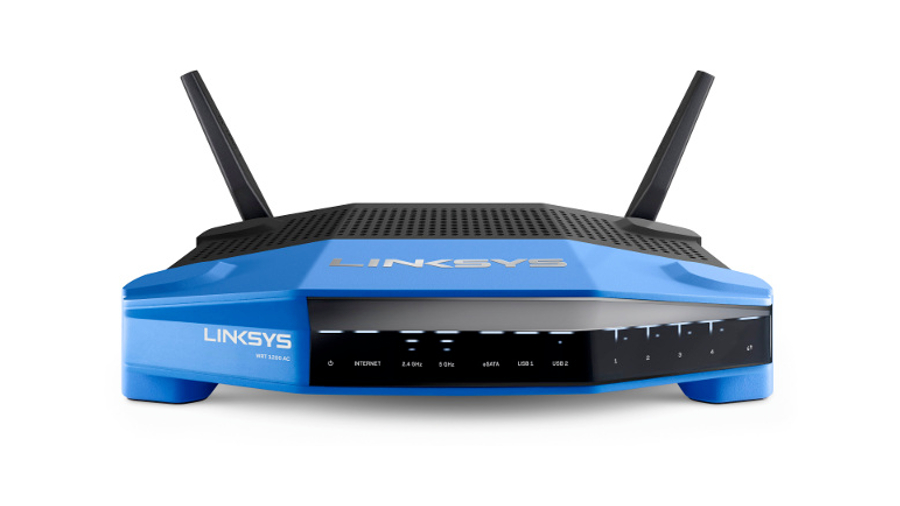
How to turn a router into a range extender
We've previously spoken about using DD-WRT on a router in order to take advantage of its in-built VPN capabilities. DD-WRT, in case you missed it, is an open source router firmware alternative, replacing the factory firmware that your router came with an adding a whole host of features.
One of those features is the ability to reconfigure your old (or new) wireless router as a bridge and a repeater. Any router that DD-WRT can be installed on can be turned into a wireless repeater and bridge.
A wireless repeater takes the signals from your main wireless network repeats them on another. It's used for range extension: the repeater takes the signals from your primary wireless network and repeats them on its own network. In addition, the router can serve as a bridge. That means that wired devices that you connect to its LAN ports (like TVs or game consoles) will also be connected to its wireless network.
We won't go through setting up DD-WRT again here – but you can check out this article or head to the website for a guide.
- We’ve picked out the best wireless business routers of 2017
Setting it up
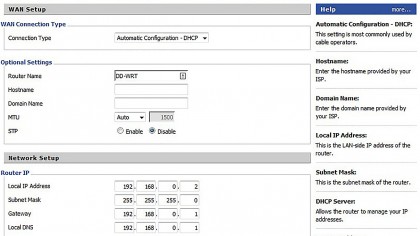
To set up the router as an extender and a wired-to-wireless bridge, just follow these steps:
1. Plug your PC directly into the DD-WRT router via a LAN connection.
2. Set up the router as a client to your main network.
Are you a pro? Subscribe to our newsletter
Sign up to the TechRadar Pro newsletter to get all the top news, opinion, features and guidance your business needs to succeed!
Log onto the DD-WRT's main admin page (the address is 192.168.1.1; username root; password admin). Click on Basic Settings.
Under Network setup>Router IP, set the DD_WRT router up so that it's a client for your main network:
- Set the Local IP address to something that has the same first three numbers as your main router, but a fourth number that's different. For example, if your main router's IP address (that's the IP address you use to access its admin interface) is 192.168.0.1, you could set this to 192.168.0.2.
- Subnet mask is 255.255.255.0.
- Gateway is the IP address of your main router.
- Local DNS is also the IP address of your main router.
Click on Save. Note that if you want to log onto the admin console again, you'll have to use its new IP address (192.168.0.2 in the example above).
Repeater mode
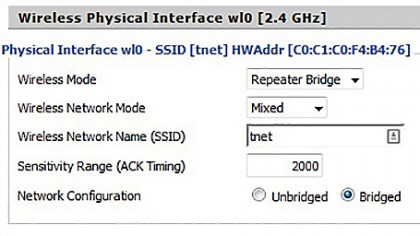
3. Click on the Wireless tab. It's here that we'll be configuring it as a router bridge.
4. Enable repeater mode:
- Change the Wireless Mode to Repeater Bridge then click on Save at the bottom. Some of the (now irrelevant) fields will disappear.
- Change the Wireless Network Mode to match the type of network your main router uses (Mixed should work as well).
- Network configuration should be Bridged.
Note that you don't actually need to fill in the SSID field (it will be done automatically when we complete step 6), but for reference it will need to have the exact same SSID as your primary network.
Click on Save again when you're done.
5. Security time. Click on the Wireless Security tab.
- Change the Security Mode to match the one used by your main router (WPA2 is most common).
- In the password field (WPA Shared Key for WPA security modes), type in the wireless password for the network.
Click on Save.
Connecting the extender
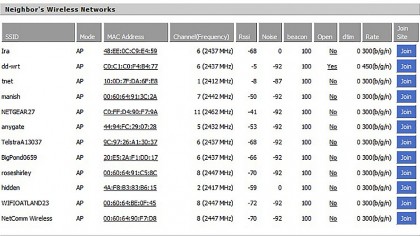
6. Now we just need to connect to the primary network. Click on the Status tab at the top of the window, then on the Wireless sub-tab.
Down the bottom you'll see a button: Site Survey. Click on it.
This brings up a window that shows you all the wireless networks visible in your area. Now you need to find the name of your primary network and click on the Join button next to it.
Hopefully it should note that you've successfully joined the network as a client. If it worked, you should now have internet access (you may have to head back to Wireless and click Apply Settings, or reboot the router for it to kick in). Essentially, this router is talking to your primary router over wireless, which is what we were after.
Now, any device connected to one of the wired ports on the router should have internet access – it will take that data off the wired connection and put it on the wireless one. You've effectively created a wired-to-wireless bridge.
Extending the network
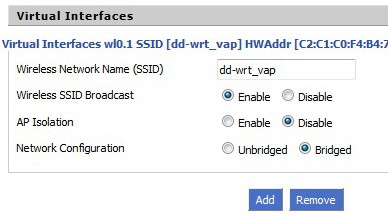
However, we're not quite done. We still have to extend the network. We do this by creating a virtual wireless interface with a separate SSID from the primary network. When you want to connect to this router, rather than the primary one, you'll connect to this SSID.
7. Head back to Wireless>Basic Settings.
Under the main router setup pane you'll see a button to Add a Virtual Interface. Click on it. This will set up a our second "virtual" wireless network. This is the one that you'll connect to if you want to connect to the extender rather than the primary router.
The section will expand. The only thing you need to do here is give it a new SSID, one that's different from the main network. When a client wants to connect to the extender, this is the SSID it will use. Click on Save.
8. Remember we need to secure the "virtual" wireless network as well. Click on Wireless Security and look for the Virtual Interfaces section.
Change the security mode from Disabled to WPA2 Personal and then type in the Shared Key (password) for the extended network. It can be the same as or different from your primary wireless network.
Click on Save and Apply.
And now you should be all done. The new network will appear on your list of available networks when your browse WiFi networks, and you can connect to whichever is better for you in the moment. If you've set up passwords for both, your wireless device should automatically choose for you, based on whichever has the strongest signal strength.
Cross-band and dual-band routers
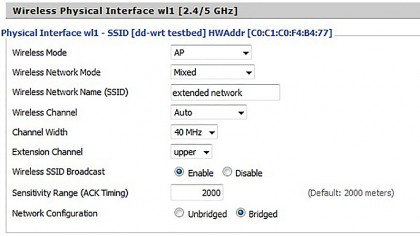
Our guide here assumes you only have a single band router. But what if you have a dual band router? It's absolutely possible to set it up so that one band connects back to the main router, while the other provides the extended network. This is a setup known as cross-band, and it can actually have some significant performance benefits over the virtual SSID model in the guide above.
It's very simple to set up. Follow steps 1 through 6. But instead of creating a virtual interface in step 7, we're just going to use the second band.
Simply set the second band up with the Wireless Mode as regular AP (access point). Give it a unique SSID and make sure the Network Configuration is set to Bridged. Save it. Then click on Wireless Security, and (just as you did for the Virtual Interface in step 8) give it a password.
Of course, your client devices need to be able to talk to this second band. In a dual-band router, the second band is the 5GHz band, and not all mobile devices support it. If your mobiles only work in the 2.4GHz band, you'll have to use the virtual interface instead (as in step 7 and 8) – or set up the 5GHz band as the Repeater Bridge and use the 2.4GHz one as the regular AP.