10 things you didn't know your smartphone could do
Make your phone earn its contract price
The secrets of your smartphone
Smartphones are great; they're basically a computer in your pocket packed full of features to make your life easier. In fact, the chances are you don't fully appreciate exactly how powerful or useful your mobile is.
Here are ten things you may not have realised your smartphone could do, and some tips on how to enable these hidden features.
Follow our tips advice and you'll be unlocking your phone's latent capabilities, all the while making your life significantly easier and more pleasant.
Change the launcher
Almost every smartphone maker overlays Android with its own interface, be it Samsung's TouchWiz or HTC's Sense. But despite their best efforts they can't please everyone. Features are frequently lacking or forced on you, and things just don't look or feel as they should.
Thankfully there's a solution. Many third parties have unleashed their own UI (user interface) creations onto the Google Play Store, allowing you to download new launchers in place of whatever one your smartphone came with.
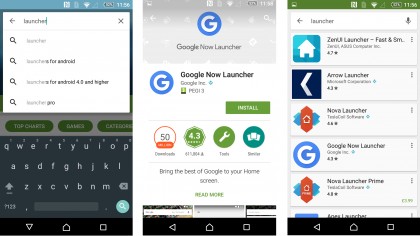
First, open the Google Play Store app and type 'launcher' in the search field. You'll now have a list of the most popular launchers available. We'd recommend Google Now Launcher for a free and authentic Android experience, and Nova Launcher for a more in-depth customisable UI.
Download and run the launcher that interests you, just like you would an ordinary app. Once you've done so, you'll be provided with the option to change your default Home selection to the new launcher. Select the new launcher, then follow any additional instructions that appear to enable it.
You should now find that pressing the home button takes you to a new-look homescreen and app tray. Key operations will remain the same, as will your phone's distinct notification and settings menus.
If you wish to return to your phone's default UI, or to switch between multiple installed launchers, you can do so by going into the appropriate Home option in the settings menu. This may vary according to your phone model.
Control other devices with infrared
You're sat in front of the TV and you want to change the channel or volume - but the only device to hand is your trusty phone. It's a common scenario. The good news is you may not need to get up off the couch.
An increasing number of Android phones are being released with infrared blasters, particularly high-end handsets like the Samsung Galaxy S6 and HTC One M9.
If your phone has one of these, in theory it can control anything that responds to infrared signals. You'll likely find that your smartphone already has an app that makes use of it hidden away somewhere, which can be programmed to control your TV or set-top box, but for the best results follow our tips for guaranteed infrared control.
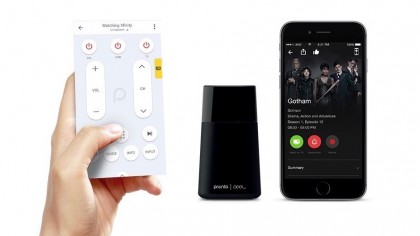
First, ensure you have a decent remote app. Arguably the best app you can download for this purpose is the Peel Smart Remote. In fact, Peel makes the remote app for Samsung's and HTC's latest flagships, such is its quality.
Peel will turn your Android phone into a universal remote app for your TV, set-top box, DVD player, Blu-ray, Roku, Apple TV, and audio system, as well as any IR-controlled home appliances like air conditioners and heaters. It even includes a smart TV guide that adjusts to your preferences.
We've mentioned Android phones already, but Peel even makes provision for the hitherto IR-less iPhone. The Peel Pronto is a free-standing device that sits in your living room, connects to your iPhone over Bluetooth Smart, and relays remote commands using a 360-degree IR output system.
The bad news: it's not currently available in the UK. If you're planning a visit to the US or Canada, however, it'll set you back $49.99. A European launch was promised back in early 2015, so keep your eyes peeled.
Identify songs
You may already know that you can get Shazam or SoundHound for your smartphone, both of which can be used to identify a song as it's playing. But did you know that Google, Apple and Microsoft have also created their own song identification tools?
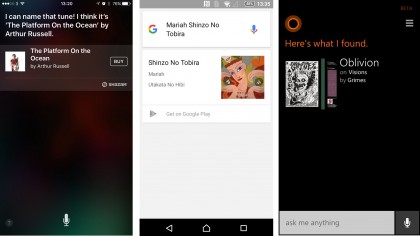
They're built right into their respective virtual assistants, so you can just ask Google Now or Siri what's playing, or tap the Music Search icon inside Cortana. The quality of these systems vary according to their library access, but the core function is the same.
For iPhone users, simply press and hold the home button to activate Siri. Then ask 'What's playing?'. Siri will then employ Shazam to listen out for a few seconds and tell you what song is playing in the background.
On Android, Google Now does something very similar. Hit the mic button or say the 'OK Google' audio prompt (depending on how your phone is configured), then say 'What song is this?' You can also type the question in the Google search box if you want to be discrete.
Windows Phone also has such a system in Cortana. Say 'Hey Cortana' or hit the search key, followed by the mic button to initiate a voice-based search. Then ask 'What song is playing?'. Like Google Now, you can also type the music search term in.
Turn your phone into a games console
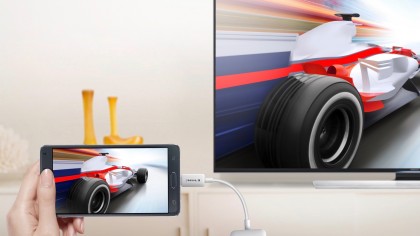
There are some tremendously powerful Android phones around, but raw power isn't all that's required for a good gaming experience. Sometimes you need a big screen and a proper controller too.
The good news is that these things are within your reach, especially if you already own a Sony or older Samsung handset. Both support MHL (aka Mobile High-Definition Link), which is a way to connect phones and other portable electronics to HD televisions and monitors. The result is lag-free mirrored content - ideal for gaming.
First up, you need to buy an MHL cable. You can pick one of these cables up for very cheap online these days - we're talking around the £5 for some of the cheaper example. It's probably best to shop for a lead according to your phone's brand, however.
If you want to invest a little extra in a top notch one for your phone's brand, there's this one from Sony, or this one from Samsung.
We should note here that Samsung seems to have cut MHL support from the Galaxy S6 onwards, so make sure to check that your phone supports the MHL standard before investing in any extra equipment.
Once you have the cable, plug one end into the micro USB port on your phone and the other into an HDMI cable, which then needs to run to an HDMI port on your TV.
Touchscreen controls are fine, but you might want to connect a wireless controller to create the full console experience. You should note, though, that you will likely experience varying amounts of lag with such a wireless MHL set-up, even with something like the MOGA Pro Controller.
It simply seems to be a result of the Bluetooth connection standard, so if you demand the speediest response time, best go with a wired controller.
You can achieve a similar gaming experience with the iPhone, but you'll need an Apple TV for the job. If you have one, bring up Control Centre on your iPhone, tap AirPlay, select your Apple TV, and turn mirroring on. Now you simply need to launch a game on your phone to enjoy it on the big screen.
One other point worth mentioning is if you've got a PS4 and a phone or tablet in the Sony Xperia Z range - we're talking from the Sony Xperia Z2 through to the Sony Xperia Z5 and everything in between - you can use the PS4 Remote Play function.
This essentially means streaming your PS4 games to your Sony phone over your Wi-Fi network, just like you can with a PS Vita handheld. To do so, download the Remote Play app from the Google Play Store.
Fire up the app and follow the instructions to pair up your phone to the PS4 and to a DualShock 4 remote. Again, you'll find there's a little lag, even over a very strong 5GHz Wi-Fi network, but it's certainly playable in a pinch.
Use your smartphone as a level
Most smartphones include an accelerometer, which is a sensor that's used to identify your phone's orientation. Smart developers have figured out that this means your phone can be used as a spirit level.
If you have an Android phone, you can download apps to do this, but if you have an Apple device running iOS 7 or higher (surely pretty much everyone using an iPhone today), the function is built in. It's a little hidden away, though.
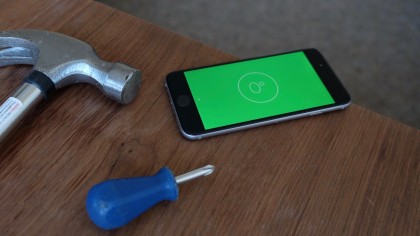
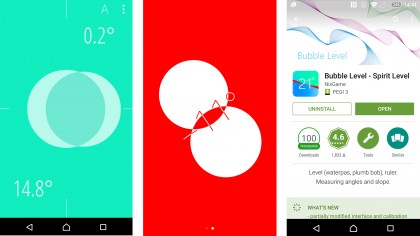
To find this function, open up the Compass app on your iPhone. Now swipe left anywhere on the screen. The actual compass function will slide aside and a spirit level feature will appear.
Lay your iPhone flat on a surface, and two overlapping circles will merge to provide you with a reading. Hold your iPhone upright or on its side, meanwhile, and you'll be able to use its edge to reveal the angle of your flat surfaces (whether vertical or horizontal).
In any case, the picture will go green when you have a flat surface. Tapping the screen will adjust the default angle, allowing you to tilt and take measurements. Tap again to reset.
For Android devices there are countless spirit level apps in all forms - many of which come with additional functions. For its iOS Compass-like simplicity, try downloading Bubble Level - Spirit Level from developer NixGame. It works in a very similar way, and it looks very sharp.
Automate your life
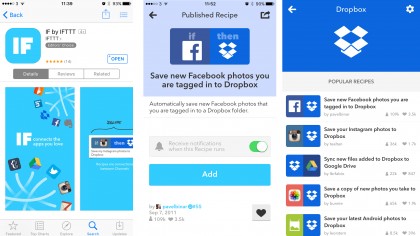
Your smartphone already runs much of your day-to-day life, but it can do so without your ongoing attention. IF (previously IFTTT or If That Then This) is a powerful app that creates simple connections between apps and functions.
You could, for example, set mobile data to turn off when you're connected to Wi-Fi or automatically save tagged social network photos to a cloud storage service of choice. To make things even easier, there are dozens of pre-created 'recipes', so you can instantly automate almost everything.
The first thing you need to do, of course, is download the IF app for iOS or Android.
Then, once you've opened it up, scroll through the description of how IF works. It's all about trigger channels - the 'if' part of the equation - and action channels - the 'then' part.
Once you've signed up for your free IF account, swipe to the right or hit the little recipe bowl icon. Now hit the '+' button to start formulating recipes.
Scroll down the list of suggested services and tap the icons of the services you want to include. Each icon tapped will take you to a login page for that particular service, where you must give approval for IF to utilise it. This step varies according to the service, but it's all pretty self-explanatory.
Once approval has been granted, IF will supply you with a list of popular recipes centred on that service. For example, the top Dropbox recipe will save any Facebook photos you're tagged in to the cloud storage service.
Google Calendar's most popular recipe, meanwhile, will automatically add any Foursquare check-ins to your calendar, so you never forget where you've been.
You can also create your own recipes from scratch. Just head back to that Suggested Services recipe page and hit the 'Create a Recipe' button at the bottom. IF has made this incredibly easy - just hit the 'if+' button to add a service from the list followed by a pre-supplied trigger, then select the 'then+' button to do the same for the action channel. Simple!
Learn your heartbeat to get healthier
Many of us would love to lead fitter, healthier lives, but perhaps not to the extent that we're prepared to splash out on a dedicated fitness tracker. Guess what? You don't need to spend a penny to monitor your heartbeat.
Your smartphone can do it for you. If you have a fairly recent flagship Samsung, phone, like the Samsung Galaxy S6, Samsung Galaxy Note 4, or Samsung Galaxy S5, you have it easiest of all. Just boot up the S Health app, select Heart Rate, and position your forefinger over the sensor next to the camera flash on the back.
Even if you don't have a phone with this feature built in, though, you can obtain similar results. Download the right app, and your phone will make smart use of its camera to record your heartbeat - a scientifically sound process known as photoplethysmography.
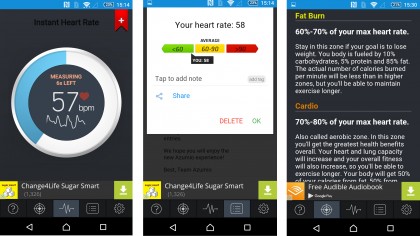
There are a bunch of apps that claim to track your heartbeat, not all of which are worthwhile. We'd recommend downloading Instant Heart Rate from Azumio, a proven app that's free for both iOS and Android.
True to its name, booting the app up will instantly guide you towards obtaining an initial pulse reading. To do this, you simply need to place your forefinger over your phone's camera lens in a well lit environment (the flash may automatically activate), keeping as still and relaxed as possible.
Once you've obtained your heart rate, you'll be able to label and tag the reading for later reference.
Of course, data without proper interpretation is useless. Head to the target-shaped tab in the app to determine your max heart rate, and to establish the kind of exercise intensity you need in order to achieve your goals.
Instant Heart Rate is also compatible with both Apple Health and Google Fit, which means its valuable data can be used in other health and fitness apps. It (or an equivalent app) is a handy tool to slot into your fitness programme, whatever your age or fitness level.

Use volume buttons to skip songs
Using a phone as an MP3 player is great, but when the screen's off and the phone's in your pocket it can be a chore to skip that Haddaway song you drunkenly added to your playlist. However, with a little bit of alteration you can make your volume buttons double as a way to skip tracks.
On BlackBerry 10 this is easiest of all. Just head to 'System Volume' in the settings screen and turn 'Music Shortcuts' on. Once you've done that you'll be able to skip to the next track by holding the volume up button and play a previous one by holding the down button. A tap on either of them will change the volume as usual.
On Android, something similar can be achieved with the help of a free third party app, such as Pocket Skip Track. This allows you to skip a song with a tap or two of the volume buttons.
Once you've downloaded the app, simply open it and flick the top Service toggle to the 'On' position. Now select your chosen music player from the following option - the stock player and Google Play Music are both well supported, while Spotify appears to be somewhat spottily-covered through selection of the 'Other players' and 'Compatibility' settings.
We had no joy with a Sony Xperia Z3 Compact, but other users have reported Spotify success in this way.
You'll probably want to keep the 'Number of clicks' option set to 'Double clicks,' so that you don't accidentally skip tracks. It'll also let you make small, quick volume adjustments as normal. It's even possible to fine-tune the delay between the two clicks.
Unfortunately there's no equivalent way to do this on iOS without a risky jailbreak, and Windows Phone 8 has no way of doing it without first turning the screen on.
Restore deleted photos on your phone
If you get a bit too tap-happy whilst navigating through your stored pictures (we've all been there), it's possible to accidentally delete one of your many treasured cat or food photos. If you have an iPhone or an Android phone, however, all is not lost.
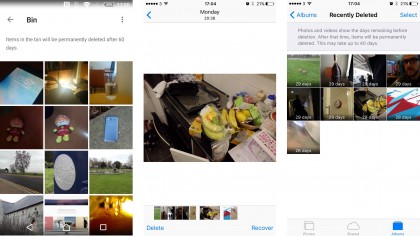
Head to the Albums section of Apple's default Photos app. Scroll down until you see the 'Recently Deleted' folder. This handy album stores all of the pictures you delete for 30 days. Only after this month-long spell will they be deleted for good.
Enter the Recently Deleted folder and tap on the picture(s) you want to rescue. Now hit the 'Recover' button in the bottom right-hand corner. Your picture will be restored to the main photo album.
You'll notice that there's also a Delete command in the bottom left-hand corner. This is a full delete command, allowing you to fully erase any embarrassing or incriminating evidence for good.
There's a similar provision on Android with Google Photos, assuming you're using that app for your photo management. BONUS TIP: If you're not, you really should be.
When you delete a picture in Google Photos, it won't be lost forever. Rather, it will be sent to the Bin folder for 60 days (twice as long as with Apple Photos) before being erased.
This Bin folder can be accessed through the side menu by swiping in from the left or hitting the 'burger' menu button.
Tap and hold on a photo to select it, as well as any others you might wish to restore, and hit the restore button at the top of the page. Alternatively, hit the bin icon to speed up the picture's trip to oblivion.
Block annoying numbers
No longer do you have to suffer PPI claims lines and other nuisance callers, as most smartphones offer the ability to block numbers.
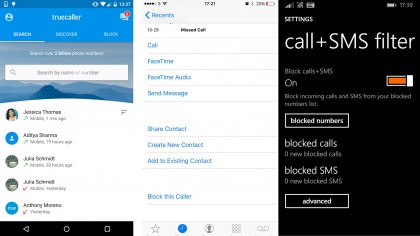
With iOS 9 on the iPhone there are several ways to do it, but the easiest is just to go into the Phone app and navigate to the Recents tab. Locate the offending number and tap the 'i' next to it, followed by 'block this caller'.
You can unblock a number any time through the same method.
On Android, things can be a bit more convoluted, depending in part on what phone you have. It may be that you can do it in a similar way to iOS 9. On the HTC One M9, for example, you can simply tap and hold a number in your call history and then tap 'Block contact'.
Other smartphones, such as the Samsung Galaxy S6, feature an auto reject list, which is found in the phone settings menu. This allows you to manually add numbers to a list of rejected callers.
However, if all else fails, there are third party apps to do the job. We'd recommend downloading Truecaller as a top free app for the job. Just open the app, enter your phone number, and you'll find a tab dedicated to blocked numbers.
In fact, Truecaller will go even further than allowing you to block numbers. It maintains an active database of identified cold callers, and will often use this to identify who's calling, so you can avoid nuisance callers.
On Windows Phone 8.1, head into the Phone app, pull up the bottom menu, and select the 'blocked calls' option to enter the 'Call + SMS filter' section. The first time you do this will activate the block function.
Once enabled, press and hold on a number in your call history, and you'll be able to opt to 'block number'.
In Windows 10 Mobile, Call + SMS has been replaced by the Block and Filter app. Open that up, and you'll be able to add select numbers to a list that will be - you guessed it - blocked and filtered.