Best photo editing tips for beginners: 18 quick fixes to common image problems
Getting to grips with your photo editing software can be quite a challenge - this will help

Getting to grips with your photo-editing software can be quite a challenge if you're just getting started. In this tutorial we've compiled 18 of the best photo editing tips and quick fixes for photographers who want to beat some of the common problems photographers face with colour, tone and composition.

Your camera's Auto function lacks the intelligence to know which areas in the frame you want to prioritise in relation to exposure, so you might end up with important details being left in the dark.
When it comes to capturing correct colours you can give the camera a helping hand by choosing specific WB presets, but with changing weather conditions, a particular preset may add unwanted colour cast to some of your shots.
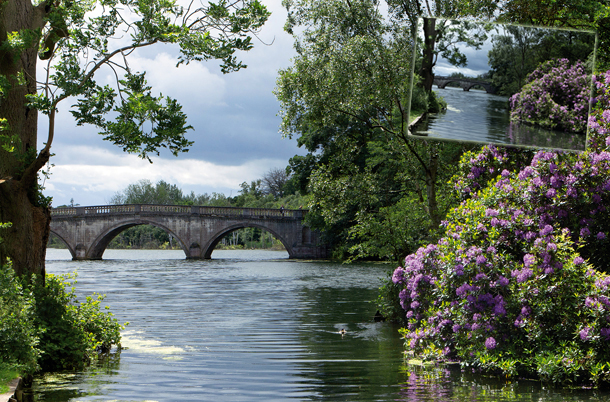
Due to cloudy weather conditions, our location in the start image has dull lighting in the background. As a result, the bridge is under-exposed, has a flat contrast and suffers from a cold colour cast.
However, the foreground rhododendron bush is being lit by direct sunlight, so has a better contrast, stronger colours and a healthier colour balance.
These contrasting lighting conditions mean that we need to use Photoshop Elements to make local (rather than global) corrections to fix the shot's exposure and colour problems.
In this tutorial, we'll demonstrate how to use adjustment layers to boost the strength of weaker colours without over-saturating stronger ones.
You'll also learn how to selectively target and warm up cold colours by editing an adjustment layer's mask. We'll show you how to sharpen up delicate details while keeping noise at bay, as well as demonstrating how to remove distracting objects with a quick swipe of the Clone Stamp tool.
Best photo editing tips for beginners: 1-3

01 Open start file and improve composition
Download our start images and follow along! In Photoshop Elements, go to File>Open. Browse to fix_before01.jpg and click Open. The shot will open in Photoshop Element's Expert workspace. Before we tackle our problem colours and tones, it makes sense to improve the composition first.

02 Set up the Crop tool
Grab the Crop tool [C]. In the Options bar, choose Use Photo Ratio. This enables you to produce a cropped shot that has the same shape as the original image. Set Resolution to 240 pixels to produce a detailed, high quality print. Click and drag the crop window to cover the entire shot.

03 Rule of Thirds
Click the Rule of Thirds option. Drag the bottom right corner handle left to tighten the crop window around the bushes. Drag the top left handle right to lose the edge of the tree. Drag inside the grid to position the bushes in the Rule of Thirds column on the right. Place the bridge in the grid's middle row.
Get daily insight, inspiration and deals in your inbox
Sign up for breaking news, reviews, opinion, top tech deals, and more.