Stunning shutter speed effects
Master shutter speeds to boost your creativity
Shoot after dark
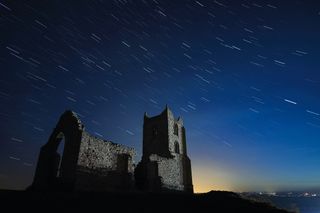
Shooting at shutter speeds longer than 30 seconds can turn a dimly lit night scene into something that’s full of detail, smooth out the roughest seas, and even capture the otherwise unnoticeable movement of the stars.
The maximum shutter speed available on most cameras is 30 seconds, so to use longer exposures you need to use the bulb exposure setting in manual mode. Bulb enables you to start the exposure when the shutter release is pressed and keep it open for as long as it’s held down.
In practice there’s a limit to how long you can shoot with your DSLR.
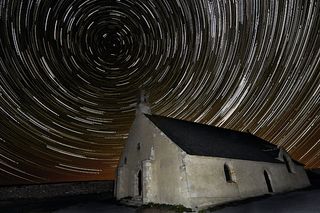
It’s hard to achieve quality results when using shutter speeds long enough to capture star trails, so try taking a series of 30 sec exposures, then combine them using the Stacks feature in Photoshop
This is because the longer the shutter is open, the more noise there is, due in part to heat building up on the sensor. This is less problematic with most recent DSLR models, which can easily shoot for several minutes without noise becoming too obvious, especially with long-exposure noise reduction activated (as described on the previous page). But for the most extreme exposures, such as those needed to capture star trails, you’ll have to use a couple of neat tricks to get good quality shots (see right).
As with using shutter speeds up to 30 seconds, it’s a technique that requires very little light, so it’s easiest to achieve after dark. But in many locations, light pollution may result
in a sky that’s not as dark as you'd hoped. This glow from street lights, buildings and traffic can obscure the stars if you’re trying to capture star trails or the night sky. In built-up areas you’ll have to work with this light in your long-exposure images.
It can actually help to produce striking effects when it adds colour to cloud or mist in the scene.
Get daily insight, inspiration and deals in your inbox
Sign up for breaking news, reviews, opinion, top tech deals, and more.
Star trails: The settings you'll need
ISO
The stars radiate very little light, so you’ll need to use a high ISO such as 800 to achieve a suitable shutter speed and aperture.
Exposure
With the camera set to manual, take a test exposure of 30 secs at f/5.6. If the stars are too dark, set a wider aperture such as f/4, or if they are too bright, try f/8.
Shooting mode
Set the drive mode to continuous shooting, and set the focus to manual. Unlike most other long-exposure shots, you should also ensure that any long-exposure noise reduction is turned off so the camera can fire continuously.
Taking the shots
With the camera securely mounted on a sturdy tripod, press down the button on the remote release and lock it. The camera will fire a continuous sequence of 30-second exposures for as long as the button is locked.
Final shots
To finish off your sequence, use a torch or flash to light up any foreground objects such as buildings or trees that you want to be visible in the final image. Take a final shot using exactly the same shutter speed and aperture as your sequence with the lens cap on to create a ‘dark frame’ that will reduce noise in the final image.
Step-by-step: Shoot in bulb mode

1. Select the right mode
On Canon DSLRs you should select the B setting on the mode dial. For most other brands you need to select manual exposure by setting M on the mode dial, then adjust the shutter speed using the input dial until 'bulb' appears in the display.

2. Use a remote release
Use a remote release so that you can operate the shutter during the exposure without moving the camera. Most of these feature a locking position so that you don’t have to hold down the button for the duration of the exposure.

3. Time the exposure
Without your camera's LCD display to help you, you'll need to time the exposure yourself. To get an accurate exposure, use your watch, a stopwatch or your mobile phone display to measure the time you hold the shutter open for.
