macOS High Sierra tips and tricks
Make the most of Apple's new desktop OS.

Introduction
Apple's latest desktop operating system is called macOS High Sierra, which sounds awfully similar to the last one. That's because, like the transition from OS X Leopard to Snow Leopard, Apple has chosen to refine its established Mac OS rather than replace it wholesale, thereby avoiding the risk of introducing niggles and issues and that were previously absent.
That of course still equates to additional new features for macOS which we'll cover in this article, but perhaps more importantly, it should mean improved speed and stability for your Mac.
And, in another piece of good news, if your Mac is capable of running Sierra, then it's fully compatible with High Sierra, too. So read on to find out how to get the most of macOS 10.13 with this selection of tips and tricks.
1. Safari website settings
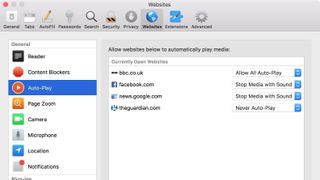
Safari users can now specify several new web page settings on a per-site basis. It's possible to set a zoom level for a particular web page, as well as enable or disable notifications and content blockers, not to mention set camera, microphone and location service privileges for a site so that they remain active the next time you visit.
And let's not forget the new Autoplay blocking feature that prevents websites from playing video the moment you visit a page, which should make browsing a lot less infuriating. All of these settings can be found in the new Websites tab in Safari preferences.

2. Mail Split View
Using Apple's native Mail application in fullscreen mode used to be a right pain in macOS. Clicking the 'Compose' button caused your new message to overlay on top of the rest of the interface, making reference to other emails in your inbox a case of switching back and forth between the two views.
Fortunately in High Sierra, Apple has taken a leaf out of iOS so that's no longer the case. Click the 'Compose' button now and fullscreen is automatically split in two, enabling total access to the Mail window as you type up your new message.

3. Tables in Notes
Apple has been making iterative improvements to its Notes app over the last few versions of its Mac OS, and happily High Sierra is no different. Now users can create simple tables for which to input lists, figures, and so on in a clearer, more organized manner, with a simple click of the 'Table' button.
And for an extra perk, it's now possible to pin an extra-special note to the top of your Notes collection, ensuring it's the first thing you see when you open the app. Just right-click the Note in question in the notes column and select 'Pin Note'.

4. Editing tools in Photos
The Photos app got a reorganized editing window in High Sierra, with new tabs along the top that let you toggle between three different editing views.
The advanced editing tools all live in the 'Adjust' tab, with two new tools on offer called 'Curves' and 'Selective Color', while the 'Crop' tab brings up the usual crop functions. The 'Filters' tab meanwhile brings up a fresh new set of image presets with variations on vivid, dramatic, and black and white.
To show or hide additional options for individual tools, simply click the triangles next to them. (Note: one-click Enhance is now an icon at the top right of the screen, alongside the 'Done' button.)

5. Imports view in Photos
In another welcome improvement to the Photos app, Apple has included a new library view mode called Imports that allows you to browse your entire photo collection based on what date they were originally added.
This makes it easier to find specific photographic events that you've yet to create an album for, for example.
Using the right-hand dropdown menu, it's also possible to filter the Imports view based on Favorites, Edited, Photos, and Videos, and even apply keywords to further restrict and simplify your search.
6. Type to Siri
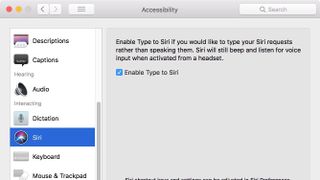
Apple has had the good foresight to add an option that enables users to query Siri via typing instead of speaking to the virtual assistant.
This is helpful if you're in an environment where you'd rather not talk out loud – in a business meeting, for example – or if Siri is having trouble understanding your voice. Just be sure to turn down the volume if you don't want to hear the response out loud.
To activate Type to Siri, open the Activity pane in System preferences, select 'Siri' in the Interaction column, and tick the relevant checkbox.
7. QuickTime and QuickLook FLAC support
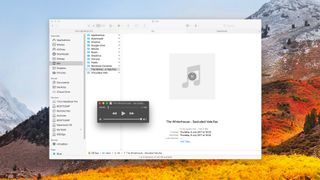
Mac-using audiophiles have been pining for native FLAC support in Apple's desktop OS for years now, so it should come as music to their ears that both the QuickTime app and Finder's QuickLook feature (tap space to activate) are both now capable of playing the lossless audio format.
Sadly, the same can't be said for the latest version of iTunes though. Maybe in the next OS, eh?
8. Safari Intelligent Tracking Prevention
Apple's Safari was one of the first browsers to include features that attempt to prevent cross-site tracking, with the automatic blocking of third-party cookies, for example.
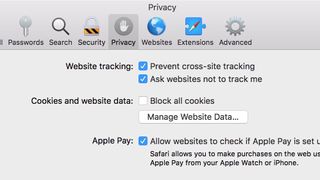
The latest version of Safari included in High Sierra takes those efforts up a notch with a feature called Intelligent Tracking Prevention.
We won't bore you here with how it achieves its aims, suffice to say it promises to make browsing more private and a lot less sluggish overall.
To enable it, simply tick the box next to "Prevent cross-site tracking" in the Privacy pane of Safari's preferences (Safari > Preferences...).

9. Lock Screen from Apple Menu
It may come as a surprise that the last few versions of Apple's desktop OS didn't offer a straightforward way to lock a Mac's screen on the fly.
Previously users had to set up a password requirement feature from within the screensaver options, or else put their Mac to sleep.
Fortunately, High Sierra now comes with a quick and easy way of locking your screen at a moment's notice - you can find the new 'Lock Screen' option in the Apple menu, or activate it with a keyboard shortcut, as shown above.
10. Messages in iCloud
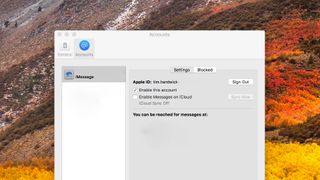
With the introduction of High Sierra, it's now possible to sync all of your messages to iCloud and quickly access them across all of your devices. (Bear in mind, this also means that if you delete a message on your Mac, say, it's deleted on your iPhone/iPad, too.)
Note that all your messages remain secure in the cloud, thanks to end-to-end encryption.
To enable this setting, open the Messages app on your Mac and select the Accounts tab in Preferences. Then simply tick the box next to "Enable Messages on iCloud" in the relevant account, and you're done.
- Still using macOS Sierra? Here's how to get started


