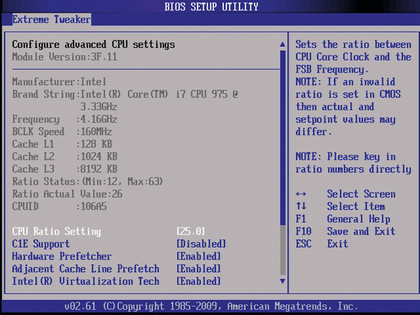
The Advanced menu might more accurately be called Miscellaneous, as it's crammed with general options relating to your CPU, chipset, USB controller, C1E support: This technology saves energy by reducing CPU power when there's little work to do. Leave this on to save power and extend battery life, but turn it off to help with any overclocking you're doing.
Intel SpeedStep
This setting – known as 'Cool n Quiet' on AMD systems – saves power and reduces fan noise by cutting your CPU's voltage and clock speed when it has little to do.
Once it's enabled, Windows Vista users can choose to reduce their maximum CPU power ('Control Panel | System and Maintenance | Power Options | Change Plan Settings | Change Advanced Plan Settings | Processor Power Management'), which is perfect for extending a laptop's battery life.
Virtualization technology
Allows virtualisation tools like Microsoft Virtual PC, VMware Workstation and Sun's VirtualBox to benefit from additional processor support.
Intel VT-d
Get daily insight, inspiration and deals in your inbox
Sign up for breaking news, reviews, opinion, top tech deals, and more.
Allows compatible virtualisation tools to directly access hardware devices on the host PC, which can greatly improve performance. We've seen reports that it can also mess up your PC in unexpected ways, though, so leave this disabled unless you need it and know exactly what you're doing.
Onboard devices configuration
Sometimes available as a separate menu called Integrated Peripherals, this lists devices integrated into the motherboard (audio, network ports, FireWire ports and more) and lets you turn them off.
Disable unused devices here to reduce the chance of hardware conflicts and prevent the BIOS and Windows wasting time by initialising them and loading their drivers. Or, if you find a network port or other device that doesn't seem to work, check here to see if it's disabled before you assume you've got a motherboard fault.
Just about every BIOS comes with an overclocking section, the area where enthusiasts go to ramp up their CPU or RAM speed. Take it too far and this can make for an unstable system, shorten the life of some components or even fry them instantly, but treat your overclocking options with caution and respect and they'll usually deliver a welcome free performance boost.
CPU level up
Overclocking used to mean lengthy trial and-error periods as you tried to figure out the best values for a stack of cryptic settings. Luckily, the motherboard manufacturers have now stepped in with a range of ideas on how to simplify the situation.
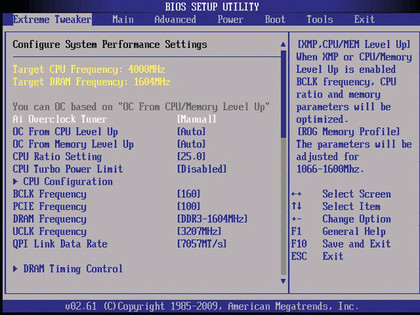
Our Asus-based test system uses a feature called 'Ai Overclocking'. If we select CPU Level Up, it provides the option to increase our CPU performance from the normal 2.66GHz i7 920 to a 2.93 GHz i7 940 setting, just by selecting it from a menu.
Ai Overclocking then steps in and adjusts the more technical settings to make this happen. It worked perfectly when we tried it, with benchmarks showing our CPU speed up by 10 per cent. But if you have stability problems, or your PC temperature rises drastically, then change the setting to 'Auto' and everything should return to normal.

Memory level up
Similar to CPU Level Up, this option displays higher performing RAM standards, lets you choose one, and then automatically sets your RAM timings to match. Again, change the setting back to Auto to undo any changes.
Ai Overclock tuner
Leave this set to Auto and the CPU Level Up and Memory Level Up options will work just as we've described. If you want to tweak the settings yourself then set Ai Overclock Tuner to 'Manual' and start exploring the more detailed options that we'll describe next.
The overclocking section in your BIOS will provide a number of useful manual settings. If you're willing to take the risk of overclocking in return for a little extra performance (and you know how to reset your motherboard's CMOS RAM in case your system locks up completely) then here's how to get started.
CPU Ratio setting
Your processor's clock rate is determined by multiplying an external clockspeed with a CPU Ratio, or multiplier.
Our test Core i7 920 system has a 133MHz base clock (BCLK) speed and a multiplier of 20, giving a CPU clock rate of 2.66GHz. Increasing the multiplier by one would provide an immediate five per cent speed gain – if it wasn't for the fact that most CPU multipliers are locked. So unless you've got an unlocked CPU, like an Intel Extreme, you'll need to try something else.

BCLK frequency
Our i7 920 test system allows the base clock frequency to be changed from 133 to whatever we'd like to try, which will proportionally ramp up the speed of our CPU and RAM.
Exactly what you'll achieve here depends on your hardware, but our Scan test PC handled an impressive 50 per cent increase in BCLK and still appeared stable. Look for an FSB (Front Side Bus) setting on other systems, which has the same effect.
FSB Memory Clock mode
The problem with changing your base clock or FSB speed is that it affects everything else too. If your RAM can only handle a five per cent overclock, say, then your attempts will fail, even if the CPU could do considerably more.
Set the FSB Memory Clock Mode to 'Unlinked', though, and FSB changes will no longer affect your RAM – so you can now overclock your memory and CPU separately.
If you don't have this option, then there should be an 'FSB to RAM Ratio' or other memory divider setting that reduces the impact of any FSB changes. Alternatively, you may be able to set the memory frequency directly.
Processor NB Frequency multiplier
Increasing the FSB affects components like the Northbridge as well as your RAM, and as these often fail early they can quickly bring your efforts to a grinding halt. Dropping this multiplier (and similar settings) lets you reduce the Northbridge frequency a little, which may allow you to increase the FSB further than you would do otherwise.
DRAM Timing control
Your RAM makes use of a number of timing delays to keep everything running smoothly, and you'll find these listed in a submenu within your overclocking section. Reducing these timings will improve performance a little (perhaps two to four per cent), but may make your system more unstable . AMD has a helpful article explaining more at www.bit.ly/oogbi.
CPU voltage
If your overclocking efforts don't produce the improvements you need, then increasing the CPU, memory and other chipset voltages may help. On the other hand, going too far might fry your hardware beyond hope of repair.
So do your research: check the specifications for your memory and processor, and browse overclocking forums to see what others are doing before you start. If you still want to try this, then increase voltages by small increments, while monitoring your system temperature.
However far you take your overclocking, keep in mind that any resulting instabilities may take some time to appear, and so it's important to stress-test your PC before you finish. Install a tool like Prime 95, Orthos or OCCT and leave it running for 24 hours. If there are no lockups then your system is stable and ready to start some serious work.
Thanks to Scan Computers for kindly providing us with a 3XS Triad: a Core i7 PC built around the Asus Rampage II Extreme motherboard. Thanks also to our colleagues at www.maximumpc.com for the BIOS images.
Current page: Advanced settings and manual overclocking
Prev Page Power controls and hardware monitor