The improvement in performance is likely to be negligible at best, but if you're keen to squeeze the most out of your system, it may be worth considering.
If you decide to disable indexing, open 'Computer' on the Start menu, right-click the SSD and choose 'Properties'. Towards the bottom of the dialog, clear the box marked 'Allow files on this drive to have contents indexed in addition to file properties'.
6. Create a RAM disk
It's not always practical to move temporary files and so on to a different drive - you might not have one available, or what you have might be of markedly lower performance than the SSD itself. One way to get around the issue of moving the various caches to a different disk is to create a RAM disk, which will run at lightning speeds compared to any physical drive.
You need at least 3GB memory installed to use a RAM drive for caching, and the more you have available, the better its performance will be. You can install a RAM drive using the Dataram RAMdisk program, which is available from here.
Download and install it. Once the program is launched, you need to open the 'Settings' tab and select the filesystem you want to use for the drive. Enter the disk size, bearing in mind how much memory you have available, and click 'Start RAMDisk'. The free version lets you set up drives up to 4GB in size.
7. Move caches to RAM disk
Get daily insight, inspiration and deals in your inbox
Sign up for breaking news, reviews, opinion, top tech deals, and more.
Now that you've set up a RAM disk, you can move Windows caches to it, thereby reducing the strain on your SSD and prolonging its life.
In fact, even if you don't have an SSD but have enough RAM available to set up a drive, this is still a great way to improve system performance, because RAM is always faster than a physical drive. Just bear in mind that all its contents will be lost once the power is shut down.
8. Temporary internet files
You should consider moving your internet cache to the RAM drive too. To do this, go to 'Control Panel | Internet options', then select the 'General' tab and choose 'Move folder'. Browse to your RAM drive for the new folder.
If you use Firefox, enter about:config in the address bar and search for 'browser.cache.disk.parent_director'. You can now double-click this value and enter the new location for your browser cache.
9. Check TRIM functions
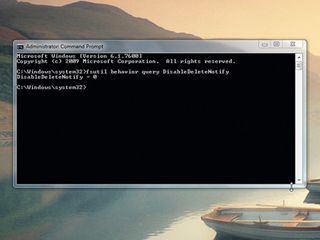
The TRIM command lets operating systems inform SSDs which data blocks are no longer needed so they can be wiped internally. This helps to keep the disk in optimum condition, and therefore maintain its performance. Windows 7 supports TRIM, but it may not be enabled in your system.
You can check the status of TRIM by launching the command prompt using administrator privileges. To do this, go to 'Start | All programs | Accessories' right-click 'Command prompt' and choose 'Run as administrator'. Now enter the following command:
fsutil behavior query DisableDeleteNotify
Press [Enter]. If TRIM is working correctly, you'll get a response of 0 (zero). If the result is 1, then you'll need to enable TRIM by entering the following command:
fsutil behavior query|set DisableDeleteNotify = 0
10. Check disk TRIM support
Not all solid state drives support TRIM, although you'll find that an increasing number do. It's a good idea to check through your drive's documentation or go to the manufacturer's website to see whether or not it's supported.
There may well be a firmware upgrade available for your drive that enables TRIM, so this is worth investigating too. You should be able to get this from the support section of the manufacturer's site, along with instructions on how to apply it.
11. Advanced Host Controller Interface
Windows Vista and 7 natively support the AHCI SATA controller standard, which enables faster data throughput, but it's worth checking that your motherboard does too.
Enter the BIOS by restarting your PC and hitting [Delete] as it starts up, or watching for the key combination displayed for you to enter the CMOS utility. The location varies, but it's often in chipset settings. If you find it's disabled, enable it.
12. SSD Tweaker
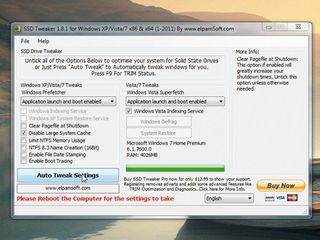
As an alternative to tweaking Windows settings manually to get the best configuration for your SSD, you can get a tweaking program such as SSD Tweaker to do the hard work.
The free version lets you clear the paging file and disable indexing, system restore, NTFS 8.3 name creation and file date stamping. There's also a handy 'Auto tweak settings' button that sets the most common SSD tweaks in a single operation.
The pro version includes more advanced settings, like querying the TRIM status and modifying hibernation settings. There's also a TRIM optimisation manager that enables you to optimise TRIM for your drive.
