40 iLife tips and tricks you may not be aware of
Cool iLife features you probably don't use
Making your tunes sound just like the real thing with GarageBand
21. Add MIDI files
There are hundreds of resources online where you can download free MIDI files to help with your music creation in GarageBand. These files include all the instrument information and notes for any particular song that you might need to recreate in your own style.
If you download a MIDI track from the internet and drag it onto an empty GarageBand project it will load all of the notes and instruments for that song for you to use as the basis of a new track, or even to use in creating your own remixes of an existing song.
You're also free to change any of the loaded instruments as you wish to suit your preferred style or genre, should you want to turn any of Radiohead or Vera Lynn's greatest works into happy hardcore or brass band remakes.
Of course, for some MIDI files, copyright may apply, so check your rights before downloading the files and also when publishing your project.
22. Record An iChat podcast
Get daily insight, inspiration and deals in your inbox
Sign up for breaking news, reviews, opinion, top tech deals, and more.
If you want to record an iChat conversation as part of an interview or for a podcast, you can do so in GarageBand version 5 and above.
Start by inviting friends to an audio or video chat via iChat (first letting them know you'll be recording). Now launch GarageBand and click Record. A message will appear asking if you wish to record the session. Click Yes and GarageBand will make a track for each person in your chat or conference.
If you're using a video chat, you can choose to show the Podcast Window from the Track menu where a snapshot of each participant will be shown each time they speak.
23. Play your keyboard
If you're lucky enough to own a USB keyboard then you won't have problems playing notes into GarageBand. If you don't, you have another option beyond simply clicking in the Piano Roll with your mouse.

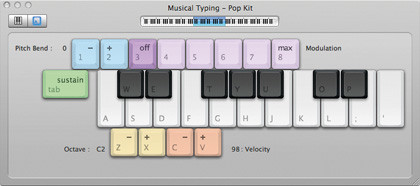
Press Shift+Command+K to bring up GarageBand's Software Keyboard which enables you to use your Mac's keyboard as an input device. The keys are lettered so you know where to press, and there are also Velocity, Octave, Pitch Bend and Modulation controls available.
When using the software keyboard you'll need to manually click the Record button as the R key will be assigned to a note.
24. Shift octaves
If you want to adjust the pitch of an entire MIDI track you can do so in a few clicks.

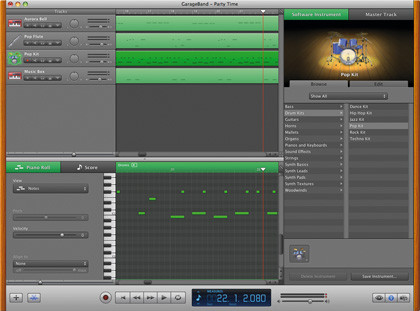
Start by double-clicking your MIDI track on the GarageBand timeline to show the Piano Roll, which includes all of your MIDI notes. Click within the Piano Roll and press Command+A to select your notes.
All of your notes will now be highlighted green, denoting that they're selected. Click and drag the first of your notes up or down to adjust their pitch. An octave change will be 12 notes up or down from your original note.
25. Note expression
Notes in songs are rarely played in the same way twice unless it's part of some highly programmed dance music. If you're applying your own MIDI notes to your project you'll run this robotic-sounding risk, so make sure you make the most of the Expression feature in the Piano Roll.
Select Expression from the Piano Roll's drop-down menu, which can be accessed by double-clicking on any MIDI track. With Expression selected, hold the Command key and click on the Piano Roll to add points to determine how the expression of a note changes over time. This is especially handy for creating swelling notes for organs and string instruments.
26. Realism and swing
As with Expression, real live drummers aren't metronomic and often slip a little out of time. If you listen to a track that has perfect percussion it sounds a little too rigid.
If this is the case with your MIDI drum part, try picking a preset from the Enhance Timing drop-down menu in the Piano Roll. From here you can set a level of Swing that pushes some of your notes a little out of time for a more realistic effect.
You're also able use the Enhance Timing slider to fine-tune the rest of your settings.
27. Automation
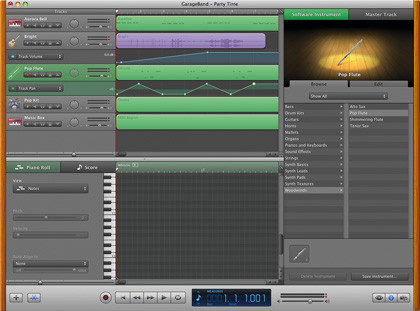
To automate changes to an instrument as your song plays, click the downward pointing arrow next to the Lock button on any of your tracks to show the Automation section. Now select Track Volume and Pan and add other effects you wish to automate.

When selected, you can apply your automation by clicking on the timeline to add control points, which you can drag up or down to create changes over a period of time. This is especially useful for fading tracks in and out using the Track Volume automation.
28. Export song as sheet music
So you've created your first GarageBand song and you want to share it with others. Of course, you can email it around as an MP3 or upload it to the web, but what about your friends who can actually read music?

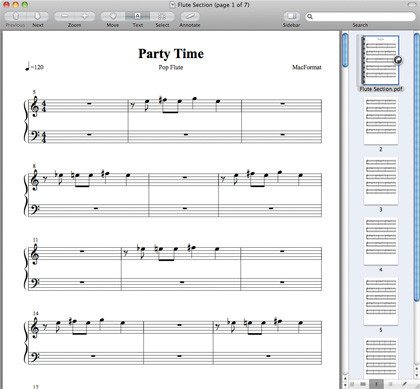
There is another way to share your project from GarageBand as long as it's made up of MIDI tracks. Start by opening the project you want to share and select the instrument you want to create sheet music for.
From the File menu, select Print, and that's it! If you want to save the sheet music as a PDF, simply choose the PDF option from the Print menu.
29. Count in and metronome
If you're having trouble playing along to your track and recording it, give yourself some warning of the start with a count in.
Head to the Control menu and select Count In. Now, every time you click record, there'll be four metronome clicks to prepare you before recording starts.
You can also turn on the metronome to help you keep time when recording without a drum track to follow. The metronome can also be turned on from the Control menu and plays every time you click the record button.
30. Multi-take recording
If you want to perfect a recording from a MIDI or real instrument you can set GarageBand to record multiple takes and then choose the best one.
Turn on the Cycle Region feature, the button to the right of the Play button on the Transport bar, and you will notice a yellow bar appear above the GarageBand timeline. Drag this bar over the area of your track you wish to record onto and click record.
You can now record your part as many times as you wish and then select your best take from the recordings. You can select takes by clicking on the number that appears at the top left of your recording on the instrument's track.
Steve has been writing about technology since 2003. Starting with Digital Creative Arts, he's since added his tech expertise at titles such as iCreate, MacFormat, MacWorld, MacLife, and TechRadar. His focus is on the creative arts, like website builders, image manipulation, and filmmaking software, but he hasn’t shied away from more business-oriented software either. He uses many of the apps he writes about in his personal and professional life. Steve loves how computers have enabled everyone to delve into creative possibilities, and is always delighted to share his knowledge, expertise, and experience with readers.
