Wipe passwords
Logging into a Windows system is easy using Backtrack, even if you don't know any of the usernames or passwords that have been set up. That's because you can use a utility bundled with Backtrack to remove the password on any Windows account, including administrator accounts.
This is possible because of a file called the SAM (Security Access Manager), which is normally locked by the Windows kernel so that no one else can read it. This is modifiable while Windows isn't running.
First, we need to find out where the system's hard disk resides in Linux. To do this, click the Konqueror icon on the desktop menu bar. This will open the Konqueror desktop browser. Click the 'Storage media' link. If you don't see anything right away, press [F5] to refresh the view.
Among the media that Backtrack knows about on your system, you'll see your hard disk. Click this and you'll see the folders in C:\, which is useful if you need to copy, add or modify files without logging into Windows directly.
Now select the Home icon on the Konqueror toolbar (the one that's shaped like a house) and click the blue 'up' arrow next to it. Click the Media folder, and then the 'Hard disk' icon again. The location bar will change to give the name we must use to access the disk. It'll be something like '/media/disk'.

Now, from the Start menu, select 'Backtrack | Privilege Escalation | Password Attacks | Chntpw'. 'Chntpw' stands for 'Change NT Passwords' and it works on all versions of Windows. When you run the command, a terminal window opens. You can ignore the verbiage on the screen and enter the following command:
Get daily insight, inspiration and deals in your inbox
Sign up for breaking news, reviews, opinion, top tech deals, and more.
chntpw -i /media/disk/Windows/System32/config/SAM
The capitalisations are very important here – 'chntpw' is all lowercase. If your Windows partition is called something other than 'disk', put its name in place of this in the command.
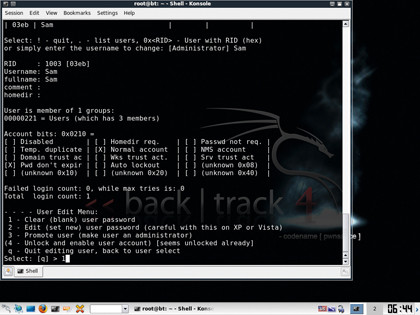
Press [Enter] and a text-based menu will appear. Select 'Option one' and press [Enter] again. This gives you a list of the Windows user accounts. Type the name of the account you want to change (taking care to use the correct case for each letter) and then press [Enter].
Chntpw displays lots of details about the account and gives you a number of options. Select 'Option one' and the password will be removed from the account. To exit, type ! and press [Enter], then press [Q] and hit [Enter] again. Chntpw will ask if you want to write the hive files. You do, so press [Y] followed by [Enter].
If you now reboot into Windows, you'll be able to log into the account you've changed without being prompted to enter a password.
Recovering deleted files
Many people believe that when they delete a file and then empty the Recycle Bin, it's gone for good – but this isn't the case. Windows, like all modern domestic OSes, simply marks the sectors on the disk occupied by the deleted file as available for future reuse. It would be inefficient to overwrite the data those sectors contain until new data is ready to be stored.
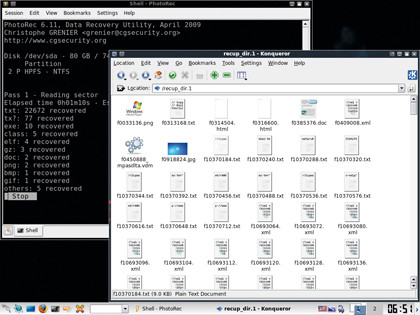
In the meantime, the old file is still there, available to be read by anyone with access to a file recovery utility. Backtrack contains several such applications. Among the easier to use is PhotoRec, which is capable of scanning a hard disk and recovering a comprehensive list of all files marked as deleted.
In fact, it can recover far more than just files deleted by users, including temporary files left over from when the operating system was installed. This means it's a good idea to have a spare USB pen drive handy to store the recovered files for later perusal, because they can easily run into the thousands.
To get going, insert the drive and run Konqueror. Click 'Storage media' and then select your USB pen drive to ensure that Backtrack is aware of it. You can leave Konqueror open and check the scan's progress later.
Now run PhotoRec by navigating to 'Backtrack | Digital Forensics | Forensic Analysis' and then selecting 'PhotoRec'. The program itself runs on the command line, but it's menu driven, making it easier to use.

When PhotoRec runs, it first presents you with a list of the hard disk partitions on the computer. In the case of a Windows-only machine, there'll probably be only one large one. However, in some Windows 7 installations, there may be a second, small partition that the system uses to store recovery data.
Use the up and down arrow keys to select the main partition, then press [Enter] to continue. PhotoRec can understand a large number of partition table types and will automatically identify the one used on your disk, so accept the default on the next screen by pressing [Enter] again.
The next screen enables you to specify the file types to recover. Use the left and right arrow keys to highlight 'File Opt' at the bottom of the screen. Next, press [Enter]. The resultant display will give you a long list of all the recognised types.
If you only want to recover one file type (JPG, for example), press [S] to deselect everything, then scroll down to the relevant type and press [Space]. You can use the [Page up] and [Page down] keys to navigate through the list more quickly.
Once you're happy with your file type selections, press [Enter] and select the filesystem you want to scan. Use the left and right arrow keys to select the 'Search' option, then press [Enter]. This presents you with a choice of file system types.
For a Windows filesystem, make sure you select 'Other', then press [Enter]. On the next screen, select 'Free' to ensure that the program only scans disk sectors that are marked as free space. Press [Enter] again to continue. You'll now be asked where to store the recovered files.
The default is the directory '/usr/local/ bin', which is on the boot media. Press the left arrow key three times to get back to the root directory, then press the down arrow key repeatedly to navigate to the media directory. When you reach it, press [Enter] to see the media connected to the system.
One of the devices you find should be the USB pen drive you inserted and navigated to in Konqueror just a moment ago. Select this and press [Enter] again. Finally, press [Y] to begin recovering deleted files. The extraction process can take quite a while, depending on how much free space there is to scan on the disk and the number of file types you've specified.
As the scan progresses, the number of files of each type will increase. PhotoRec creates a long list of subfolders in which it stores all the files it's recovered. By perusing these, you may be able to locate some interesting or even incriminating pictures and other documents.