How to benchmark your PC
Hard disk testing
To gain some idea of the wealth of performance information that Sandra can provide, we'll take a look at the hard disk benchmark. You'll probably need to do some homework to understand all the figures, but even so, you'll be impressed by the wealth of data provided.
To run this benchmark, click on the 'Benchmarks' tab and then, under 'Storage devices', double-click on 'Physical disks'. Now, on the 'Physical disks' window, page back and forth using the green arrows at the bottom, choosing the category of test you want to run. You can, for example, monitor speed against position on the media, or against file size.
Having made your choice, use the drop-down lists at the top to select which drive you want to benchmark (if you have more than one, and remember that it considers USB memory sticks to be disks) and whether you want to test the read or write speed. Finally, click the 'Refresh' icon to run the benchmark and display the results in figures at the bottom of the window, and graphically compared to other popular drives.
Do it yourself
Sysmark is a popular application-based benchmark suite but it is hugely expensive. Virtually all the cheap or free benchmarks are of the synthetic variety, but your can make your own tool for application-based benchmarking. It isn't as hard as you might think.

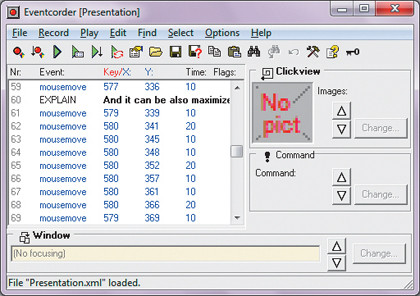
Eventcorder is a macro recording and playback utility, which provides a similar facility to Microsoft Office's macros, but across any application. It also has a timing facility, which makes it ideally suited to application based benchmarking.
Sign up for breaking news, reviews, opinion, top tech deals, and more.
Start up Eventcorder and click the red 'Record' button. The Eventcorder window will be hidden, but you'll see a message in the top-left of the screen indicating that recording is in progress. At this point, perform whatever actions you want to be played back as your benchmark. When you're done, press [Ctrl]+ [Esc].
The Eventcorder window will reappear so you can save your recording from the File menu, and try it out by clicking the 'Play' button. It's not yet a benchmark - we'll address that later - but it's now important to recognise the limitations of this approach.
Nothing important should change between recording and playback. Don't change the screen resolution and, if your recording involves clicking on desktop icons, make sure they haven't moved and that the wallpaper is the same. Also, if the recording results in a file being created, delete it before playback, otherwise you'll be asked if you want to overwrite it, and the script won't be expecting to provide such a confirmation.
All of this is fairly easy if you're playing back on the same machine but could be more difficult if you want to run your benchmark on a different PC.
In practice, because you can't guarantee that icons are at the same position on the desktop or that Start menu entries are in the same order, you're probably limited to using a single application that's already running before making the recording.
Run your test
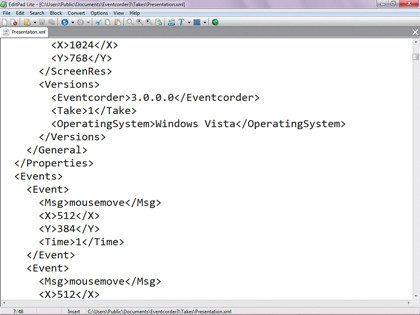
To use a recording as a benchmark it's necessary to edit the recording file. It's in XML format, which means it's human-readable and easily editable using a text editor. The recording will include delays, which represent the time you waited between key presses or mouse movements.

For use as a benchmark, all those delays should be removed so that the playback time depends solely on the execution time.
To do that, replace all lines of the form 120 (where '120' varies depending on the delay time) with 0 (zero delay).
Finally, we need to tell Eventcorder to display a pop-up box showing the time taken to play back the file. This is achieved by adding the following immediately before (as opposed to the singular ) near the end of the file:
EXPLAIN
{\rtf1\ansi\ansicpg1252\deff0\deflang1033{\fonttbl{\f0\fnil\fcharset0 Arial;}{\f1\fnil Arial;}} Elapsed time = %TIME% mS
}
10
Note that if you try to edit xml code in Word, it will recognise it as XML and format it accordingly, but the tags (like ) will not be searchable.
Notepad, on the other hand, will display the XML code as pure text so you will be able to search for tabs but it doesn't support wildcards that you'll need to search and replace lines containing and with any number between the tags.
So unless you edit every one of those lines by hand, which will normally be a huge undertaking, you'll need a fully-featured text editor.
-----------------------------------------------------------------------------------------------------
First published in PC Plus Issue 307. Read PC Plus on PC, Mac and iPad
Liked this? Then check out Overclocking guide: overclock your CPU, graphics card and RAM
Sign up for TechRadar's free Week in Tech newsletter
Get the top stories of the week, plus the most popular reviews delivered straight to your inbox. Sign up at http://www.techradar.com/register