How to stream files from Raspberry Pi to a smartphone
Turn your Raspberry Pi into a file server and seedbox
When you're back in the utility, select the Expand Filesystem option to allow the Raspbian partition to take over all the space on the SD card. We'd also recommend changing the user password at this point too.
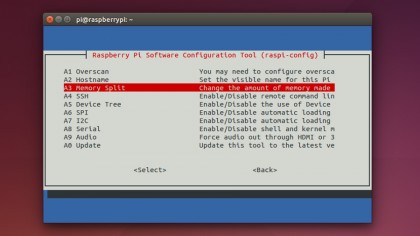
Next, select Boot Options and choose B1 Console to stop booting to the desktop GUI. Finally select the Memory Split option under Advanced, which lets you split the RAM on the RPi between the GPU and the CPU. Since we'll be accessing the Pi only via a remote connection, make sure you assign the bare minimum memory to the GPU, which is 16MB.
Close raspi-config and reboot. Next, you should add other users to the RPi. Later on, we'll restrict access to certain directories on an attached USB device to certain users as well as to a group of users, while still having public areas on the device. But first:
$ sudo adduser
Replace with your target username (don't include the marks). This will add the user and create the appropriate directories. The command will ask for the user's password and other details. Then add this user to the users group with:
$ sudo usermod -a -G users

To the dance floor
When you're done, it's time to make the RPi accessible to users on the internet. For this, we'll use Samba, which allows us to share files via the Common Internet File System (CIFS) protocol. To install Samba on the RPi, type:
Get daily insight, inspiration and deals in your inbox
Sign up for breaking news, reviews, opinion, top tech deals, and more.
$ sudo apt-get install samba samba-common-bin
When it's done, you'll have to add users to Samba. To do this for the default Pi user:
$ sudo smbpasswd -a pi
You'll then be prompted for a password. It's usually safe to use the same password as the user's account password. Repeat this step for every user on the system.
Samba is controlled via a configuration file that you need to tweak before you can use it. It's always a good idea to back up existing configuration files before making changes:
$ sudo cp /etc/samba/smb.conf /etc/samba/smb.conf.old
Now use the nano command-line text editor to edit the configuration file:
$ sudo nano /etc/samba/smb.conf
In the file, search for the section marked Global. Under this section, remove the hash sign at the start of the line that reads #security = user so that it now reads security = user (if it's missing, add it below the Workgroup line).
This will ensure that Samba only allows users to log in who have home directories on RPi. To let users access their own home directories, look for the [homes] section under Share Definitions, and make sure that browseable = yes and read only = no.
To exit nano, press [Ctrl] + [X], then type y and hit [Enter] when it shows you the name of the file. Every time you make any changes to any service, you need to restart it before the changes are enabled. To restart Samba:
$ sudo service smbd restart
$ sudo service nmbd restart
It's now time to plug in the USB device to the RPi. Even if your Pi only has two or even four USB ports, it's a good idea to plug in any additional USB devices via a powered USB hub, particularly if you're connecting large USB storage devices that consume a lot of power.
Also, pay close attention to how the drive is formatted. By default, many USB flash drives are formatted as FAT32. It might be the best format in terms of operating system compatibility, but it is by far the worst for sharing files over the network.
Then there's NTFS, which is used by many large external USB drives. This isn't the format for you if you want to stream media off the remote drive, which is best served via ext4. However, use ext4 only if the drive will be used over the network or on Linux machines and you know what you're doing – it can be a nightmare configuring permissions.
After plugging in the drive, find out its location with sudo fdisk -l. This will list the devices attached to the RPi and the partitions in them. Scan the output and look for the disk which size matches the USB drive that you have plugged in. The device will probably be at sda and the partition we want to mount at sda1.
Create the mount point and mount the device:
$ sudo mkdir /mnt/usb
$ sudo mount /dev/sda1 /mnt/usb
The USB drive will remain mounted until you reboot the RPi. To avoid having to remount the device, first find its UUID:
$ sudo blkid
/dev/sda1: LABEL="USB" UUID="3B5C053D35CAD865" TYPE="ntfs"
Now add it to the list of devices that are mounted at boot:
$ sudo nano /etc/fstab
UUID=3B5C053D35CAD865 /mnt/usb ntfs-3g uid=1000,gid=100,umask=0002 0 0
Replace ntfs-3g with vfat if your drive is FAT32. Save the file, and type the following to ensure the drive will mount correctly at boot:
$ sudo mount -a
Current page: Setting up users
Prev Page Introduction and getting started Next Page Installing torrent serverWith almost two decades of writing and reporting on Linux, Mayank Sharma would like everyone to think he’s TechRadar Pro’s expert on the topic. Of course, he’s just as interested in other computing topics, particularly cybersecurity, cloud, containers, and coding.
