Supercharge your Raspberry Pi
Get your soldering iron ready
Installing Raspbian
For the majority of people who use it, Raspbian will be the graphical face of the Raspberry Pi. It can be obtained and installed onto an SD card by following the instructions on the previous page.
Once it's up and running, it's a good idea to grab the latest versions of all the software by connecting your Pi to the internet and doing one of two things – either open Menu > Preferences > Add/Remove Software and choose Options > Refresh Package Lists followed by Options > Check for Updates… or open a Terminal and enter the following two commands:
$ sudo apt-get update
$ sudo apt-get upgrade
The killer feature of Raspbian is the raspi-config program, which can be run at any time by typing sudo raspi-config in a terminal. Again there's a friendlier front-end available through the default desktop environment – click Menu > Preferences > Raspberry Pi Configuration to access the GUI.
It has got quite a few options, but the most important are:
Expand Filesystem – because of the way Raspbian is installed, it will only create a 2GB filesystem, so if you have a larger card, any remaining space will remain unused. You can use this option to expand the filesystem to take advantage of any wasted space. Click Expand Filesystem on the System tab to achieve this in the GUI.
Get daily insight, inspiration and deals in your inbox
Sign up for breaking news, reviews, opinion, top tech deals, and more.
Boot options – this changes whether your Pi boots into a graphical environment or a text one. Choose 'To Desktop' or 'To CLI' respectively from the GUI's System tab to achieve the desired effect.
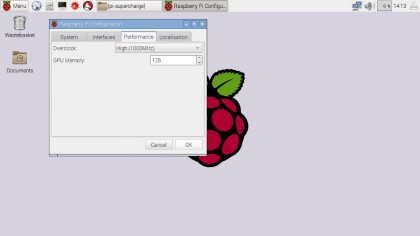
Overclock – get extra performance at no extra cost! See the section below for more details – this option is on the Performance tab of the GUI.
Advanced Options > Overscan – this option can be used on some displays to make the graphics expand to fill the whole screen. You can safely ignore it unless you have problems.
Advanced Options > Memory Split – the Raspberry Pi uses the same chunk of memory for both the main processor and the graphics chip. Using this option (GPU Memory under the Performance tab on the GUI) you can specify the amount to allocate to the graphics. You'd typically lower this figure if you were running the Pi headless, allowing you to free up more memory to the main processor.
The installed software has been kept to a minimum. This is a good idea, but you may find that tools you use on other desktop distros aren't there. Fortunately, as Raspbian is linked to the Debian Armhf repositories, you have access to more software than you're ever likely to need. Just open the Menu and choose Preferences > Add/Remove Software.
14 cool Raspberry Pi hacks
- Convert a Pi into a laptop
- Use a Kindle as a screen
- Build a Pi-powered wall-mounted Google Calendar
- Low-cost HD surveillance camera
- Build a synthesiser
- raspbAIRy – the Raspberry Pi-based Airplay speaker
- Control a solar power setup
- Converse with a foreigner
- Send a payload into (near) space
- Control a house from the web
- Brew beer
- Play old games
- Learn to build an OS
- Make a photobooth
Overclocking
The processor at the heart of the Raspberry Pi is designed to run at anything from 700MHz (older models) to 900MHz (the newer Pi 2 and Pi Zero). In other words, to perform between 700,000,000 and 900,000,000 operations per second in the single-core models, and – in theory – up to 3,600,000,000 operations per second in the Pi 2's quad-core model (in practice it's unlikely to do this).

Of course, 'designed to run' doesn't mean 'has to run'. You can increase this speed. However, doing this will increase the power consumption, which in turn increases the amount of heat generated. If it gets too hot, you're liable to end up with a smoking pile of silicon rather than a functional processor.
Fortunately, later versions of Raspbian now include a tool to help you ramp up the speed while keeping an eye on the temperature. Since this is an official tool, using it won't void your warranty (unlike earlier unofficial methods). Note that this doesn't apply to the Pi Zero – it's already clocked at its theoretical maximum, and attempting to overclock it will actually slow it down.
Overclocking your Pi is simply a matter of opening the Raspberry Pi Configuration tool from Menu > Preferences, switching to the Performance tab and selecting the faster clock speed from the Overclock dropdown menu.
If you find that your Pi becomes unstable, reboot with the [Shift] key held down to disable overclocking, then change the option back to . The maximum setting should give owners of the original Pi model a whopping 50% extra speed, which we found makes a real difference to the desktop user experience, especially for web browsing.
If you want to keep an eye on your core temperature, you can add the Temperature widget to the LXDE panel. However, your Pi will automatically turn off overclocking once it reaches 85 degrees C.
Current page: Installing Raspbian and overclocking
Prev Page Distro guide Next Page OSMC and going further