The beginner's guide to Greasemonkey scripting
How to make the web work exactly as you want it to

The idea behind Greasemonkey is pretty simple. It's a Firefox extension, installed in the same way as any other Firefox extension (find it via the Tools > Addons menu and hit Install).
However, it doesn't do anything in and of itself: what it does is to enable you to run scripts, either by other people or by yourself, which will alter the way web pages look and function.
Greasemonkey user scripts are the bits of code that actually do the work – Greasemonkey itself just loads and manages these. User scripts are written in JavaScript, but be warned: for security reasons, this isn't just a question of writing regular JavaScript and away you go.
There are some gotchas to be aware of, although the scripts in this guide don't encounter any of them. A quick note if you're unfamiliar with JavaScript: this guide isn't going to explain JavaScript syntax in any detail, but don't let that stop you from giving it a go. It's all fairly logical and the code snippets are all explained.
To install a script that someone else has written, you navigate to its location in Firefox and click on the link to the script. You'll get an install popup, as with a normal extension, and can either look at the source code of the script first or, if you're feeling trusting, just install it.
Part 1 - Your first Greasemonkey script
Greasemonkey provides a helpful dialogue to make writing a script as straightforward as possible. In your Firefox window, once you've downloaded and installed Greasemonkey, there'll be a little monkey face in the right-hand corner of the status bar.
Get daily insight, inspiration and deals in your inbox
Sign up for breaking news, reviews, opinion, top tech deals, and more.
Right-click on that and you'll get a menu that includes the option "New User Script". Click that and you'll get a dialog looking a bit like the box on the right.
The 'name' is just the name of your script – it's best to choose something that obviously indicates what it does, for ease of script management later on. The 'namespace' is to avoid your script clashing with others.
If you try to install a script that has the same name as an already-installed one, it's the namespace that governs whether it will overwrite the old one (if the namespace is the same) or co-exist with it (if they're different).
There are a couple of things you can do here: the first one is to use your own website as the domain name. Alternatively, you can use http://localhost, or if you're intending to upload it to http://userscripts.org when you're done, you can use that.
Current versions of Greasemonkey won't allow you to leave it blank. 'Description' is for a human-readable line describing what the script does. It's a very good idea to fill this field in, even for your own scripts – you may wind up with stacks of the things and they'll be a lot easier to manage if you provide extra clues about which is which.
Hack the web
The 'include' and 'exclude' rules govern on which sites a script will run, and can include wildcards. So, www.example. com/* will match www.example.com/ and all pages starting with that URL (whereas www.example.com/ without the asterisk will just include the front page).
You can also use wildcards for parts of names: http://*.example.com/f* will match any page whose path begins with f, on any server in the example.com domain. By default, the include box will contain the page you were on when you clicked the new script option, but you're free to delete that.
If an include rule is matched and no exclude rule is matched, the script will run. If you have no include rule, Greasemonkey assumes @include *, ie, that every URL is matched, so the script will run on every page you load.
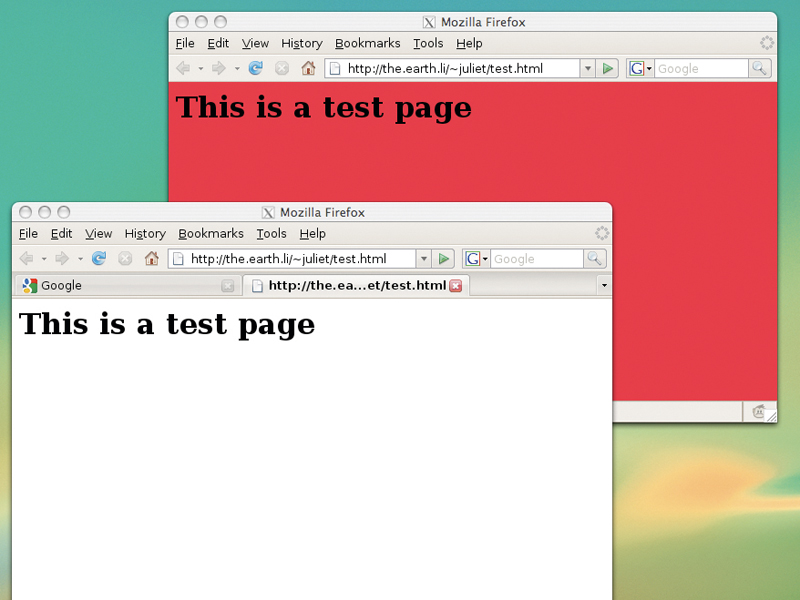
This first script is going to set the background of a page to white – very useful indeed if you come across a page whose author has a fondness for eyeball-searing pink, or the sort of repeating background image that generates a headache within seconds.
So pick a website you want to change the background of and put it in the @include box (here I'm using www.example.com), and set the other fields as appropriate.
Once you've filled this in, you will be asked for your preferred editor (if there's not already one set), and then Greasemonkey will load the script file – which currently will just contain the metadata – up in your editor, ready for you to write something.
At this point, the code you're faced with will look a fair bit like this:
// ==UserScript==
// @name Background Change
// @namespace http://www.example.com/ juliet/
// @description Change the background colour of a page
// @include http://www.example.com/*
// ==/UserScript==
Now it's time to actually write the script. All this first script does is to change the background colour of any pages from sites in the include domain to white. (There really are some unpleasant background colour choices out there.)
For a page without frames or other complications, this is very straightforward: just a single line.
document.body.style.background = "#ffffff";
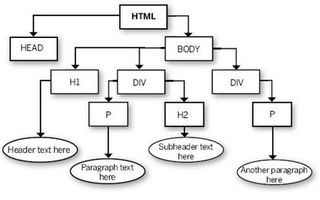
document is the built-in way of referring to the current page. It's a DOM (Document Object Model) object that represents the entire HTML document.
Think of this as a tree of HTML elements seen as objects, with each new element branching off as a 'child' of the one before it – have a look at the diagram below, which shows a possible structure for the body part of an HTML document.

DOM TREE: An HTML document as a DOM tree – each child node branches down from its parent node
The notation for referring to an object in this model is toplevel.child.childofchild. So this line takes the document, then the body element, then the style of the body, then the background attribute of the style… and sets it to white. (#ffffff is white in hexadecimal notation, which is one of the HTML standards. You could also just use white.)
Try it out now – pick a page with a non-white background, use the Manage Scripts menu to add that to the includes for your script and reload the page.
When testing, remember: you're not actually doing anything to the web page you're editing. You're just changing it for you. So if you do something catastrophic, no problem! You can just turn your script off, or edit it and reload the page. So feel free to experiment.
When you're testing, if you left-click on the little monkey face, it'll toggle Greasemonkey on/off. So you can toggle it off, check how the page looks currently, toggle it on, reload and see what your script is doing.
Most Popular

