How to repair your gaming laptop
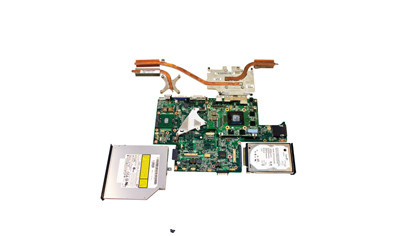
If you like to super-size your laptop then you've got yourself a big-ass machine to lug around. When it comes to 17-inch, larger-screened models construction tends to be somewhat different to everything smaller, due to the additional weight of the screen and the extra features that can be put in there.
The very size and weight of screens does mean they are more prone to damage from drops and also screen damage, never mind the extra kit high-end gaming models will be carrying around inside of them.
The good news is we've generally found these bad boys to be easier to get into and disassemble. If you follow the walk-through it's often the case that removing the top fascias and keyboard provides access to much of the insides. While the screen can be easily removed for replacement.
Cooling is a big issue with any gaming laptop we would typically expect at least two main fans, if not three, and there can be as many as four on crazy SLI models. Each of these will be wedged next to a heatpipe- connected heatsink that goes to the cooling block, which in turn is bolted to the GPU or CPU.
Typically both mobile GPUs and CPUs aim to keep the thermal design power or TDP - that's needed to dissipate the heat - to 35W or below, but for extreme versions the heat profile can got up to 55W for Intel Extreme CPUs and 75W on the GPU side of things. This is why it's necessary to keep the vents clear and check for dust build up in the small heatsink fins.
Hard to process
Overheating usually characterises itself as instant shutdowns in the middle of a heavy load coupled with - oddly enough, Sherlock - high chassis temperatures. The situation is usually exacerbated by environmental issues, such as blocking the vents with your duvet, using your laptop in direct sunlight on a hot day or being backed up to a radiator while on top of having blocked vents.
Externally air dusting vents doesn't really help, as it just pushes the dust back into the laptop, so removing the keyboard is usually a minimum requirement.
Get daily insight, inspiration and deals in your inbox
Sign up for breaking news, reviews, opinion, top tech deals, and more.
For new laptops, contemplating upgrading the processor makes no sense but for older models, especially mid- or low-end ones, a cheap bump in processor speed could be a welcome one. It's often the case that the processor is socketed, which makes for an easy upgrade path. Assuming, of course, the laptop supports a faster processor.
Current Intel Core i3/5/7 mobile processors use Socket 988/G1, the previous Socket 478/P was for the Core 2 mobile range, preceding that was Socket 478/M designed for the original Core mobile processor, but just to make things more confusing some older Core 2 chips also used this socket.
AMD laptops use the company's confusing Socket S1Gx. Stay safe and only consider processors designed for the same socket. Physically the sockets are identical but, for example, S1G4 is DDR3 while S1G3 is DDR2. As with Intel chips we'd suggest if you're interested in a processor upgrade, stick with a GHz bump within the range of the model.
Going in the top
For the big guys a top assault is the way to go
01. The spice of life
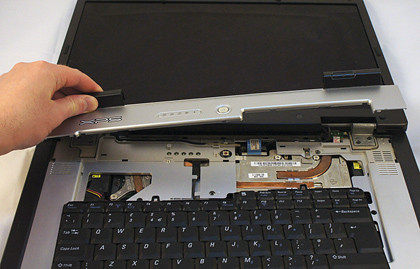
For larger 17-inch models, especially gaming-orientated ones often a top-down teardown approach is needed. For this older Dell XPS and for many other Dell models you can remove the top facia that covers the screen hinges, by folding the screen right back. Sometimes there are a couple of fixing screws along the back edge.
02. [Ctrl]-[x] the keyboard
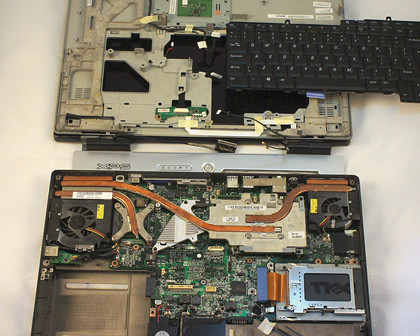
Usually the keyboard is clipped into place but on larger models there can be a couple of screws to remove too. This is besides the inevitable ribbon that lurks underneath. With the keyboard removed, the top part of the chassis was only held in with a few screws. It's the same for the screen, once the hinge screws are removed, this can be lifted away.
03. Gaming power
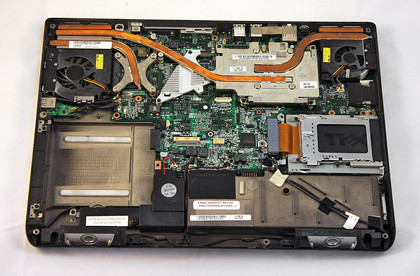
Once the keyboard and screen are removed the base-unit usually stands alone as a self-contained unit. The two main parts we're interested in are the heatsinks; the smaller one you will find in all mid- to high-end models and is for the processor. The larger one is for cooling the GPU, once you've removed the screws for these the entire assembly should lift out.
04. Whip it out, boys
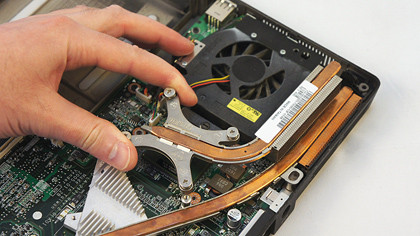
If the laptop processor is socketed then you have the option to replace it, if damaged, or even upgrade it. It's often possible to jump up a couple of notches on the GHz scale with mobile processors. If it is a socketed processor you should see the retaining screw poking out from the side of the cooling module, which you will need to loosen and remove.
05. Brain transplant
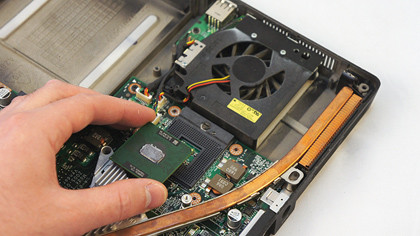
Just like the extra scene from Terminator 2 you now have access to the brain of the laptop, undo the retaining screw and it'll lift out like any normal processor from the ZIF socket. To ensure compatibility look up the original specification of the laptop and see what range of processors were offered for it. These will be supported by the BIOS in your model.
06. Tuck her into bed
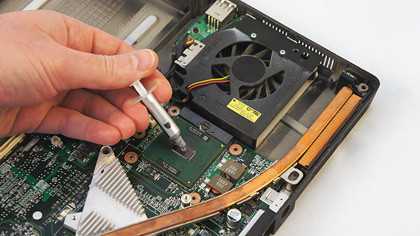
Drop the processor carefully back into the ZIF socket and instead of a lever you just tighten the securing screw back up. Make sure you don't forget to apply a small amount of thermal paste to the processor before reinstalling the cooling module. Just as with a desktop processor it'll need this to efficiently transfer any heat off to the heatsink.
Current page: How to repair your gaming laptop
Prev Page How to repair your laptop Next Page How to fix a larger laptop