How to build a router based on Linux
Turn your trusty Linux box into the world's most flexible router
Click 'Next' and you'll be asked which network mode you want to configure. Which you choose will depend on how you want to use your new router.
The best option here is Gateway Mode, but this won't appear unless you have two network adaptors installed - one connected to the internet and the other to your LAN. If you'd rather experiment with ClearOS as a server, choose one of the two other options.
After selecting Gateway Mode, you need to tell the wizard which adaptor is which. The installer makes a pretty good guess at this, marking one adaptor as External and the other as LAN, but you can change the assignment if it's wrong using the 'Edit' button.
The next question asks for a DNS, and we'd recommend entering the IP address of either your ISP, Google (8.8.8.8) or OpenDNS (208.67.222.222). After this, make sure the free community edition is selected and click 'Next' to download and install any critical updates.
Marketplace
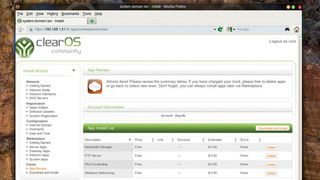
One of the best things about ClearOS is a package manager it calls the Marketplace, and the next step of the installation is to create an account to access this. You'll be asked for an email address, and be instructed to register your system with your new credentials.
You'll now be asked a couple of questions about domain names for your connection. If this is a home connection, you might not have one. We'd recommend using a free dynamic DNS service to get yourself one. Otherwise, you can always use a made-up name or the default values as a temporary fix.
We can now start installing applications. To start with, we'd recommend selecting the Windows file server, the bandwidth manager, port forwarding and the FTP server, but you can always come back at a later time and install more applications.
Get daily insight, inspiration and deals in your inbox
Sign up for breaking news, reviews, opinion, top tech deals, and more.
After making your selection, click on the 'Download and install' button. This will automatically grab and install all the packages you've selected. A few minutes later, depending on the speed of your connection, you'll be presented with the ClearOS dashboard and you'll be able to start using your new gateway.
Firewall
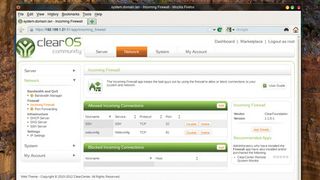
A gateway with a firewall acts as a permissive barrier between two networks. In our case, that's between the internet and your local network. It's a necessary precaution because the internet is saturated with systems that constantly bombard every connection with random requests directed at ports with known vulnerabilities. Most of these vulnerabilities are found on non-updated versions of Windows, but they can also be found within almost any network-facing service, such as a web server or file server.
Within ClearOS, the firewall can be configured by clicking on the 'Network' menu on the left or top of the dashboard, followed by 'Incoming Firewall'. By default, there should already be a single defined rule called webconfig. This allows port 81 on the oncoming connection, which is the port you need to access the ClearOS web interface.
This rule means you can configure your gateway from the internet, and if you don't want this facility, click on 'disable' for the rule. To add your own rule, click 'Add'. You don't need to memorise most port numbers because the Add interface includes a list of the most common services. Select 'SSH', for example, and then click on 'Add' again. The rule list will now include SSH running on port 22, which is its default port.
If you need to add custom ports for your own services (or games) this can be done from the same interface.
ClearOS does run an SSH server, which is all you need if you want command-line access, but you may also want command line access to another machine in your network. To do this, you'll need to use port forwarding. This takes an incoming connection on one port - 22 in the case of SSH - and maps this to a different port on either a local machine, or another machine within your LAN.
