# samba-tool testparm --verbose --suppressprompt | grep "ntp signd socket directory"
ntp signd socket directory = /var/lib/ samba/ntp_signd
Samba creates the socket directory, but it is very important to ensure that it is writable by ntpd. If ntpd runs with a uid:gid of ntp:ntp then you should change the directory's group to ntp also. Restart ntpd to ensure any configuration changes are picked up, and then check its log file for a warning that ntpd was configured without the --enable-ntp-signd compile-time configuration option.
If you do see that warning, then your ntpd does not support the required authentication mechanism. You will need to obtain the sources for ntpd and rebuild it to include the aforementioned compile-time configuration option.
Unfortunately, there is no tool to test NTP authentication from Linux. To test it from a Windows computer that is a domain member, open a command prompt window as the Administrator (click the Start button, type cmd and then right-click the command prompt entry in the search results to select Run as administrator) and enter
C:\> w32tm /resync
Sending resync command to local computer
The command completed successfully.
Before connecting a Windows client to the new domain, change its network configuration so that it uses Samba's DNS. Also, it is a good idea to manually adjust the client's clock so that it is within a few seconds of the domain controller.
If their clocks aren't synchronised, errors may be reported that bear no relationship to the real problem. The Windows time service will keep the clocks synchronised once the client becomes a domain member.
Get daily insight, inspiration and deals in your inbox
Sign up for breaking news, reviews, opinion, top tech deals, and more.
To add the client to the domain, go to Start > Computer > Right-Click > Properties -> Change settings. This will display the Computer Name/Domain Changes dialogue, where you should select Domain in the Member Of section and enter the Samba domain name (eg, mydomain) before pressing OK. This should request the administrator account credentials (the username is Administrator and password is 'Pa$w0rd' if you've followed our example settings).
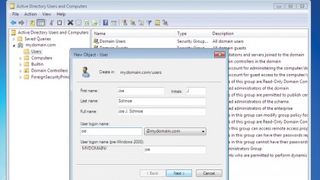
Domain administration can be performed locally on the server using the samba-tool command line utility, or remotely from a Windows computer connected to the domain. An administrator, using a suitably configured PC can run the Active Directory Users and Computers tool. This offers full control over users and computers, and functions exactly the same as if it were administering Microsoft's Active Directory.
Adding users to AD is done differently from classic Samba (which uses smbpasswd), but it's more flexible because it can be done from a server command prompt using samba-tool or remotely from Windows with Active Directory Users and Computers.

When AD users are created, they are unrelated to existing users in /etc/passwd because they are given different uid numbers. The assigned uid can be changed, and it is quite straightforward to do so:
# wbinfo --name-to-sid myuser
S-1-5-21-4099219672-1275272411-291422405- 1104 SID_USER (1)
# ldbedit -H idmap.ldb cn=S-1-5-21- 4099219672-1275272411-291422405-1104
This allows you to edit an entry from Samba's ID mapping database using your default editor so that you can change the user's uid (the location of idmap.ldb depends on your installation, but will be something like /var/lib/ samba/private or /usr/local/samba/private):
0 # editing 1 records
1 # record 1
2 dn: CN=S-1-5-21-4099219672-1275272411- 291422405-1105
3 cn: S-1-5-21-4099219672-1275272411- 291422405-1105
4 objectClass: sidMap
5 objectSid:: AQUAAAAAAAUVAAAA2CB V9NscA0zFwF4RUQQAAA==
6 type: ID_TYPE_BOTH
7 xidNumber: 3000020
8 distinguishedName: CN=S-1-5-21- 4099219672-1275272411-291422405-1105
The value to change is xidNumber, which can be changed to the user's correct uid. The changes will be saved to the database when the edit session is exited.
Setting up file shares can be done in a similar way to classic Samba by adding relevant blocks to smb.conf. You can share [homes], as with classic Samba, but you can go a step further and offer roaming profiles with a [profiles] share:
[profiles]
comment = Roaming Profiles
path = /var/lib/samba/profiles
writable = yes
browsable = no
To configure a user with a roaming profile, use the Active Directory Users and Computers tool to edit the user's settings, and set their profile path to \\mydomain\ profiles\%USERNAME%. Following this, the user's profile will be copied between the local disk and the Profiles area on the server when they log in to and out of any client on the domain.
Whatever your needs, from basic file sharing through to a complete Active Directory environment, Samba 4 offers a viable opensource alternative to otherwise expensive proprietry alternatives.


