Guide: Email tips and tricks for Note II power users
How to own your email life on the GALAXY Note II
Dig a little deeper and you can change how many lines of preview text accompany each email, choose whether your title line shows either the sender or subject and tweak handy settings like ring volume.
Split screen
Another unquestionable highlight that can be toggled in the settings menu is split screen mode. On by default, the mode allows for a split screen view when you flip your Note II into landscape orientation.
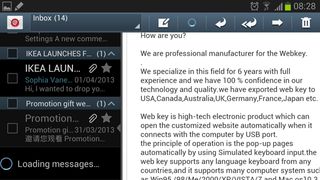
On the left side are all your messages, while on the right, a message's body copy.
In addition to being incredibly useful, the view really maximises what you get from the 5.5-inch HD Super AMOLED display.
Setting up your email
What good is all this technology if the set-up screen confuses you and you never open the app again?
Get daily insight, inspiration and deals in your inbox
Sign up for breaking news, reviews, opinion, top tech deals, and more.
Luckily, despite mail clients' nasty reputations for being laborious to set up in general, Samsung makes its app a doddle.
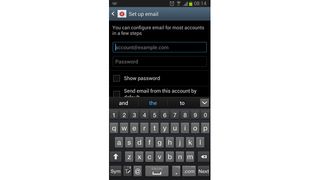
Open up the application and you're immediately prompted to enter an email address and password. Provided you're using a popular mail service such as those mentioned earlier (Gmail, MSN Live mail, Mail for Exchange or Yahoo Mail to name a few), the Note II will set everything up automatically.
It's worth noting, if setting up your Note II's Samsung Mail app up with the same Gmail account your native Gmail app is synced to, it would be worth disabling email in the native Gmail application so you avoid two notifications for every email. Which, after a very short while, becomes very annoying indeed!
How? Open up your Note II's settings, scroll down to the 'Accounts' section and tap 'Google'. Here you can uncheck the checkbox next to Gmail to stop you emails doubling up.
Setting up the Note II Mail app with Google Apps
If you're using Google Apps for work, then set up is a little bit different.
You'll need to enter your email address and password, then tap manual settings when you start up the client for the first time and you'll be prompted to select your mail type. Choose IMAP. The next screen will require you enter a couple of fields.
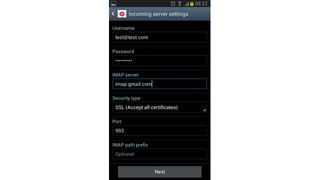
Under username, enter your email address. Your password should be your corresponding password, and the IMAP server address will be "imap.gmail.com".
Change the Security type to "SSL (Accept all certificates)" and press done.
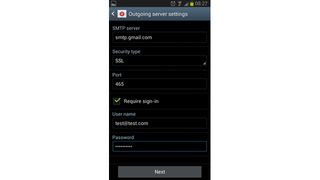
Finally, you'll be prompted to enter your outgoing mail settings. Make sure your username is the same email address as that entered prior and the password corresponds. Under the field SMTP server, input "smtp.gmail.com", and once again, change the Security type to "SSL (Accept all certificates)" and press done.
Setting up the Note II Mail app with other providers
If you have a service provider not mentioned, they will be able to provide you with the details to manually set-up your mail account with your Note II.
The process will be no more complicated that that outlined above, and as we've made pretty clear, the perks of using the stock app are abundant.
So whether it's the smart Motion features, Air View, split screen viewing or the Note II's ability to display a unified inbox, hopefully this guide has helped you better understand your Note II's mail client and give you everything you need to.
----------
Also check out on Your Mobile Life:
VIDEO: A Beginner's Guide to the Samsung GALAXY Note II
Living with the Samsung Galaxy Note II
Writers, designers and gamers: how the Note II brings innovation to the smartphone space
