How to transfer files between your Mac and your iPhone
Syncing made easy
01. Sync files
For online sync-based backups, SugarSync betters Dropbox. However, to get some files onto your iPhone (or make it so you can later access them), Dropbox is a great free solution. To start, download the Mac client from www.dropbox.com, install and launch.
In the setup dialog, create an account or input your account details. If creating a new account, select the free 2GB plan. Your Home folder should now contain a Dropbox folder. Copy to it files you'd like to share. The menu bar extra shows when uploading is complete.
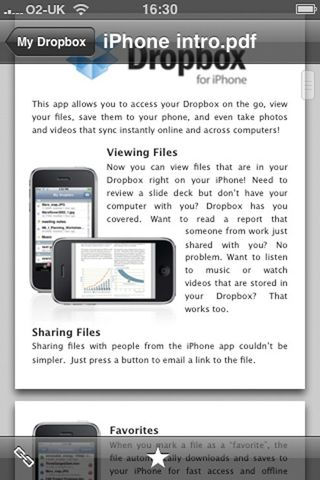
Install the free Dropbox app on your iPhone and input your Dropbox account details. Tap My Dropbox to display a list of the files you copied earlier. To view a file, tap it — Dropbox supports Office and iWork files, PDFs and images.
Unlike Dropbox for the Mac, the iPhone app doesn't automatically download synchronised files — to store something permanently for offline use, view it and tap the star icon to define it as a favourite, which can later be accessed via the Favourites toolbar button.
02. Copy and preview documents
For a more Finder-like experience, try Air Sharing. It comes in two flavours — Air Sharing (often on sale, dropping from its regular £2.99 price to £1.19) and the more feature-rich Air Sharing Pro (£5.99). A comparison chart is available at http://avatron.com/apps.
Get daily insight, inspiration and deals in your inbox
Sign up for breaking news, reviews, opinion, top tech deals, and more.
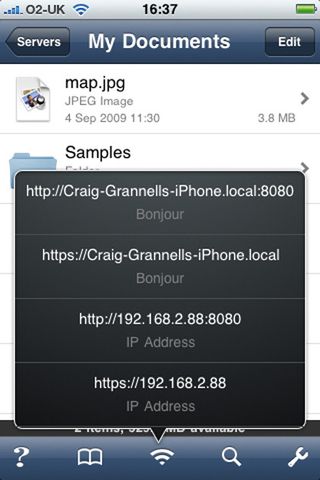
After installing Air Sharing, tap the toolbar's wireless icon to see IP and Bonjour addresses you can use to connect to the app. In Finder, go to Go > Connect to Server (Command+K), type one of the aforementioned addresses in the Server Address field and click Connect.
Select the item that appears in Finder's sidebar (under Sharing) to access Air Sharing's storage area. You can create folders and copy files to your iPhone (or back to your Mac).
In Air Sharing, your folder structure will be preserved, displayed by default in a view akin to Finder's list view (but without expandable folders). Air Sharing's settings also offer an icon view option.
Like Dropbox, items can be selected to preview them. The Pro version adds bookmarks and file actions.
03. Copy and read PDFs
For PDFs use GoodReader, which comes in a 59p 'pro' version or a free app that stores only five files (see here for more info). Launch the app and tap the connection button at the bottom left to see IP and Bonjour addresses.
Files and folders added in Finder are accessed via My Documents on the app's home screen. Open documents are displayed full-screen; to access the interface, tap the screen's centre.
There's also a Web Downloads option for importing PDFs from MobileMe, Google Docs and Dropbox.
04. Share clipboard data
Pastebot (£1.79) shares clipboards rather than files. Install Pastebot on your iPhone and the free Pastebot Sync from here.
In Pastebot, go to Dashboard, then Settings, then Sync and you'll see a four-digit code. Type that into Pastebot Sync on your Mac, drag the slider to On and you're all set. When your iPhone's running Pastebot, Pastebot Sync's menu item turns blue.
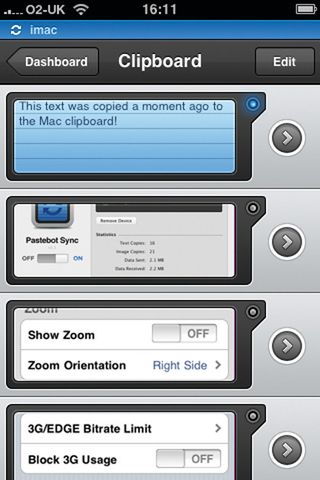
Similarly, when Pastebot Sync's active, Pastebot displays your Mac's ID. Now for the fun part. On your Mac, copy some text to the clipboard. Within a second or so, it'll be added to Pastebot's clipboard. The reverse is also possible — take a photo, open the Photos app, tap-hold your photo in Photo Roll.
Select Copy, then open Pastebot. Your copied photo will be automatically pasted as the newest item. On your Mac, switch to Finder and click the Desktop. In Pastebot, hold the image until you hear a click — it'll appear as a time-stamped file on your desktop.
Alternatively, open Preview, hold the image in Pastebot and use File > New from Clipboard to open the photo you took on your iPhone. Text can also be transferred to Mac text editors in the same way.
- 1
- 2
Current page: How to Share data with your iPhone
Prev Page Transfer files between Mac and iPhone