Instagram on iOS: the complete guide
Everything you need to know about the photo-sharing app
Follow your friends

The setup process should ask you to find Instagram-using friends from Facebook, Twitter, or even just from your Contacts list, but if you skip this, or want to do it later, just tap the right-most button in the toolbar along the bottom of the screen, tap the cog that appears at the top right, and then tap Find & Invite Friends. (Alternatively, of course, tweet or post a status inviting your friends to tell you if they're using Instagram, and what their username is; you can search for specific usernames from the explore tab - tap the second button in the toolbar.)
Like and comment
Let's imagine that you've followed a couple of friends and suggested users, and you've found a photo you like. You can give it the electronic thumbs up either by tapping the Like button beneath it, or by double-tapping the photo. You can also leave a comment - tap the Comment button - or tweet the photo by tapping the button with three dots to the right, and then tapping Tweet. In iOS 5 or later, a standard tweet sheet opens up so you can write your message and choose which account to send it from.
Post a photo

Okay, let's get you posting a photo; we'll just cover the basics here. Tap the blue icon in the middle of the toolbar at the bottom of the screen. If you want to upload a photo you took earlier, tap the overlapping rectangles icon at the bottom left. Otherwise, frame the shot with your camera and tap the shutter icon. Experiment with filters, and once you're happy, tap the big green checkmark, enter a caption if you like, and share your photo with the world!
Take Instagram further
If you've already mastered the basics of following friends on Instagram, liking and commenting on their photos, and uploading a photo yourself, you're ready to move on to the next level. Here, we'll share some more advanced tips and techniques not only to make your photos look impressive, but also to help you get the most from the Instagram community.
Using Instagram's selective blur

Once you've snapped or selected a photo from your library, you're taken to the editing screen where you can apply filters and borders, and rotate photos that are at the wrong angle. But there's a terrific creative option here too; tap the little water droplet icon in the top toolbar and you'll get two options for blurring parts of your image, plus an 'x' icon to clear the effect if you decide you don't like it.
Whether you tap the circle (which creates a circular focal point) or line (which leaves a strip of the photo in focus and blurs everything either side of it), both work in the same way. By default, Instagram keeps whatever's in the centre of the photo in focus, and blurs everything else.
You can tap anywhere you like on the picture to move the focus point, but the real creative control comes when you hold two fingers on the image. Now, not only can you reposition the focal point, you can also resize it live too, by pinching and unpinching your fingers. Once you release your fingers, the blur is applied, but you can still tweak it by putting your fingers back on the screen.
Get daily insight, inspiration and deals in your inbox
Sign up for breaking news, reviews, opinion, top tech deals, and more.
Used well, this feature can really help draw the eye to a part of your photo, or help simulate bokeh, a more exaggerated depth of field effect than your iOS device's camera is capable of, but there's one other trick worth exploring with it.
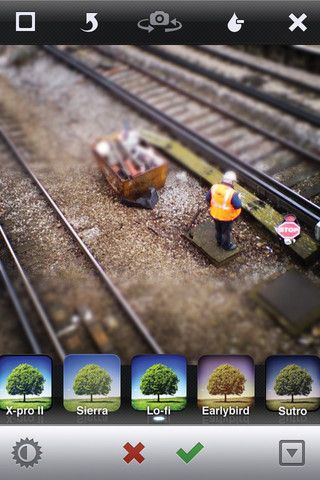
Because we're used to seeing photos of model sets in which the limitations of the camera blur the foreground and background, if we force this effect onto a photo of real life using a technique called tilt-shift, it looks like it was taken of a model. The effect works best with photos taken from above, as would be the case with models. Apply Instagram's linear blur horizontally, and enhance the effect by adding the Lo-fi filter.
