Encoding photos

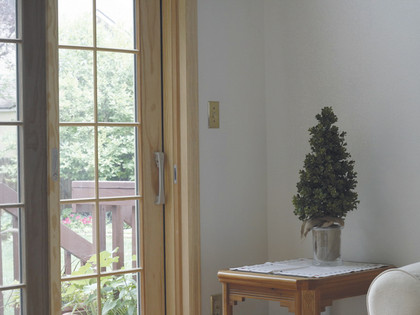
NORMAL EXPOSURE: Our scene normally exposed
Without getting bogged down in compression details, image formats and so on, traditional images (like an individual photo from our set of three) encodes colour information for each pixel as a set of three bytes, one for red, one for green and one for blue. Each colour channel for each pixel can therefore represent 256 different levels, and the pixel itself can be defined as a single 24-bit value.
An HDR image is different. In a simple sense, it encodes more bits per colour channel per pixel than a standard image, but that's not the entire story. To understand why, we need to understand what's meant by 'gamma correction'.

OVER-EXPOSED: Our scene over exposed. Notice the difference in colour tones to the normal exposure
Gamma defines the difference between a pixel's colour values and how bright it is actually perceived (its luminance). For a camera, if you double the amount of light on a sensor's pixel, a value twice the original is detected – the relationship between a pixel's value and its luminance is linear.
This linear relationship doesn't apply for our eyes. When we increase luminance at low light levels, we perceive a larger increase in light. At higher light levels, we don't perceive increases in luminance as well. Our eyes are more sensitive to changes in dark tones than changes in light tones.
Accounting for this difference is known as gamma correction. A camera will apply gamma correction to an image before it saves it as a JPG file. It's the same with image processing applications that work with RAW image files, when you save an image as a JPG. In other words, instead of encoding the values of the pixels reported by the sensor, it will apply a gamma correction (the industry standard value is 1/2.2) first.
Get daily insight, inspiration and deals in your inbox
Sign up for breaking news, reviews, opinion, top tech deals, and more.
Instead of recording the real values of the pixel colours, it will encode them as colour tones that we perceive as varying uniformly. In effect, the code that saves an image as a JPG file uses more bits to encode darker colours than lighter ones.
When you view such a gamma-encoded JPG on your screen, the screen software will apply the reverse gamma correction (a gamma of 2.2 usually) so that the image you see is roughly the same as the original scene. Lighter shades will have less variation than darker shades, though.

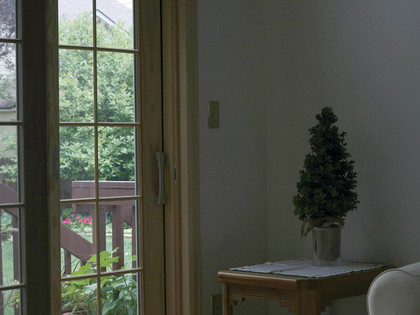
UNDER-EXPOSED: Again, notice the differences in colour between this and the first two shots
Notice also that merging three JPGs to produce an HDR image would necessitate that the gamma correction be reversed before the merge. JPG is already a lossy compression algorithm (we're losing image information when the camera creates a JPG, smearing out high-variation regions of the image), which means that our three differently-exposed photos should all be in RAW format.
Now back to the HDR image. It converts colours as tones using the gamma correction just discussed (so darker tones have more shades) and encodes them as a floating point number, using either single precision (32-bit) or double precision (64-bit). All three standard images are used in this conversion/encoding process, since each will have a different complementary set of tone information.
There's a lot of redundant information, so the most popular HDR format compresses the RGB tone data as three fixed point values, with an extra byte holding a common exponent.
Viewing the image

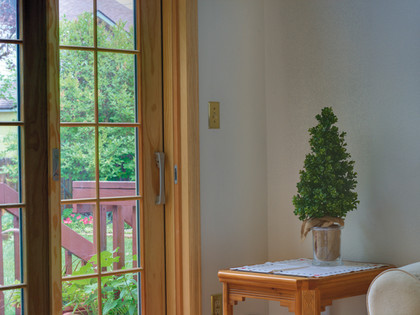
TONE-MAPPED HDR: And like magic, the final result shows more dynamic colours and contrast to the original photos
So now we have an HDR image whose tones are encoded in high fidelity using a special encoding scheme. To view it, however, we have to export it as a JPG again.
Because of the +/- 2 stops bracketing, the HDR image has a dynamic range of roughly 14 stops, which happens to be about as much as the eye can perceive, but we have to convert that wide dynamic range into the 10 stops of the screens we use.
We have to map the HDR tones into the range that can be displayed on a monitor. Since we're going to be removing information (or reducing the amount of data) in order to do this, tone mapping is a lossy one-way process. It also tends to be an interpretive process, much as dodging and burning was to the film photographers, requiring a good eye and attention to detail and lots of time tweaking and experimenting.
In any HDR image-processing application, there will be several knobs or sliders you can adjust to change the tone mapping, and thereby the look and feel of the finished low dynamic range image (sometimes known as LDR).
Some examples include exposure or brightness, gamma or contrast – sharpening tools that alter the local appearance of parts of the image. Some may come with presets that generate an LDR image according to the image style you want to show (Photomatix, the application I use, has a preset called Grunge and yes, the results are pretty grungy).
There are several tone-mapping algorithms that can process an HDR image to produce an LDR version (a hands-off algorithm), but it's a field that is being actively researched and is changing rapidly.
The biggest issue that automated algorithms have to solve is that tone mapping, by its very nature, reduces contrast (contrast is a difference in luminance: the higher the contrast, the greater the difference in luminance or tone). The earliest hands-off algorithms were global algorithms that acted on the image as a whole.
An example of global tone mapping is to take the tone (or luminance) information and scale it linearly to the required range. Luminance is a value on an exponential scale (each increase of one stop doubles the brightness), so the linear scaling is usually done on the logarithm of the tone values. The problem with this was that it paid no attention to areas within the image with local high contrast.
Other algorithms attempt to take into consideration regions of the image that have wide variations in contrast. The algorithms use a range of methods to generate an LDR image as a multi-pass process. Some, for example, tone map most of the image one way, then map the localised high-variation regions using another method to maintain contrast.
As you can see, the problem of HDR image processing hasn't been completely solved yet. Nevertheless, it's fast becoming an accepted way to process images with high contrast, and can produce some stunning photographs.