10 cool iMovie effects to make your videos sparkle
Dolly zoom and steadycam effects, cutting to music and more
7. Perform a split edit
You can cut video to another shot, but how do you let audio carry on?
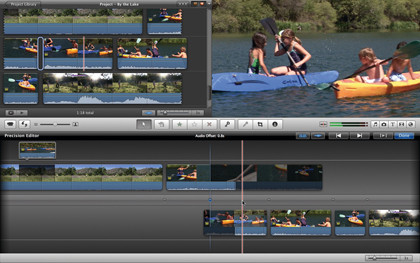
When you cut a clip and insert another in iMovie, its audio is cut at the same time. But if you watch any movie, you'll notice that this isn't what usually happens: a scene between two people takes place, the action cuts between a shot of one to another before the first person has finished speaking, yet you can still hear them. This is known as a split edit.
It is used extensively throughout the industry and is a great way to improve a shot. It offers immense flexibility since you get to use the audio that works best for your current situation.
Split edits are obviously easy to achieve with professional editing suites, but how would you manage with a consumer-level program? If you were working with the original iMovie, you'd be out of luck. Even with a version as recent as the one released in 2009, you'd have to create complicated workarounds like detaching the audio and extending it, leading to potential disaster should that audio track move out of sync with the video it came from.
That option is still available in iMovie '11, but thankfully, the latest version also introduced many very powerful audio features (some of which had been missing since iMovie 6 HD). These include being able to see a clip's audio waveforms, alter just a segment of it and even see at a glance which part could be peaking and lead to distorted sound, making it easier to fix, or cut out of your project. Another addition is the split edit and we'll show you how it's a lot easier to achieve than it appears.
How to create a split edit effect
1. The Precision Editor
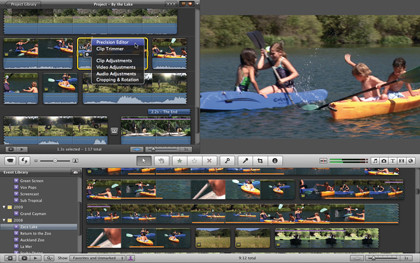
Find a clip in your project whose audio you'd like to extend and mouse over its thumbnail. You'll see a button appear lower left of it. Click on it and select the first option: Precision Editor. The lower part of the interface is replaced with a more zoomed-in version of your clips and their edit points.
Get daily insight, inspiration and deals in your inbox
Sign up for breaking news, reviews, opinion, top tech deals, and more.
2. See waveforms
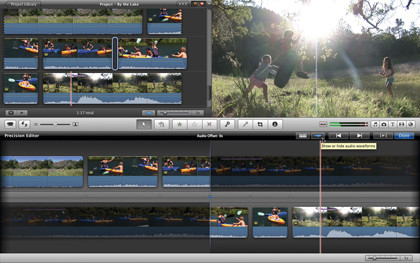
By default, you'll only see the video clip. Just like the project section, you can zoom in or out of it with the slider, bottom-right of the section. If you want to see the clip's audio track, you need to click on the Show Audio Waveform button, top-right of the interface.
3. Create the split edit
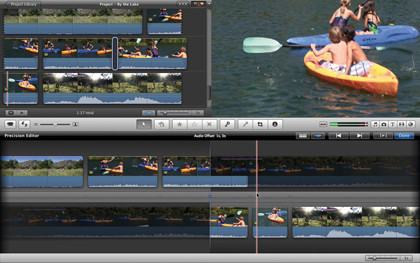
Move the cursor to the edit point's blue line and make sure it's over the audio waveform, not the video. Now drag to the right to extend the audio but leave the video exactly where it was. You can do the same for the clip beneath it so you don't hear two audio tracks at the same time.
8. Split the screen in a clip
Create the effect for more than one image on the screen at the same time
Generally, the screen is the viewer's window into the film's world and it behaves like human eyes: you see one image at a time. But film can be a lot more flexible than that. You can in fact be more creative and see more than one image at the same time, each battling for your attention or complementing each other.
The most traditional reason to have two images side by side is for telephone conversations so you can see both people talking and more crucially, their reaction to what they're hearing. But you can also work with a smaller image, tucked away in the corner of the screen to create an observer of the larger action, for instance. You could also find a creative way to make both images interact with one another.
iMovie's interface appears to be designed to only handle a single layer of video and you can only put one clip before or after another. But it is possible to create both of the effects described above without you having to purchase a more expensive application – although you'll have to make sure the Advanced Tools are turned on (they aren't by default).
How to create the split screen effect
1. Picture in Picture
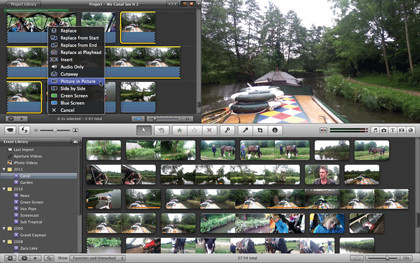
Drag a clip from an Event onto one already in your project (it doesn't matter which since you can move it around later). With your Advanced Tools switched on, a large menu will pop up. Select Picture in Picture from the contextual menu and your new clip will appear above the current one.
2. Move and resize
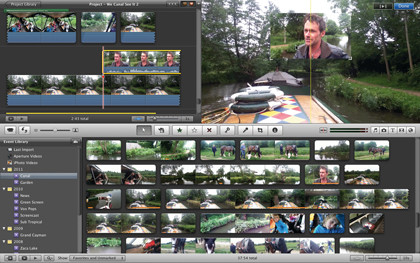
Check the preview section and you should now see a smaller clip top-right of the main image. You can actually move it around to wherever you please with a simple click and drag. Also, if you drag one of its corners, you can resize the smaller picture until it's the dimension you're after.
3. Inspector options
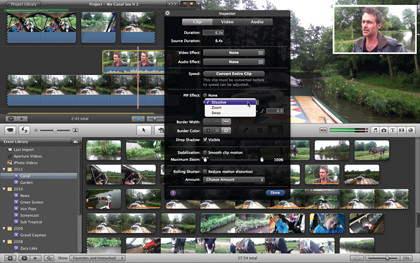
Double-click it to open the Inspector. From there, you can add a border around your smaller clip with a limited choice of thickness and colours. You can also turn the shadow on and off by clicking the appropriate tick box. The PIP Effect section offers you three ways to make the clip appear on screen.
4. Side by Side
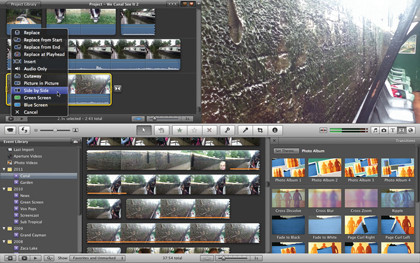
You could alter the smaller clip until it's the same size as the one beneath it, but you can't place it side by side. To do this, you need to use a different tool. Drag another clip from an Event onto one in your project. This time you should choose Side by Side from the contextual menu.
5. More Inspector options
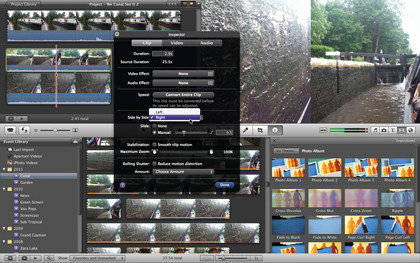
Double-click on the new clip to open the Inspector window. The options you're looking for are in the Side by Side section. You can choose which side of the image it will be placed, and whether you'd like it to slide into view instead of just appearing out of nowhere.
6. Cropping makes perfect
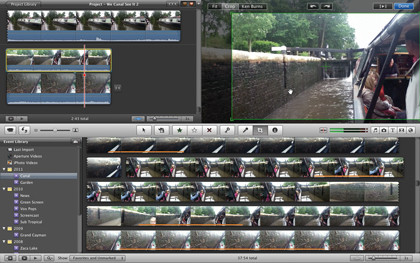
iMovie cuts your clip in half for you, focusing on the middle of the image. This may not be ideal; so if you do need the effect to preserve another part of the video, you have to use the Crop tool and experiment with the best section to use (you may also find a Ken Burns effect useful too).
9. Create a movie trailer
Announce your forthcoming film in style using iMovie's trailer factory
Once you've created a short film and put all your hard work into it, you need to build anticipation for your family blockbuster. After all, it's a very well ingrained tradition to create one (or more) trailers to lead the way for your film… although no one's ever truly explained why they're called trailers – aren't trailers supposed to trail, not lead?
In any case, creating a trailer is an art in itself. You have to: pick the right music; select the appropriate clips; and not show too much otherwise there's no reason to see the actual movie, but reveal enough to make people look forward to it and get excited about the story.
You'll be pleased to know that you don't actually need to think too much about this: iMovie '11 comes with its own trailer-making factory: just add the clips in place, type in some information and you're good to go.
A lot of the technology behind trailer creation in iMovie centres on the program's ability to recognise if and how many people are in each shot. Without this facility, making such projects wouldn't be as fun, or as fast – as you'll see…
How to put together a movie trailer
1. Trailer selection

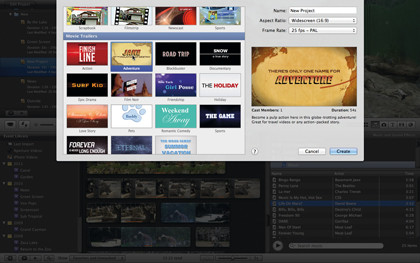
Start by creating a new project: use the Command+n keyboard shortcut. Scroll down past the usual project themes to the Movie Trailers section. You can choose from one of 15 different types. If you're not sure which one to go for, click on it and see a sample, complete with theme music.
2. Type in the details
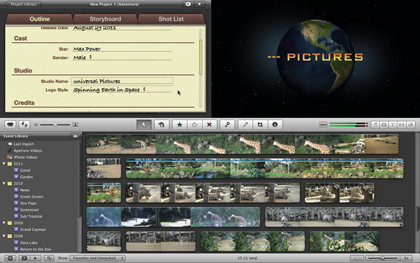
The project area takes on an entirely new look and presents you with an outline of your trailer. Fill in all the information requested. The logo style is a choice of five recognisable Hollywood production studios – but don't try using that studio's actual name: iMovie won't let you.
3. Storyboard titles
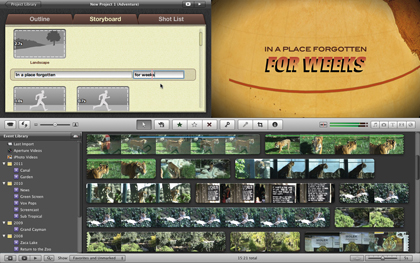
Switch to the Storyboard section (the middle tab) where you'll see the building blocks of your movie, along with placeholder images and generic titles. Click on those titles to customise them (skim through them to see what they'll look like in the preview section; they are played in real time).
4. The Keyword panel
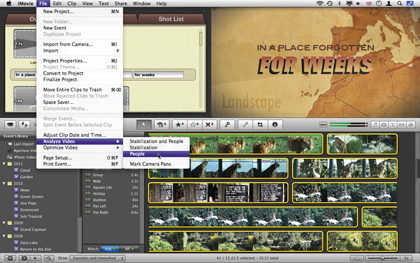
The Advanced Tools have to be turned on for this next step. In order to fill in those placeholder clips quickly, go to Window > Show Keyword Filter to open a panel to the left of the Event thumbnails. If no keywords are present, you'll also need to select your clips and go to File > Analyse Video > People.
5. Filter to fill
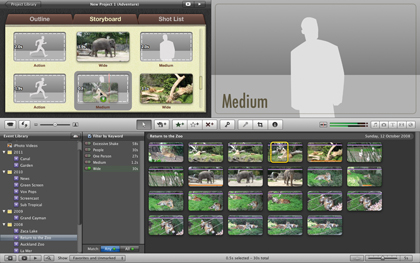
You'll see filters for Wide, Medium and Close-up shots, along with others with one, two or more people in the frame. Click on one of those filters to see all the clips matching that category. You can then drag the appropriate clip onto the right placeholder in your storyboard.
6. The Shot List
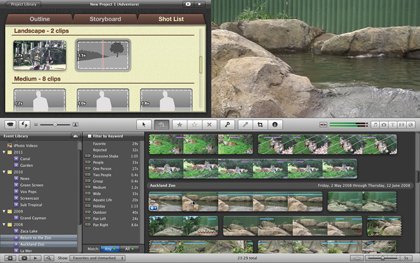
If you're getting lost, go to the Shot List tab. All the clips you need to find are there, listed by time. You can fill them up really fast: select the first one, then click on a clip to replace the placeholder instantly. The next placeholder is automatically selected. Repeat the process until none are left.
10. Cut in time to music
Create an effective montage or opening sequence in time to the music
Music is an essential part of any movie, as it helps set the mood for a scene. An opening sequence would be a lot less interesting and montages would just be a bland assortment of clips without any musical score to underpin them. Who can forget Soylent Green's musical opening montage, or the soundtrack that introduces Rocky?
Like these, the best examples of such sequences are those that are designed to work in time to the accompanying audio track. Trying to replicate such segments may be simple with a high-end video editing programme, but there's no obvious way to achieve this with iMovie; unless of course you reveal the audio's waveform in your project and manually trim each clip you're adding to match a particular peak, which would be an incredibly time-consuming and frustrating exercise.
Thankfully, hidden inside the Clip Trimmer is a way of doing this effortlessly. You'll see that anybody now has the means of editing any sequence in time to any musical track of their choosing. It really is only a matter of hitting the right key just at the right time.
How to cut your video to music
1. Music selection
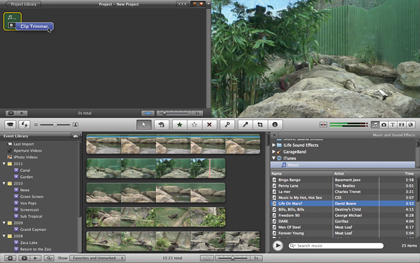
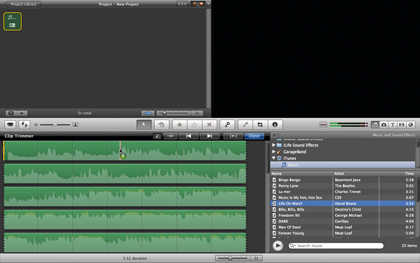
Start with a brand new project. Go to Window > Music and Sound Effects to bring up the section, bottom-right of the interface. Find a song you'd like to use and drag it onto the empty project. All you'll see is a small green square with a cog wheel button. Click on that button and choose Clip Trimmer.
2. The musical note

The Clip Trimmer will appear in the area where your Events usually show; it displays the entire song's waveform over multiple lines. Top-right of the section is a series of icons. You can drag the musical note over your track to place a marker if you like, but that's not a very efficient method.
3. Add markers
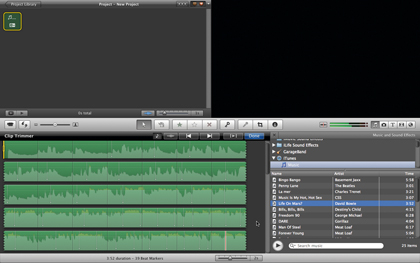
Instead, start playing your song and each time you wish to add a marker (a point where you'll want to cut to another clip in time to the music), hit the m key. Don't worry if you're not very accurate: you can drag those white markers around until their position is perfect. Once finished, click Done.
4. Snap to Beat
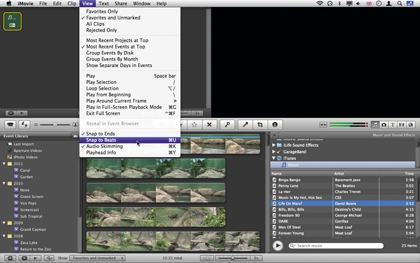
Before you start editing your sequence, there's one more setting you need to turn on: iMovie needs to realise that those markers are important (it will curiously ignore them by default). In order to do this, make sure View > Snap to Beat has a tick next to it. If it hasn't, click on it to activate that feature.
5. Add clips
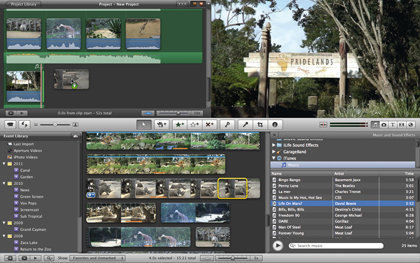
Your project doesn't look any different, but that's all about to change: choose a clip but don't worry about your selection's duration – just make sure it starts where you want it then drag it over your project: it'll be cut as soon as it reaches the first marker. Add more clips to build your edit.
6. Mute 'em
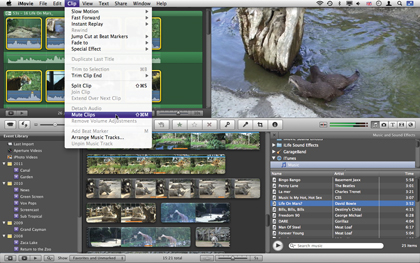
A sequence built in time to music often works best when no other audio can be heard, but montages involve many clips and it would be time consuming to mute each one individually. Thankfully, there's a faster way: Go to Edit > Select All, then Clip > Mute Clips to do it all in one go.
Steve has been writing about technology since 2003. Starting with Digital Creative Arts, he's since added his tech expertise at titles such as iCreate, MacFormat, MacWorld, MacLife, and TechRadar. His focus is on the creative arts, like website builders, image manipulation, and filmmaking software, but he hasn’t shied away from more business-oriented software either. He uses many of the apps he writes about in his personal and professional life. Steve loves how computers have enabled everyone to delve into creative possibilities, and is always delighted to share his knowledge, expertise, and experience with readers.
