Google Chrome for Linux tips and tricks

We devote a lot of time in Linux Format to the renowned "Internet Explorer slayer", Mozilla Firefox. Understandably so, especially when you consider that this browser is bundled by default with almost every Linux distro with a GUI.
At the time of writing, it had a global market share of around 30% across a variety of operating platforms. In short, it's the most widely used and best supported competitor to Internet Explorer and is completely native to the Linux environment.
However, everyone's favourite woodland animal is now coming across new competition from browsers based on an open source engine called WebKit. Originally created by Apple for the Safari browser, it offers numerous advantages, including reduced system overhead (which is why it sees use on several mobile devices).
Now Google has stepped into the ring with its Chrome browser, based on the same engine, and it's out of beta status, ported to Linux and gobbling up market share at an alarming rate. It's a browser we recommend you take at least a cursory glance at.
Just a few hailed advantages include its minimalist user interface, blistering speed and the built-in services you would typically need plug-ins for with competitors. Read on to discover how to make this browser even faster, get the most out of Chrome using little-known tips and tricks, and install extensions to boost your productivity and web experience.
Free and free-er
The first thing you'll notice while you're hunting around for the Google Chrome download is a lot of mentions of a browser called Chromium. This is the unbranded and BSD-licensed version of the browser, and is typically the one you would use for bleeding-edge features that haven't made it into Chrome yet.
Sign up for breaking news, reviews, opinion, top tech deals, and more.
Both browsers are compatible with the same extensions and are the same in almost every respect. You could use either to complete the steps in this tutorial, because we'll point out any differences between the two that may affect what you're doing.
Now that's cleared up, we can start improving the performance of both browsers, and the first tweak we recommend is ensuring that DNS pre-fetching is enabled. You can do this by clicking on the far-right icon on the same strip as the navigation bar and selecting Options. Ensure that 'Use DNS pre-fetching to improve page load performance' in the Under The Hood tab is checked to activate it.
This won't provide an instant boost, but as you continue to surf the web your overall page load times should slowly decrease. You can optionally disable malware and phishing protection from the same tab to further lower page load times, but we don't recommend this for the obvious reason that it reduces your in-browser security significantly.
The next step is to click on Content Settings under the same tab to open a new window containing various options. Here you can disable services you don't need, and provide exceptions to either block or allow sites through a particular rule.

If you're on an especially slow tethered mobile connection, you may wish to disable website pictures, in which case you need to click the Images tab and select the Radio button next to Do Not Show Any Images. You can add exceptions to this rule by clicking on Exceptions > Add and then in the window that appears you can type in an address and decide whether to block or allow the site.
Additionally, if you wish to block JavaScript or Java applets from sites you don't know in order to improve security and performance, then you can do so from the relevant tabs in the same window. Just like before, you can also add exceptions for particularly useful or troublesome sites.
From the Plugins tab, you can also enable or disable individual browser plugins, and you can also enable or disable Google Chrome's built-in pop-up blocking service from the Pop-ups tab.

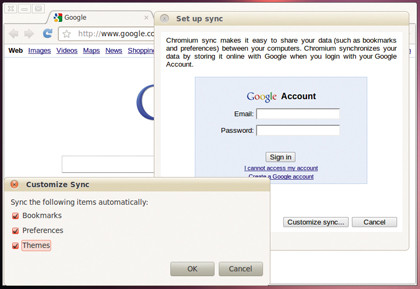
Another useful feature is Google Sync, and to set this up you'll need to click the Settings button, followed by Set Up Sync. Just type in your Google account details and, once validated, your bookmarks, preferences and themes will be synced between all instances of the Chrome or Chromium browser you're using.
If you want to clear some space on your hard disk or simply don't want people to be able to track your history, head to the Options area and the Under The Hood tab you were on before, and hit Content Settings. Here you can clear your stored web and download history, as well as any cached URLs and saved passwords, and delete cookies, site and forms data all in one click.
All you have to do is check the relevant boxes before doing so and your localised web history will be "obliterated" (to quote the program itself). Google will still store your URLs remotely, however, so you'll need to take further steps to remove web history (or use the Incognito Mode).