Developing for the iOS App Store is a no-brainer. If I said that a measly investment of £250 was enough to open up a market of 150 million consumers, the ears of any smart developer should prick up.
If I were to add that many of those consumers are Apple fans eager to part with their cash in an attempt to purchase software justifying the cost of their hardware, then you might well start to see why there are now 300,000 iPhone apps and 60,000 iPad apps two and a half years after the App Store launched.
The sheer size of the App Store is staggering, with more than twice as many apps available as all the competing stores combined.
In this article I want to help kick start your own development on the App Store, and I hope it's encouraging for you that I myself went from having zero apps to having 20 approved and on sale in the space of just over a year and a half. I haven't made enough money from them to retire, but they do provide a regular income - and it's an income that's only going to grow as Apple sells more hardware.
All you need to join in is an idea, a Mac (for coding), and this tutorial. Let's go!
Requirements
To make software for iOS devices - that's iPads, iPhones and iPod Touches - you need just one software package: the iOS SDK from Apple.
Get daily insight, inspiration and deals in your inbox
Sign up for breaking news, reviews, opinion, top tech deals, and more.
This comprises four major components: The Xcode development environment, in which you'll be writing all your code; Interface Builder, which is a drag-and-drop user interface design system; libraries and header files for writing your code in Objective C (the iPhone's native language); and the iOS Simulator, which lets you run a virtual iPhone or iPad on your Mac.
I should stress that this can only be done your Mac, because the iOS SDK isn't available for any other platform. In fact, you're pretty much limited to using Apple's hardware, software and development tools. This is why many people refer to iOS development as being as a 'walled garden' - Apple is very protective about who makes apps and what goes into the store.
The Mac requirement is a hurdle you can't really vault over, but I will say this: even if you're dedicated to Windows or Linux, a Mac is an excellent purchase. We rarely see more solid or reliable PCs.

SIMULATOR: You can test out your app on your desktop with the use of a simulator - should save you some money on an iOS device for testing
Anyway, if you plan to work only inside the simulator, you don't need to pay Apple any money for a test device or a developer account - you can go straight to http://developer.apple.com/ios and get access to the free tools.
If you later decide you've built an app you want to sell, you should pick up an iPod Touch for testing purposes (£180), then sign up for a commercial iOS account (£60). If your 59p app sells just 500 copies - if just 0.00033 per cent of iOS owners buy it - you've made your money back and everything else is profit.
Once you've created your account, you need to download the latest SDK. At the time of writing, that's Xcode 3.2.5 with iOS SDK 4.2. This package includes everything you need to make iPhone and iPad apps.
The installer is very simple: just click 'Next' until the copying process starts, then give it about 30 minutes to perform its magic and you're ready to get going.
Building your project
I'm not interested in teaching you theory here - I want to show you how to make a real project so that, if you want, you can extend it with your own customisations and make your own valuable addition to the App Store.
We're going to make a simple to-do list manager, building on some of the basic user interface elements that are common to iOS apps.
First, fire up Xcode - you should find it in the 'Developer | Applications' folder on your hard drive. A welcome screen should appear, but you can close that and choose 'New | New project' from the menu.
Apple includes seven application templates out of the box, but the one that's most useful to begin with (primarily because it comes with a fair amount of code written for you) is the navigation-based application. Choose that, then name it 'TaDaList' and save it to your desktop.
A navigation-based app gives you a UI similar to the Settings app - you get a title bar at the top and a table of options to choose from. Choosing any option will cause a new screen to pan in from the right. You can then go back to the previous screen by tapping a 'Back' button - it's all very intuitive and easy to learn.
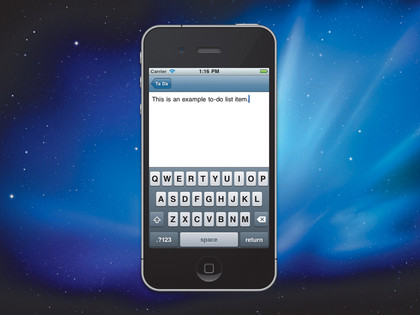
You can see the basic application template that Apple has created for you by pressing [Command]+[Y] to build and run your app in the simulator. You can see the Apple blue bar at the top (it's blank because we haven't typed anything in there yet), plus the table of information (again empty because we haven't told the app what should go there).
Define items

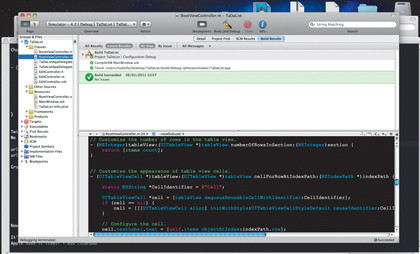
X-CODE: Xcode is your primary development environment for iPhone. Some people like it, most don't
Before we type any to-do list items into the table, we need to define what those items are and where they're stored.
First, think about what we need each to-do list item to be stored as, and how they might helpfully be stored as a group. You should come up with these two key points: Firstly, a to-do list item, like 'Feed the cat' or 'Take over the world', is just a string.
In Objective C, there are two types of string: 'NSString' and 'NSMutableString'. The only difference between the two is that the latter can be changed after it has been created.
Secondly, the collection of items is very simple: as they are added, we need to put them either at the beginning or end of our existing list. Users need to be able to read them in any order they please. This calls for a pretty standard array, although again there are two on offer - 'NSArray' and 'NSMutableArray'. Hopefully you can figure out the difference.
In this project, we'll be using the mutable versions of both of those classes. We need mutable strings because users need to be able to edit to-do entries, and the easiest way to do that is to let them edit the entries in place. We also need a mutable array, otherwise users wouldn't be able to add and remove items.
So, let's start with the array: we're going to use a very basic programming technique in Objective C called 'properties'. The syntax for these is a little verbose, so I recommend that you commit it all to muscle memory as quickly as possible.
Properties
Our to-do list items need to be stored in an NSMutableArray, and the correct way to create that NSMutableArray is with a property. This is a little bit of Objective C syntactic sugar that means 'When I try to get the value, run this method, but when I try to set the value, run this method instead.' It's all about the methods, as opposed to setting values directly.
Having to write two methods to get and set each value is clearly an annoyance, so Objective C has special syntax that can generate those methods for us when the code is compiled. If you ever choose to write your own, just tell it to stop auto-generating the methods that you want to replace - easy.
First things first, we need to tell Objective C that we want an NSMutableArray for our items. In 'RootViewController.h' - the definition file for our main table view - modify the definition of the class to be as follows:
@interface RootViewController :
UITableViewController {
NSMutableArray *items;
}
@property (nonatomic, retain)
NSMutableArray *items;
@end
At first, that probably looks like we're declaring the 'items' array twice, but there's a difference: the first declaration makes the variable so that it can be used anywhere inside the class, but the second declaration turns it into a property so that it can be used anywhere in our code.
What's more, the keyword 'retain' tells Objective C that if it generates the code for us, it should make sure and keep the object alive until we say otherwise.
I say "if it generates the code", because that's still to come - change to the 'RootViewController.m' file and put this line of code immediately beneath '@implementation RootViewController':
@synthesize items;
That's the bit that makes the code generation happen - with that single line, Objective C will turn our '@property' into two methods, both doing memory management for us automatically.
There's one last piece, though: using 'retain' keeps the 'items' object alive until we say otherwise. If you never say otherwise, that memory is never freed up - even if you can't access it any more. As a result, you should always free memory that you've retained, so scroll to the bottom of the 'RootViewController.m' file and look for the 'dealloc' method. Change it to read as follows:
- (void)dealloc {
[items release];
[super dealloc]; }
Sending the 'release' message to an object - which is what this code does - has the effect in this example of freeing the memory. It's actually a little more complicated than that, but it works well enough for now.
Filling the table
Now that we have an items array declared, we can create some items and show them in the table. But first, we need to create the items array. And now, thanks to the amazing power of magazine telepathy, I can read your very thoughts: "Wait a minute… didn't we just write some code to do all that?"
Well, not quite. We wrote code to declare the variable so that it's available to use - now we need to use the thing.
Near the top of 'RootView Controller.m' the 'viewDidLoad' message has been commented out. Remove the '/*' and '*/' to uncomment it, then add this to it:
self.items = [NSMutableArray
arrayWithCapacity:10];
With that in place, our array is ready to be used. Scan down the file a little and look for the 'numberOfRowsInSection' method - that determines how many rows appear in the table in our UI.
How many? Easy - as many as we have items in the 'items' array. Right now, the default method implementation has 'return 0', meaning '0 rows'; change that to return the number of items in 'items':
return [items count];
Next, we need to change the way table rows are created so that they show the text of the correct to-do list item. As with the other methods, Apple's template already includes code to do most of this work - in fact, you just need to add one line that says 'set this row's text label to have whatever is in our items array at that position'.
About halfway down the 'RootViewController.m' file is the 'cellForRowAtIndexPath' method, and you should be able to see that it receives a parameter called 'indexPath' - that tells us which row we need to load. So, directly beneath the comment that reads 'configure the cell', add this:
cell.textLabel.text = [self.items
objectAtIndex:indexPath.row];
That uses the row's position as passed in 'indexPath' to look inside the 'items' array and assign the correct text to the table row. However, if you run the app it still doesn't do anything, even after all this code.
Fortunately, that's just a matter of us not having any items in the array, so we need to add a button to the navigation bar at the top that lets users add new items.