Linux backup: the complete guide
Data loss is inevitable. Backing yours up is prudent
MondoRescue
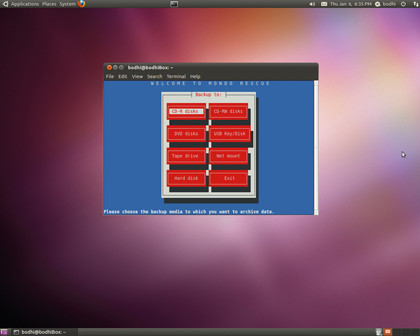
MondoRescue isn't your everyday backup program, but rather specialises in recovery after catastrophic data loss. It's ideal for backing up the core filesystem, say once a month. It can also be used to clone an installation on larger partitions.
While your distro might include MondoRescue in its repositories, it's best to grab packages for the app from ftp://ftp.mondorescue.org. You'll also need Mindi, Mondo's companion tool that packages backups into bootable distros, and mindi-busybox, which contains the tools Mindi needs.
When you're all set, launch MondoRescue as root with sudo mondoarchive You'll see the tool's crude-but-effective Ncurses-based interface. You're asked for your choice of backup medium, how much compression you'd like to use, and whether it should divide the backups to fit CDs or DVDs.
Then you'll be asked what to back up. By default, the app backs up everything under the root directory. MondoRescue can also back up Windows partitions if it detects them on your disk. You should let MondoRescue verify the archives it creates too - this takes time but is well worth it.
When it's ready to copy data, MondoRescue creates a catalogue of files, divides them into sets, then calls Mindi and finally begins backing up, which can take several hours. If you've asked MondoRescue to back up to a hard disk, when it's done you'll find one or several ISO images inside the directory you specified. Boot from the first image and enter compare at the boot prompt to check the archived copies against your filesystem.
At the end of the process, this prints the non-matching files. There might be some immediately after backing up, but these are often just cache files, which can be safely ignored. To format and restore all files, type nuke, or interactive.
Sign up for breaking news, reviews, opinion, top tech deals, and more.
If you're restoring to a blank hard disk, MondoRescue will also partition it and adjust the backed up partitions to suit. It'll also regenerate the bootloader, which you can then fine tune.
Tonido
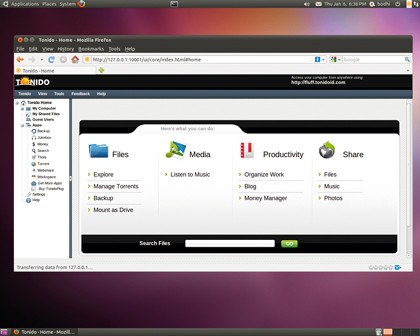
Back in LXF 122, we looked at a piece of software called Tonido to help you create your own personal cloud server. It's a wonderful tool for sharing your files over an internal network as well as the internet. It might not be open source, but it gets the job done without you having to mess with your router and firewall settings.
Tonido is available as a binary for both Deb and RPM-based distros, or you can download it from www.tonido.com.
The only bit of setting up it requires is a username, which becomes part of your tonido web address. So if you choose Fluffy as your user name, you can access your files from anywhere by pointing your browser at fluffy.tonodoid.com.
Note that your data is still stored on your computer, not external servers, and is simply served over the internet, which may help qualm any fears you have about the security of what you store.
Tonido also includes an application to back up data to a local disk or remote computer. To perform a backup, log into Tonido's web interface and click the Backup app. This then opens another interface that enables you to add and schedule backups. Click on the New button to add a new backup record.
The process involves selecting the device and the backup source and destination folders if you want to backup to a local disk. If you want to back up to a remote computer, you'll be presented with a list of peers. You can only back up to remote machines that are in your group.
Tonido identifies machines with their globally addressable peer ID. So you can back up to any machine on the internet, as long as it's in your group.
Once the backup is good to go, you can schedule it to run at periodic intervals, or run it manually. If you're particularly paranoid, you'll also be glad to know that Tonido encrypts data using AES encryption and transfers it directly from the source computer to the remote computer.
Tonido has many other features too. It enables you to collaborate, share, and sync files with others on the internet via Group Workspaces. To sync content through Tonido Groups, other users will need to have Tonido installed.
Since the software runs and functions the same way on both Windows and Mac OSX, however, you can share your data with them regardless of their chosen operating system.
How to make crash-proof discs
DVDisaster
Optical discs are the commonly preferred media for keeping backups. However, even when stored carefully, they'll go bad over time. One option is to make new copies of the backup discs. Depending on your backup catalogue, this could be an exhaustive and expensive exercise.
A better option is to use DVDisaster. The tool creates an error correction code (ECC) file from a healthy disk, which can be used later to recover data when the media is damaged.
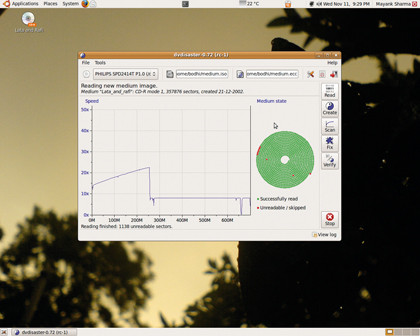
DVDisaster works on ISO images. To create one, insert the disc into the drive and launch DVDisaster after it's spun down. Now click on the Image File Selection icon, type in a name for the ISO image and select a directory for it to be stored in, then click the Read button. The app will read the disk sector by sector, then create the image as per the name and location you specified earlier.
Correction corner
Now it's time to create an ECC file. DVDisaster supports two types: RS01 and RS02. The former stores the ECC file in a remote location, while the latter bundles it along with the ISO image.
To make your selection, head over to Preferences > Error Correction, and select the storage method from the drop-down menu. We'd advise you to stick to the default RS01 method and store the ECC file using a separate medium.
Using the default settings, the ECC file is about 15% the size of the ISO file. For better protection, head back over to Preferences > Error Correction and select the High option. This balloons the ECC file to about 35% the size of the image, but gives you a better chance of restoring badly damaged media.
With an ECC in place, it's now a good idea to regularly check backup media with DVDisaster. Just insert the media in the drive, and click on the Scan button. If the scan detects bad sectors in the media, it's time to recover the lost data.
For that, first create an ISO image of the damaged media using the same procedure as before. Then find the ECC file you created earlier for the damaged media and point to it using the button for ECC file selection. With the image and ECC file in place, click on the Fix button, which reads and repairs the damaged image.
The success rate of the recovery depends on the state of the damaged disk, which is why it is necessary to scan the media regularly and repair it as soon as bad blocks show up.
Step-by-step: Back up a disk or partitions
1. Where to save?
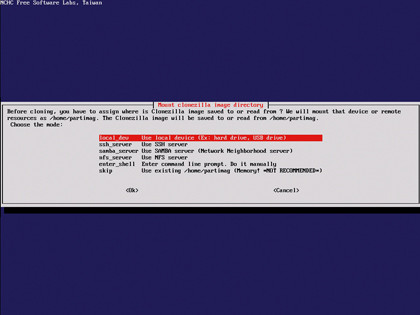
With a Clonezilla Live CD you can back up your entire disk. After booting the CD and opting to create a clone, select where the images are saved, which can be on a local device or over the network.
2. Disk or partitions
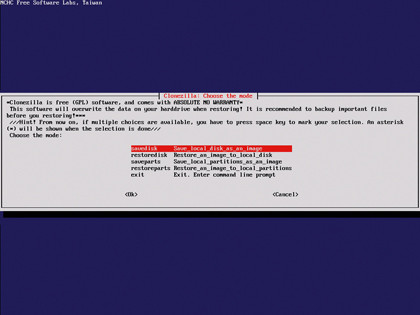
Now you'll need to choose your mode. The Save disk option clones whole disks, and will later prompt you to select a disk on the computer. To save individual partitions, select the Saveparts option instead.
3. Back up selection
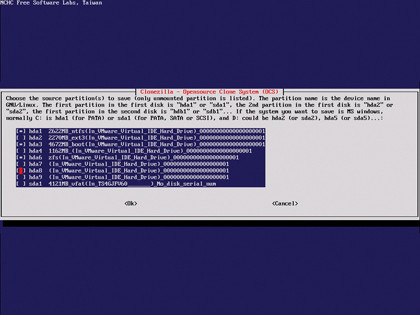
Depending on your previous selection, you're shown a list of disks or partitions. Use the Spacebar to mark multiple partitions to back up. Once done, follow the onscreen instructions to complete the process.
Store your files online
SpiderOak
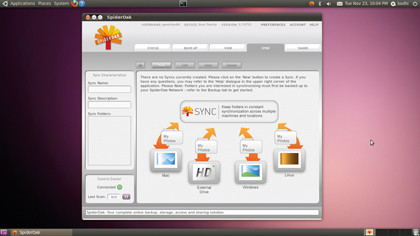
The most convenient place to back up is online. There are plenty of services that enable you to store files online and access them from anywhere you want. In fact, newer versions of Ubuntu bundle clients for the Ubuntu One service, but this isn't as cross-platform as Dropbox.
In turn, Dropbox has the drawback of restricting you to a single directory for backups and synchronisation. SpiderOak, on the other hand, has a consistent interface across Linux, Windows, and Mac, and enables you to back up any file or folder.
The service offers 2GB of free space, or 100GB for $10 per month. When you install the client and register for the service, the installer generates encryption keys that it then uses to encrypt the data before transmission.
The app's interface is divided into tabs. To back up files, simply head to the Backup tab and select your files or directories. Switch to the Advanced view to fine tune your file selection. When you're done, click on the Save Settings button. That's it.
Now SpiderOak compares the contents of the local folder with the one it keeps online. Whenever there's a change, it automatically starts the backup. Moreover, the service keeps track of changes to the files using version control with a date stamp, which lets you roll back to previous versions of a file.
This makes SpiderOak ideal for keeping copies of important documents you're working on, or photos you've transferred from your camera. Your files are kept on the server unless you explicitly ask SpiderOak to remove them.
In addition to its backup features, the service can help you share files with others via virtual isolated silos. Others can subscribe to these silos via RSS, which keeps them updated of any new additions.
JungleDisk
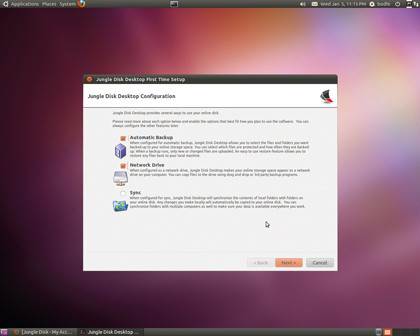
Although it's proprietary, JungleDisk works across platforms, and enables you to keep data in Amazon's S3 service or the Rackspace storage equivalent. The Desktop Edition costs $3 per month with 5GB of free storage. You can get additional storage for $0.15 per GB per month - find out more at https://www.jungledisk.com.
What sets JungleDisk apart from other online solutions is that it lets you mount your online storage as a network device in your filesystem, so you can directly save files to the cloud. To restore the files, just mount your drive and copy them onto your desktop.
Besides the network drive, JungleDisk also enables you to schedule automatic backups, which are kept separate from the network drive. The data is encrypted and compressed using data de-duplication. So although it keeps multiple timestamped copies of your data, it minimises online disk space usage by avoiding backing up redundant data.
What's more, when you upload a file, JungleDisk automatically creates a public URL with an expiry date one week in the future in order to help you share this file with anyone.
Once installed, the JungleDisk client sits in your taskbar. Use it to configure backup settings, such as selecting files and folders to back up. You can also use it to change the schedule of an automatic backup or run one manually.
What's more, you can set up JungleDisk to keep certain files and folders on your local disk in sync with the online disk. Any changes to files locally will be automatically copied to your online storage.
Step-by-step: Back up browser data
1. Download
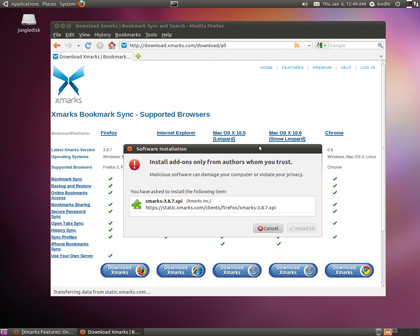
Head to www.xmarks.com to get hold of XMarks. It works with Firefox, Opera, Chrome, Internet Explorer and Safari; is cross-platform; and even works on mobile devices.
2. Configure
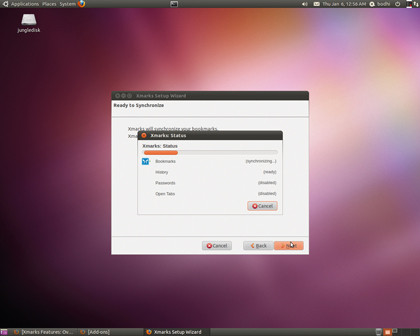
From the Addons window, click Preferences and then run the Setup Wizard to configure XMarks to back up your browser's collection of bookmarks and passwords.
3. Restore
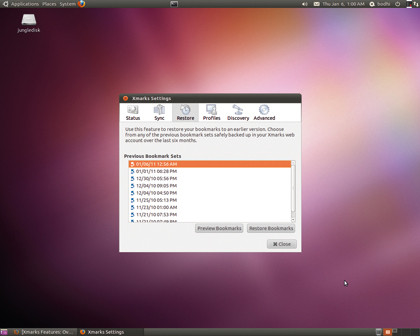
Now when you install XMarks on a new computer, you can download and sync your bookmarks from the server. You may also manually restore them.
This is the real world of backing up - here's how to deal with it
With your hard disk's contents now more secure than a locked box in a reinforced vault that's buried in concrete at the bottom of the Mariana Trench, you might imagine you're done, but think beyond your hard disks for a moment.
Do you blog? Run a website? Use a web-based email service that also holds your calendars and contacts? Then you'll want to keep that safe too.
Back up blogs
Most blogging software and content management systems, such as Wordpress and Drupal, have plugins or modules to help you download and save your content offline, which you can then file away with your favourite backup tool. If your web host runs PhpMyAdmin, you can also use its Export feature to download entire databases - or selected tables inside them - in a variety of formats.
Alternatively, if you have shell or telnet access to your database server, you can back up the database from the command line with mysqldump, as in the following example: mysqldump -u [username] -p [password] [databasename] > [backupfile.sql]
The backupfile.sql file will contain all the SQL statements needed to create and populate the tables in a new database server.
Some web hosting control panels, such as cPanel, also enable you to back up your entire website with a single click.
Back up online email
Then there's web-based email services such as Yahoo and Gmail. Yahoo lets you archive messages via POP, but you'll have to sign up for Yahoo Mail Plus, which costs $19.99 a year. Once subscribed, however, you can configure offline email clients such as Evolution and Thunderbird to fetch messages from the Yahoo servers, and keep them on your hard disk.
Gmail uses the IMAP protocol to synchronise your online mailbox with the one on your disk. In your Gmail account, make sure IMAP access is enabled under Settings > Forwarding And POP/IMAP.
Thunderbird will automatically configure itself for sending and receiving emails once you've pointed it towards your Gmail account, and the setup procedure isn't much different with Evolution. Once it's been prepared, right-click on a folder and select the Copy Folder Content Locally For Offline Operation option. Then head to File > Download Messages For Offline Usage to download messages.
Evolution also enables you to save individual messages with the File > Save As Mbox option. To make your emails easy to back up, Evolution will also compress them in a single tarball. Head to File > Backup Settings and specify the location where you want to keep this.
To restore your email, head to File > Restore settings, and point it towards the compressed tarball.
Backupify
There's a lot of other data you already have online on Facebook, Twitter and other such services. Like your blog and email, it's a good idea to take occasional snapshots of this data and back it up locally, which is where Backupify comes in.
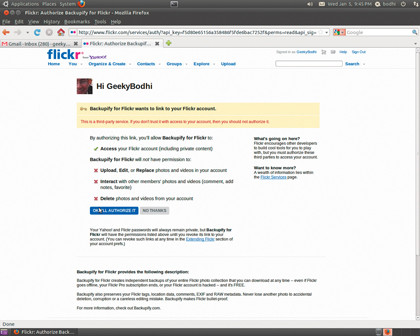
It's a web-based service that backs up data on other internet services and enables you to download it all to your local disk. It can even handle your blog and email if you want an all-in-one solution. It requires no installation either; just register on its website and authorise the service to back up your accounts.
It currently works with over a dozen different services, including the ever-popular Facebook, Twitter, Flickr, Google Docs, Gmail, Blogger and Hotmail, but check the website for a full list.
The basic service is free, offers 2GB of free storage, and backs up data from your online accounts weekly. There are also paid-for plans that offer more storage and let you adjust the backup frequency.
Backupify backs up data it receives from the services as is, which is generally in XML. However, for some services, such as Twitter, it can also generate a PDF.
Currently, the service doesn't enable you to download emails in bulk and the ability to search backed up messages is under beta testing. You do have the option to download individual messages in the EML format, though, and Backupify can also restore backed up messages to Gmail directly.

With almost two decades of writing and reporting on Linux, Mayank Sharma would like everyone to think he’s TechRadar Pro’s expert on the topic. Of course, he’s just as interested in other computing topics, particularly cybersecurity, cloud, containers, and coding.