Breathe new life into your Windows XP PC
Give your XP PC a refresh
The standard Windows XP installation is designed for ease of use rather than outright speed, and once you've got used to the basics there are plenty of adjustments that you can make so that both you and your PC can work faster. Here's a selection of the best time-saving changes you can make.
41. Prioritise your Start menu shortcuts
Windows XP can intelligently sort the Start menu so that your most frequently used programs are always accessible in the lower portion of the menu.
You can ensure that certain programs always stay at the very top of the menu if you like, enabling you to launch programs in a couple of clicks. Navigate through the Start menu and locate the shortcut for one of your more frequently used programs.
Right-click this shortcut and select the 'Pin To Start' option from the menu that appears. The shortcuts now appear in the top portion of the Start menu beneath the shortcut for Internet Explorer.
42. Organise your Start menu alphabetically
As you install more and more programs on your hard drive, your Start menu can become harder to navigate because shortcuts are displayed in order of creation.
Are you a pro? Subscribe to our newsletter
Sign up to the TechRadar Pro newsletter to get all the top news, opinion, features and guidance your business needs to succeed!
To make programs easier to locate, it may be useful to alphabetise your menu. Click 'Start > All Programs', right-click a shortcut and select the 'Sort By Name' option. If this becomes frustrating, check out tip 44 to force the Start menu to stay in order.
43. Access control panels from the Start menu
If you like to change system settings from time to time, you'll appreciate how long it takes to visit the Control Panel. If you're making a large number of changes to your PC, it can take a while to navigate the Start menu, open the Control Panel and launch the relevant applet.
A useful way to speed up access to individual Control Panel components is to add a menu to the Start menu that appears when you click the Control Panel option, giving you instant access to any applet.
To do this, right-click the Start button and select 'Properties'. If you're using the Windows XP-style menu, click the upper 'Customize' button and move to the 'Advanced' tab.
At the top of the list that appears, select the 'Display as menu' option beneath the Control Panel heading. If you're using the Classic Start menu, click the lower 'Customize' button and tick the box labelled 'Expand Control Panel'.
44. Put the Start menu in order
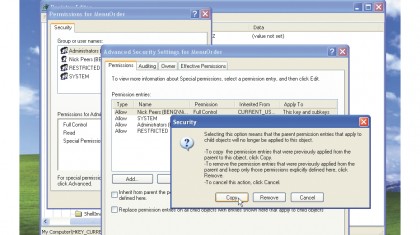
To force the Start menu to stay in order, click 'Start > Run', type 'Regedit' and press [Enter]. Select the following key: HKEY_CURRENT_USER\Software\Microsoft\Windows\CurrentVersion\Explorer\MenuOrder.
Choose 'Edit > Permissions', click 'Advanced' and untick the 'Inherit from parent the permission entries…' box. A pop-up dialog will appear. Click 'Copy' followed by 'OK' to return to the first screen.
Finally, select your user name from the list and clear the 'Allow' tick box next to Full Control (but leave the 'Read' tick box alone) and click 'Apply'. Repeat for the Administrators group. Finally, click 'OK'.
45. Cut the Start menu delay
There's a slight delay built into the Start menu to give you thinking time. If you know your way around, you can shorten it with a Registry edit.
Open the Registry Editor by choosing 'Start > Run' and entering 'Regedit' in the 'Open' bar, then clicking 'OK'.
Now go to 'HKEY_CURRENT_USER\Control Panel\Desktop'. Double-click the 'MenuShowDelay' value and change it from the default 400 to a lower number of your choice.
46. Create your own toolbar
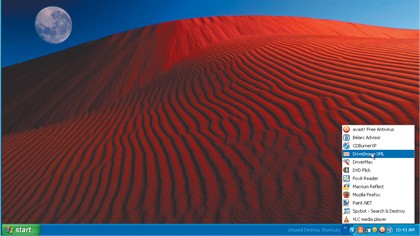
You can turn a folder into a toolbar for quick and easy access to its contents. Right-click the taskbar and choose 'Toolbars > New toolbar' from the menu. This launches the 'New toolbar' dialog.
Select the item that you want to use as a toolbar. If necessary, browse through 'My Documents' or 'My Computer' to find the folder you want. Alternatively, click 'Make new folder' to create a custom one. Click 'OK'. Your new toolbar will appear as a button on the taskbar.
Click this to see an expanding menu of its contents. Subfolders become their own expanding menus. Select a file to open it in its associated application.
47. Use the Quick Launch toolbar
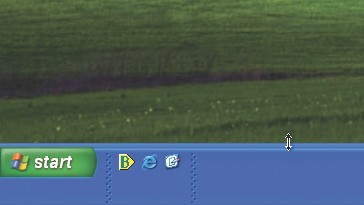
Fed up of having to hide all open windows to access your desktop shortcuts? Move them to the Quick Launch toolbar instead, which appears at the bottom of the screen and is accessible whatever windows are open.
Start by right-clicking a blank area of the taskbar and choosing the 'Lock the taskbar' option to remove the tick and unlock it. You'll see the top edge of the taskbar change, indicating it can now be moved or altered. Click and hold the top edge and you'll see the cursor change to a double arrow. Drag this up so the taskbar takes up two lines instead of one. Right-click the taskbar again and choose 'Toolbars > Quick Launch'.
As things stand the two toolbars sit side by side - we want the Quick Launch to sit on top of the other. To do this, click and hold on the spotted border to the right of the icons and drag it into place as shown above.
48. Get quicker file searching
If you search for files on a regular basis, you can save a great deal of time by enabling the Indexing feature. Open up My Computer, right-click your hard drive and select 'Properties'. Tick the box labelled 'Allow Indexing Service to index this disk for fast file searching', and click 'Apply'.
Make sure that the option labelled 'Apply changes to [drive letter]:\, subfolders and files' is selected and click 'OK'. More in-depth searches, such as looking for files containing certain words or phrases, are now performed much quicker.
49. Find Messenger contacts more easily
If you use Windows Messenger to conduct conversations with friends and family, there's a good chance that you've built up a large list of contacts. While it's great to have a lot of people to talk to, an overly long list can make it difficult to find individual contacts when you want to start a new conversation.
By default, your contacts are split up into a number of pre-defined categories, but you can create your own to help keep yourself organised. Right-click one of the existing group headings and select 'New Group'. Enter a name, and then drag and drop contacts on to the heading. You can expand and collapse a group by clicking the double-headed arrow to the left of the heading.
50. Save time with keyboard shortcuts
You can access many Windows XP functions using keyboard shortcuts, which can be much quicker than using a mouse to navigate through menu options.
To quickly access Explorer, press [Windows] + [E]; to access the Run dialog press [Windows] + [R]; and to search for files press [Windows] and [F]. You can log out of your user account by pressing [Windows] + [L].
51. Attach files to emails in two clicks
Rather than starting a new email and navigating through folders to attach a file, you can simplify the process. Right-click the file you want to send and click Send To > Email Recipient. Your email client opens with a new blank message, with the selected file attached.
52. Disable menu animation
You can turn off animated menus in Windows XP for faster navigation. In Regedit, open the key 'HKEY_CURRENT_USER\Control Panel\Desktop' and create the string value 'MinAnimate'. Give it a '0' value. To restore menu animations, delete this string value.
53. Return to your Desktop in an instant
When you're working with a number of programs at once and want to return to your desktop, it can take some time to minimise all the open windows individually.
It's quicker to use the Show Desktop shortcut on the Quick Launch bar, or press the [Windows] key on your keyboard and [M] simultaneously. To restore your windows to their previous states, press [Windows] + [Shift] + [M].
54. Send files faster
If you're attaching files to an email, you can compress them to radically reduce the amount of time it takes for the mail to be sent and received using the Windows XP support for compressed files and folders. Select the files you want to attach to an email, right-click them and select 'Send To > Compressed (zipped) Folder'.
55. Say 'No to all' requests
When you're copying or moving a group of files, you'll sometimes be prompted to provide a 'Yes' or a 'Yes to all' response - if you need to give permission for a process to to overwrite existing files, for example.
Choose the latter option and similar files that prompt the same question will be ignored in future. But what if you want 'No to all' instead? There's no visible option, but you can select 'No to all' by simply holding the [Shift] key as you click 'No'.
56. Manage the Send To folder
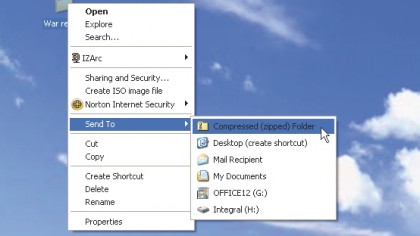
You can extend the Send To option by adding custom entries. It's basically a folder on your hard drive that you copy shortcuts to, so to access it click 'Start > Run', type 'sendto' and press [Enter].
Create shortcuts to favourite drives, folders and even programs in here to give you speedy shortcuts from any Explorer window, simply by right-clicking the file or folder in question and choosing 'Send To'.
If you select a program you've added to the menu, your selected file is opened with that program; choose a folder you've added, and the file is copied to it.
57. Switch users quickly
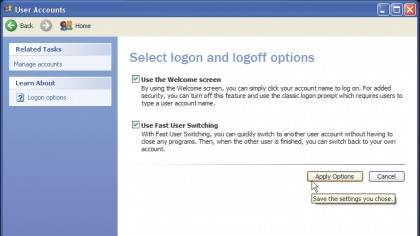
If you share your computer with others, giving everyone their own user accounts is a time saver in itself, because that way each person can set up the computer exactly the way they want it, without impacting on anyone else's experience.
The only problem with having multiple user accounts set up is if someone else suddenly wants to nip onto the PC for a few minutes - perhaps to check their email or copy a file to a CD.
Saving your work and logging off is time consuming, so switch on Fast User Switching, which enables you to switch user accounts without logging off first.
When the other person has finished, either switch straight back or log them off before returning to the point you were at. To do this, open the User Accounts Control Panel, click 'Change the way users log on or off' and tick the box next to 'Use Fast User Switching'.
58. Copy and move files with the Context menu
If you frequently copy or move files, you'll have found yourself juggling windows or copying and pasting files left, right and centre. You can save time by adding two options - Copy To Folder and Move To Folder - to the menu that appears when you right-click a folder or file - ordinarily this would involve editing the Registry (see tip 59 below for how to do this yourself), but we've found a time-saving workaround.
Go to this Kelly's Korner page and click the 'Copy to/Move to' link (it's number 45) on the page. Right-click this and save the reg file to your desktop. Double-click it and click 'Yes' when prompted - the options will now appear when you right-click a file. Alternatively, try the method in the next tip.
59. Add new 'Copy to' key
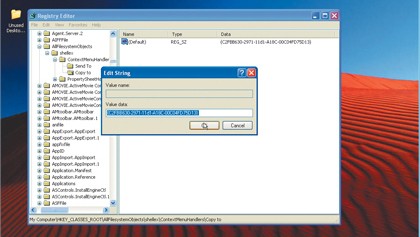
Add a 'Copy to folder' option to the right-click context menu so that you can quickly copy a file by right-clicking it.
In the Registry Editor, browse to HKEY_CLASSES_ROOT\AllFilesystemObjects\shellex\ContextMenuHandlers and create a new key called 'Copy to'. Change its default value to '{C2FBB630-2971-11d1-A18C-00C04FD75D13}' and check it works in Windows.
You can also add a 'Move to folder' option in this way. From the same 'ContextMenuHandlers' key, simply create a new key called 'Move to' and then change its default value to '{C2FBB631-2971-11d1-A18C-00C04FD75D13}' to do this.
60. Halve folder and file access times
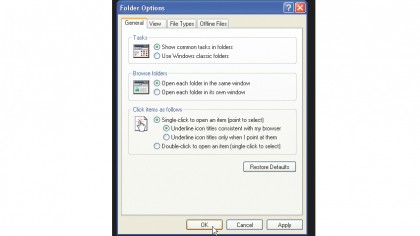
To open a folder or launch a program you have to double-click its icon. You can cut the launch time in half by opening the Folder Options Control Panel and selecting the option labelled 'Single-click to open an item (point to select)' and press 'OK'.
61. Start your computer faster
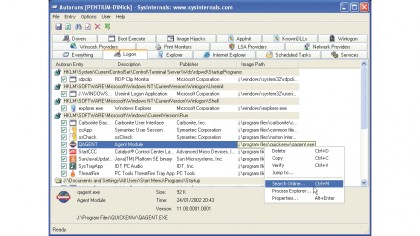
Every time you turn on your PC, besides Windows XP itself there are usually a number of programs that load in the background. Over time, this list of programs can grow and grow, resulting in a slow, sluggish computer.
Many of these programs aren't actually needed when you start your PC, so disabling them will save at least several seconds off your boot time. It will also free up memory in Windows XP, resulting in zippier performance all round.
To do this easily you'll need a free start-up manager called Autoruns. Once installed, click 'Run', then 'Run' again. Switch to the 'Logon' tab. Select an entry to see more about it - if you need help identifying it, right-click it and choose 'Search Online'.
Never delete an entry until you're sure you won't need it - instead, untick an entry to disable it. Reboot your PC and verify that disabling the entry doesn't cause problems. Once you're confident you no longer need it, delete it.
If you're suspicious that there might be some obsolete entries in the list, right-click them and choose 'Verify'. If they are still working, you'll see [Verified] appear next to the publisher's name; if not, [Not Verified] will be shown.
62. Skip welcome screen
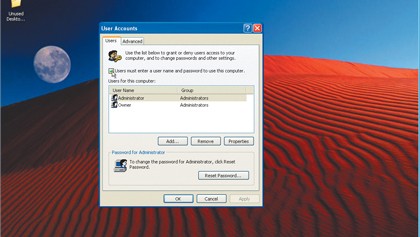
You can choose to log into Windows automatically and bypass the welcome screen by making a simple tweak. To do this, choose 'Start > Run' and enter 'control userpasswords2' into the 'Open' bar. Click 'OK' to see a dialog showing each user installed on the PC.
Clear the box marked 'Users must enter a user name and password to use this computer'. Click 'OK'. Now restart your PC and you should go directly to your desktop.
63. Shut down your computer quickly
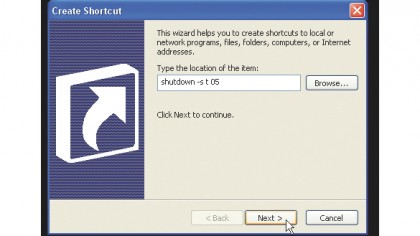
Rather than using the Start menu to instigate a system shutdown, you can create a shortcut on your desktop to enable you to switch off with a simple double-click.
Right-click an empty section of the desktop and select 'New > Shortcut'. In the box that appears, type 'shutdown -s' to create a shutdown shortcut, 'shutdown -r' to create a restart shortcut, or 'shutdown -l' to create a shortcut that logs out of the current user account.
By default, when you double-click one of your new icons, your selected action will not take place for 30 seconds. To make things happen instantly, you need to add an extra parameter to your shortcut. To create a shortcut that shuts down your PC after five seconds, for instance, you would need to use the code, 'shutdown -s -t 05', as your command string. While you can technically change this to zero, we don't recommend this.
Once you've created the shortcut, you can leave it where it is or drag it to your Quick Launch bar so you can turn off your PC with a single mouse click. You can also change the icon to make it more easily identifiable. Simply click the Change icon button in the shortcut properties and select a new one.
64. Speed up your desktop
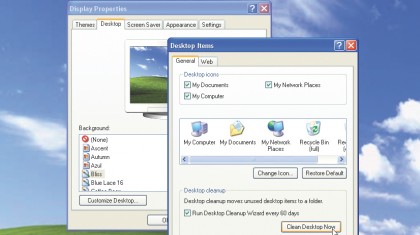
Every icon on your desktop takes up memory. You can reduce the number of icons on display by deleting some manually, or by using the Desktop Cleanup wizard to automate the process.
To access this tool, right-click an empty section of your desktop and select 'Properties', then move to the 'Desktop' tab and click the 'Customize Desktop' button.
While you're here, it's a good idea to tick 'Run Desktop Cleanup Wizard every 60 days', because this wipes out unnecessary and unused icons every couple of months.
To run the tool straight away, click 'Clean Desktop Now' followed by 'Next'. The wizard then tells you which of your icons haven't been used for a while and are prime candidates for removal. If you'd prefer to keep any of the icons, clear the tick box next to them. Click 'Next' and then 'Finish' to complete the process.
65. Speed up your desktop, Part 2
When you configure the settings for your desktop, it's natural to opt for the highest possible settings. Although you use your monitor's native resolution you can dramatically speed up your system by reducing the number of colours that are used. Rather than opting for 32-bit colour depth, drop this setting down to 16-bit.
Right-click the desktop, select 'Properties', move to the 'Settings' tab and use the Color Quality drop-down menu. In general use, you'll notice no difference between the colour depths, but using the lower setting frees up far more memory for applications to use.
66. Keep your hard drive defragged
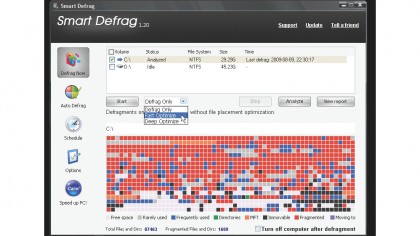
One of the biggest bottlenecks of a poorly performing computer is the hard drive. Due to the way files are organised on your hard drive, they can fragment over time, which makes accessing them slow and also reduces the lifespan of your hard drive as it has to do more work to access the files, leading to its components wearing out that little bit sooner.
The solution is to defragment your drive. Windows XP has its own built-in tool for the job, but a better bet is to use a free tool called Smart Defrag from iOBit.
Once installed, tick each hard drive and click the Analyze button. Once complete, follow its advice (typically 'Fast optimize and defrag'). The first defrag will take a while to complete, but once done, Smart Defrag can be left to its own devices, working unobtrusively in the background to keep your drives optimised.
67. Read text quicker with Cleartype
This little tip should help you enhance the display on an LCD monitor. To achieve better, crisper fonts, you should enable the Cleartype font smoothing for your screen.
This can be done in the following way. First of all, right-click an empty space on your desktop and select 'Properties'. Now move to the 'Appearance' tab and click 'Effects'.
Tick 'Use the following method to smooth edges of screen fonts' and then select 'Cleartype' from the dropdown menu next to it. Finally, click 'OK' to apply the new settings. You will experience a richer, less fudgy display on your LCD screen after this change.
68. Get rid of error reporting
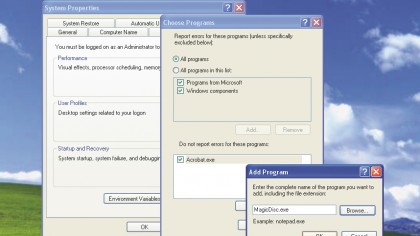
If you're tired of those annoying error messages that pop up when an application or system error occurs, the System applet in the Control Panel gives you some control over the situation.
Right-click the My Computer on your desktop or Start menu then click 'Properties'. From the 'Remote' tab, click 'Error Reporting' on the 'Advanced' tab. Error Reporting is enabled by default for Windows XP and all installed programs. To choose what's monitored, click 'Choose Programs'.
If you only want to exclude a handful of programs, click 'Add' at the bottom of the box, then click 'Browse' to locate and select the program executable (such as acrobat.exe). Click 'OK'.
To disable error reporting for all except specified programs, select 'All programs in this list'. Click 'Add' to select programs - all Microsoft programs and Windows components are selected.
Current page: Windows XP time-saving tips and tweaks
Prev Page Windows XP back up and recovery tools Next Page Speed up web browsing in Windows XPChris Thornett is the Technology Content Manager at onebite, editor, writer and freelance tech journalist covering Linux and open source. Former editor of Linux User and Developer magazine.
