Beginner's guide to Linux: where to start
Start your journey from beginner to Linux guru
It's that time of year again, when lots of people set resolutions for themselves, trying to break bad habits and form a few good ones.
Many aim to start exercising more or eat less junk food, but here at LXF towers, we think you should consider trying a new operating system.
Unsurprisingly, this being a Linux magazine, we think that you should try Linux. That's why we've created this guide - to give you all the information you need to get started with Linux. We'll begin by looking at what Linux is, and consider why you'd want to use it. We'll then show you how to get your feet wet in a risk-free way, before explaining how to install Linux and go about your day to day business with it.
At the end of the article, we're also going to take a look at how you can begin learning what's happening behind the scenes. This final section isn't necessary for using Linux as a casual computing platform, but it's knowledge that is getting increasingly important as digital technologies are becoming more widespread.
We also happen to think it's a lot of fun to learn how computers work, and a new hobby for a new year is never a bad thing!
We hope that, with this guide in hand, you'll start using Linux, and keep using it long after you've started enjoying all those delicious pastries again.
What is Linux?
Linux is an operating system, in the same way that Windows, Mac OS X, iOS and Android are all operating systems.
Get daily insight, inspiration and deals in your inbox
Sign up for breaking news, reviews, opinion, top tech deals, and more.
Essentially, what an operating system does is provide a platform for everything else on your computer to run on top of.
This platform is made up of lots of different parts. Some parts are responsible for making the hardware work, others for displaying the user interface, and still other parts for ensuring that applications can work with the hardware and each other. Just like Windows etc, Linux performs all of these functions.
You may be asking, "If Linux does all the same things that Windows or Mac OS X does, why bother switching?". The answer is that Linux has its own way of doing things, and for some people, the Linux way suits them better.
Secure, flexible, powerful
Out of the things that Linux does differently, two categories can be formed. The first one covers all the technical aspects that make Linux distinct from other operating systems. This includes, amongst other things: A radically-reduced risk of catching viruses - so much so that only very specialised users need to run anti-virus software.
It's modular, and so infinitely flexible - for example, while Windows limits you to a single user interface (what the system looks like), on Linux you can choose from a dozen different options. It runs well on very old and slow hardware, as well as on super-computers and modern laptops (by some counts, 90% of the world's super-computers are currently running a variant of Linux). It's designed with security in mind, providing advanced features, such as strong encryption, as standard.
One caveat that you'll want to keep in mind, with regard to Linux's technical differences, is that it has a completely different approach to making hardware work. This means that Linux's developers have to add support for hardware all by themselves. They do a remarkably good job of this, and you'll find that almost every piece of hardware imaginable works 'out of the box'.
There are exceptions to this, though, particularly where hardware manufacturers keep the way their devices work a secret. On these occasions, the developers have to figure out how a device works for themselves, and then write the software to make it work - it's kind of like listening to a piece of music to figure out the score.
This most often applies to graphics cards and wireless cards, although even these are almost universally supported these days. Later in the article, we'll show you how to check your hardware works, and how to get help if it doesn't.
Freedom
The second category could broadly be called 'ideological'. Linux is what's known as free software. This doesn't necessarily mean that it's free of charge (although it often is), but that anybody can study how it works, share it with their friends, modify it, and use it for any purpose.
This sounds a bit out there, but it's actually a very important aspect of Linux. For starters, it means that it's not developed by a single company or nation, but by a massive community that's spread around the world. This means you don't need to worry about a company going bust and taking your photos, documents and other data with them; neither do you need to worry that your computing activity is surreptitiously being recorded, or otherwise influenced, to advance some unknown group's interests.
With free software, your computer works for you. When you combine this freedom with Linux's unique technical features, some interesting results emerge. For instance, since Linux works well on older hardware and can be shared for free, it's often used to provide low-cost but powerful computing solutions for developing nations, schools and charities.
What's more, since the source code can be studied, it gives a valuable leg up to many students who wouldn't otherwise be able to get a quality technical education.
How it works
Of course, some people don't use Linux because of any of these reasons - they just like the way it works. They don't care that they could use it to build the next Wikipedia, or that it makes a wonderful educational tool, and they have no interest in bundling up old computers for the developing world. They just find that, out of all the operating systems available, Linux works best for them.
What's more, as we'll soon see, you can try Linux in a virtually risk-free way, without modifying the current contents of your computer. So, you should at least give Linux a try because, whatever you think of its other defining features, you might just find that it works right for you.
Now that you've decided to give Linux a try, you must first back up your data. This isn't because using Linux is dangerous - in fact, as we've said, it's virtually risk-free - it's just that accidents do happen, and you should back up your data regularly anyway.
Lord of the Jungle
If you don't yet have a backup solution, we think that Jungle Disk is a great option. It works with Windows, Mac OS X and Linux, and it has a basic monthly cost of just $2/month.
More importantly, though, it uses Amazon's cloud storage to back up your files. This means that your files are kept in a different location from your computer, ensuring that they'll remain safe even in the event of a fire or any other physical disaster.
Of course, if you're in a hurry or you have limited bandwidth, you could consider burning your data to a DVD, or putting it on a portable hard drive - just remember to keep it in a different location.
Trying Linux
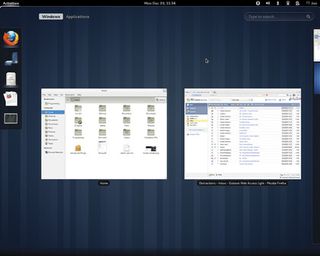
With your data safe, we're ready to get started and load Linux for the first time. For this we're going to use a version of Linux known as Ubuntu.
This version of Linux, like many, is really clever, as you can use it as a live CD. This means that you can run the entire operating system from the disc without it making any changes to your computer.
If you decide you like Linux, you can then install it using the same disc; if you don't, you can just reboot your computer, take out the disc and everything will be just as you left it. It's the perfect way to try Linux without risk.
The only thing you need to bear in mind about live discs is that they're slower than if the operating system were installed on your hard drive. So, while it's a useful way to get a feel for what a system is like, don't think that Linux is always so slow!
To use the live disc, you'll need to put the disc in your computer and then reboot. When the first screen appears, usually with your computer manufacturer's logo on it, you'll need to press a key to tell your computer to start from the disc, rather than your hard drive. This key is different on every PC, but it's usually one of F2, F12 or DEL.
The only way to be sure is to try the different buttons, one of which will display a boot menu. From this menu, you'll want to select whichever entry corresponds to your DVD drive.
Shortly after making this selection, you'll be presented with another menu, this time with the Linux Format logo on it. You'll want to select the entry that reads 'Ubuntu with Gnome', after which your computer will load Linux and eventually leave you at the desktop - the main interface. Great! This is so cool! Now what?
Well, the first thing to do is get familiar with the interface. Before we show you around, remember Linux isn't Windows, and it isn't Mac OS X. As with the technical and ideological differences, Linux's interfaces are different from theirs. This means that it will take a while for you to get used to the way things work, but if you persevere with it, you'll be surprised at how quickly it becomes second nature.
It helps that some of the most basic ideas, such as the mouse, work the same in Linux as in other operating systems. So, you use the left mouse button to select things, some of which require a double-click, and the right mouse button often pulls up a menu with further actions you can perform.
That said, let's take a look around the desktop. As you hopefully noticed while exploring the Activities overview, as well as providing an attractive desktop, Linux comes with a great set of applications installed by default. This means you can get started working with your new operating system as soon as you've turned it on.
A few of the applications will be familiar to users of other platforms, since they're available for all operating systems; some of the applications are Linux-specific, however, and aren't so well known (although they're just as good, if not better!).
Getting to know you
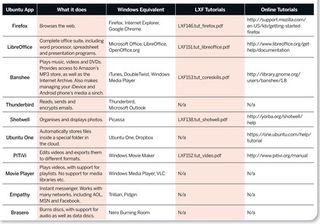
To speed you on your way to familiarity, we've compiled the above table, which compares Ubuntu's default applications with their counterparts on other platforms. Most of the default applications are fairly self-explanatory, requiring little more than a bit of time playing with them to discover their essential functions.
For those times when you're not sure how to do what you want, however, check out the tutorials we've linked to.
The most important thing to do at this point is play around with everything. It's almost impossible to break anything, and if you do, you can just reboot your computer and remove the disc!
Don't forget to launch the System Settings dialog from the user menu, too, as you'll find all kinds of options in there, including changing the wallpaper, the keyboard layout and much more.
While you're trying things out without the fear of breaking them, now is a great time to test your hardware too. If you managed to boot Ubuntu successfully and explore the desktop, you can rest assured that all the most important bits work well already - including your graphics card.
Test cards
Having said all of the above, one bit of hardware Linux occasionally has trouble with is wireless cards, so it's worth using this playing around time to make sure that this works too.
The easiest thing to do is just make sure that your computer can see some nearby wireless networks: to do this, click the small computer icon on the right of the panel and, if all is well, you should see a 'Wireless' entry followed by all the nearby networks.
If you can't see this and you think you should, don't worry too much. With Linux, there's almost always a way to make things work, it sometimes just takes persistence and a helping hand to get there. See 'Getting help with Linux' to find out how to go about solving your problem.
Installing Linux
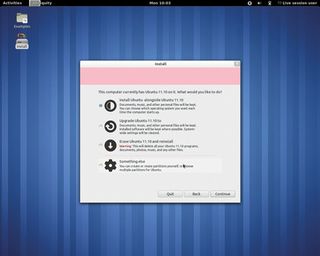
Things are looking pretty good at this point. You've successfully started your computer with Linux instead of your normal operating system; you've explored the interface and tried a few of the default applications; you've even checked that it works with your most important hardware.
If, by this point, you're wanting to explore this new world further, then it's time to install it on your computer and learn more about the system. This will give you the chance to begin finding out how you can tweak the system, how fast it runs in the real world, and to use it with your own files in your day to day work.
This is the part where that backup you made is more important, as we're going to be making changes to your computer's hard drive. It's surprisingly easy, but in the event of any mistakes, you'll want to know that your data is safe. If you didn't make a backup earlier, do it now.
To start the installation process, get to the desktop of the live CD as before, and then double-click the Install icon on the desktop. From this point on, most of the installation screens will ask you straightforward questions about your language, time zone, keyboard layout and the like.
However, there are one or two screens that will require a bit of further explanation. The third screen of the installer will give you some options covering how Ubuntu should be installed - whether to install it alongside your existing operating system, to replace the existing system entirely, or to let you do your own thing.
What this screen is really asking is how to partition your computer. Your computer keeps all of the information it stores on your hard drive, and this hard drive can be sub-divided into distinct 'partitions', which it treats entirely separately from one another.
By shrinking one partition, the one your existing operating system is on, and creating a new one, Ubuntu's installer can let you keep the existing system while still making Ubuntu available to you. This is what the Install Alongside option will do, and this is the safest option to choose while you're just getting started.
If you select this, every time your computer starts a menu will appear asking whether you want to start Ubuntu or your previous system - something we call dual booting. This way, if you still need your old operating system, whether for games or to occasionally use something familiar, you can just reboot and select its menu entry.
You can also partition the computer in many other ways, including creating separate partitions for important locations on your computer. This can have some benefits when it comes to keeping your data safe and your computer secure, but that's a topic for another time.
Security
The other screen you'll want to pay extra attention to is towards the end, when it asks you for a username, computer name and password. While it doesn't really matter what you choose to call your computer or user, you should think carefully about choosing a good pass-phrase, as it will greatly increase your security.
As we've often said here at LXF, the best thing to do is string together a few random words, such as 'LXFlovespinkponies', to create something memorable and difficult to crack. Try to use some upper- and some lower-case letters, and maybe add a few punctuation marks, too.
This screen also gives you the option to encrypt your home directory (more on the home directory shortly). This provides extra protection if you ever leave your laptop on a train - or in any other position where some nefarious foe might get physical access to your computer.
Move to Linux
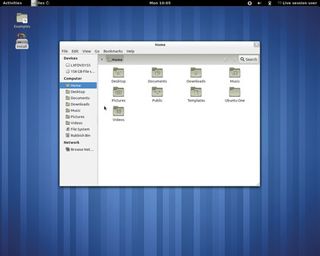
After installing Ubuntu, rebooting your computer and selecting your brand new operating system from the boot menu, the first thing you'll want to do is make all your existing data accessible. This is a straightforward task.
Launch the Activities overview, and from there select the filing cabinet icon at the bottom of the dash. This will launch Nautilus, the default Ubuntu file manager. On the left of this window is a panel, and above all the bookmarked locations, such as Home, Pictures and Downloads, there should be an entry for a xxx Gb Filesystem.
This is the partition that your previous operating system lives on, and which contains all your old files and folders. Accessing them is a simple matter of double-clicking the entry, and then all your files and folders will appear in the main part of the window.
Most user documents and settings, on Windows 7 and Vista, are stored in the Users\ directory, on XP in Documents and Settings\, while on Mac OS X they're in the /Users/ directory. If you can't find this directory, check to see if there's more than one partition listed in the side panel.
Some manufacturers distribute their computers with a separate data partition by default, so you may need to look in these other partitions for your files.
Copying and linking
Once you've got access to the files, you may want to copy them across to the appropriate directory on your Ubuntu partition.
This works just like in all other operating systems: use the mouse to drag a box around all the files you want to copy, go to the Edit menu at the top of the window, and select Copy (or press Ctrl+C). Then, go to the location on your Ubuntu partition where you want to store the files, probably in your home folder, but maybe in the Documents, Music or Pictures subdirectories, and select Paste from the Edit menu (or press Ctrl+V).
Of course, this will work best if you're not constantly switching between operating systems. If you are, then you may find that you end up with files that are out of sync with one another. The best way to avoid this situation is to work on the files straight from the Windows partition; if you do this, however, keep in mind that you'll have to open the file manager and click the partition each time you want to use it.
There is a way to automate this, but it's beyond the scope of this feature. Take a look at the Getting Help with Linux box if you want to find out how to do this.
Importing data
The final thing you'll want to do to make your new operating system feel like home is import some of your files to the appropriate applications. For instance, now that your music files are accessible, you can import them in to Banshee's database, which will then automatically download cover artwork and keep everything organised for you.
To import your music into Banshee, launch the Activities overview and begin typing 'Banshee'. After a few characters, the Banshee icon should appear and be highlighted, at which point pressing Return will launch the program. Then, go to Media>Import Media, and select Choose Folders... in the window that appears.
This will launch a file browser, from which you can browse to your Windows partition, or the location on your Ubuntu partition where your music files are stored. Select the folder that your music is stored in, and then click Import at the bottom of the file browser. Banshee will then take care of everything else for you. (Note that importing your photos to Shotwell involves a similar process).
It's also worth knowing that Banshee comes with support for several online media stores turned on by default, so you can download new music from Amazon, get podcasts from Miro, or classic videos and audio from the Internet Archive. All of these are available at the bottom of Banshee's side panel.
Package managers
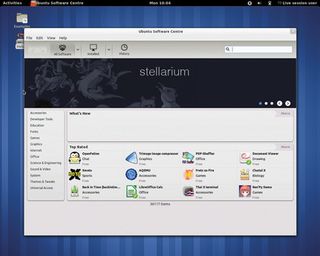
The penultimate step on our journey is to show you how to install new programs and keep old ones up to date. This is an area where Linux has been ahead of the game for years.
Rather than expecting you to go to third-party websites and download an executable file (.exe in Windows, .dmg in Mac OS X), Linux distributions provide package repositories, which store all the software you can install on that distribution. This is much more secure, since the packages in the repositories are all digitally signed to guarantee their origin. This means you can be sure who's providing the package, and that it hasn't been altered by someone with malicious intent (whereas on Windows and Mac OS X, there's little to guarantee the authenticity of the programs you install).
It also has the major advantage that all the software on your computer can be kept up to date automatically. So, every time there's a security fix, you'll immediately be notified about it and given the opportunity to install it. It's really a very good system.
Installing and updating
On Ubuntu, the repositories are accessed through the Software Centre. If you launch it from the Overview mode, you'll find yourself at the Software Centre's homescreen. It's very much like the iTunes app store - here, you can see featured applications, browse by category or search for applications.
Once you see one that takes your fancy, you can click its entry and you'll be taken to a more detailed description of the program. This page includes user reviews, version details, and a button that says Install.
Unsurprisingly, this Install button installs the application. Installed applications are marked by a green circle with a tick inside it, and instead of having an Install button, these have a Remove button.
There are loads of applications to explore, and as luck would have it, a few months back we ran a feature on the 50 Best Linux Apps to help you find some interesting targets to install on your new machine.
Updating applications uses an alternative program. From the Overview mode, you'll want to launch the Update Manager. You can click the Check button to look for new updates, and then the Install Update button to install them. It's rare that you'll need to restart your computer for updates to take effect, but you'll be notified if necessary.
- These are the best Linux training providers and online courses in 2017
- 1
- 2
Current page: Beginners guide to Linux: starting off
Next Page Beginners guide to Linux: the command line