Get super-organised with OS X Smart Folders
Automatically create folders with the files you need fast

Spotlight has become a revelation for many Mac users, providing a speedy system-wide search tool for finding installed and saved items.
The technology isn't confined to an input field at the top-right of your display, though, and it drives one of the best but most underused components of Mac OS X: Smart Folders.
Essentially, Smart Folders in Mac OS X are saved search results, accessed from the Finder sidebar's 'search for' section. By default, three are provided as a starting point: 'all images', 'all movies' and 'all documents', which, when selected, list all found items of the relevant type on your Mac. (Note that the visibility of default searches can be toggled via the Sidebar section of Finder's preferences.)
Create your own Smart Folders
The real power in Smart Folders comes from making your own - and fine-tuning them to the content you most often access. Creating a smart folder is straightforward, and the following method details how to make a basic one for finding documents with your name in.
Open a Finder window and type your name into the Spotlight search field at its top-right corner. (If the field isn't visible, widen the Finder window; if it still doesn't appear, Control-click the Finder toolbar, select Customize Toolbar, and drag the 'search' item to the toolbar.)
All items matching your search term will be displayed. Because Spotlight searches metadata, it will initially show documents that have your name within the content, but you can switch this to file-name-only by clicking 'File Name' in the Search toolbar that appears when you start creating a search.
Get daily insight, inspiration and deals in your inbox
Sign up for breaking news, reviews, opinion, top tech deals, and more.
To further filter the displayed documents, click the + button to add more search criteria. The first menu in each case provides access to common attributes (kind, created date, file extension, and so on), but selecting 'Other' shows dozens more - if you like one, add it to the standard menu by checking its checkbox.

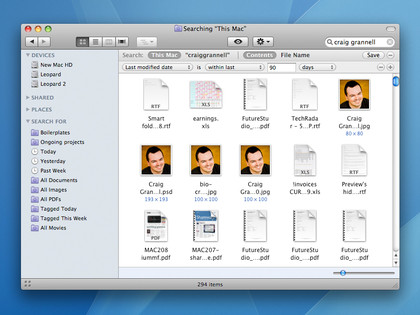
ADD ATTRIBUTES: Searches can be made more complex by adding attributes and values, increasingly filtering results
Once you've selected an attribute, context-sensitive menus and fields appear that enable you to set values, such as timescales for date-oriented attributes. In the image above, the chosen attribute and values filter the listed items to those modified within the last 90 days.
Saving and editing Smart Folders
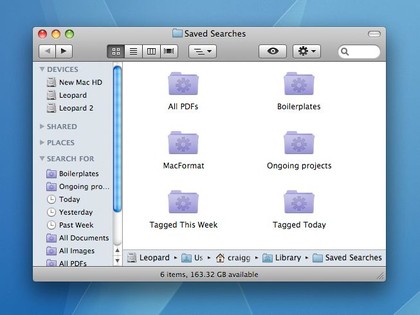
To save a smart folder, click the Save button. In the sheet that appears during a save, give your smart folder a name, leave the default save location alone, and select 'Add To Sidebar' to add your smart folder to the Finder sidebar. (You can remove it later by dragging it from the sidebar, and restore it by dragging the smart folder to the sidebar from /Library/Saved Searches).
To edit an existing smart folder, select it in Finder's sidebar, choose 'Show Search Criteria' from the toolbar's action menu (the button that looks like a cog), change the attributes and values and then click Save.

RESTORE IT: Navigate to /Library/Saved Searches to access your saved searches and restore them to your Finder sidebar
When you've got the hang of the basics, try experimenting with more Smart Folders. You could, for example, use a Finder label to colour current project folders and then create a smart folder with 'File label' set to your chosen colour and 'Kind' as 'Folders'.
Or, if you'd like to know what apps you've used during the past 48 hours, set 'Kind' to 'Applications' and 'Last opened date' to 'within last 2 days'. And to see the last six months of Word output, set 'Kind' to 'Other' and type 'Word' in the text field, and then set 'Last modified date' to 'within last 6 months'.
Once you get going, you soon realise the possibilities for Smart Folders are endless. Let us know in the comments about the best Smart Folders you've created on your Mac.
-------------------------------------------------------------------------------------------------------
Liked this? Then check out 5 Mac OS 9 features Apple should bring back
Sign up for TechRadar's free Weird Week in Tech newsletter
Get the oddest tech stories of the week, plus the most popular news and reviews delivered straight to your inbox. Sign up at http://www.techradar.com/register