Guide to Mac OS X File Sharing
Share files with other user accounts or across your network
Alternatively, upload from the MobileMe website. Go to www.me.com and log in to your account. Click on the cloud icon in the top-left corner, and switch to iDisk. Select the folder you wish to upload to, and press the up arrow in the blue bar at the top of the website.
Now, navigate to the file you want to upload. If you want to password-protect your iDisk's Public folder, in the iDisk section of www.me.com, click the cog icon in the top bar and select Preferences; here you can opt to set, change or remove a password. You can also edit permissions to write to or delete files from the Public folder.
To access another user's Public folder from your own Mac, in Finder's Go menu, select iDisk > Another User's Public Folder. Enter the MobileMe account name of the person whose Public folder you wish to access, and the password if necessary. You can now download files from that person's folder, and also upload and delete files, if they've enabled this in their iDisk preferences.
Note that your iDisk's Public folder is stored on a cloud server as part of your MobileMe account's alloted storage space, and is not the same as your OS X account's Public folder.
If you want to give someone access to a specific file on your iDisk without putting it into the Public folder, you can invite them to download it by email. Log onto www.me.com/idisk, and navigate to the file you wish to share. Click on it, and then click on the Share File button in the right-hand column.
You're then given a URL at which the file can be downloaded. Enter the email address of the person you want to share it with and a message in the fields provided, and press Share; the URL is emailed, and the recipient can download the file just by clicking on the link. If you want to send the email from an account other than your me.com address, you can copy and paste the URL and leave the email and message fields blank. You still have to click on Share, though, or the file won't be shared and the link won't work.
Finally, MobileMe service Back to My Mac is an easy and convenient way of remotely accessing another Mac that's logged into the same account, from both your home network and over the internet. It's a great way of using your notebook to retrieve files from your home machine while out and about, but it must be switched on if you're to do it.
Get daily insight, inspiration and deals in your inbox
Sign up for breaking news, reviews, opinion, top tech deals, and more.
How to activate and use OS X File Sharing
1. System Preferences
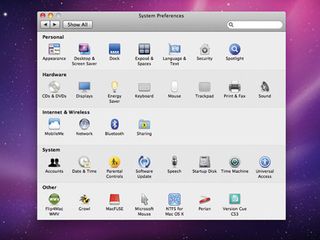
Open System Preferences from the Apple menu, and go into the Sharing preference pane, found in the Internet & Wireless section. It looks like a folder badged with a stick man on a yellow diamond. It's here that you activate File Sharing, and other sharing services.
2. Switch File Sharing on
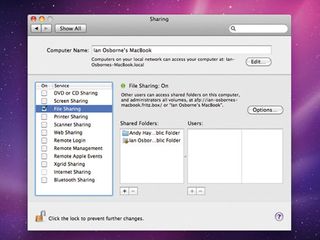
Click the File Sharing check box to turn on File Sharing. You'll need to be an administrator, or know an admin's name and password. File Sharing is switched on, and a list of currently shared folders appears in the central panel. Each user account has its own shared Public folder.
3. Add folder to share
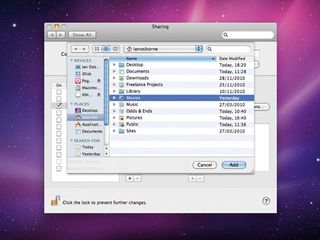
To define another folder as shared, click the '+' button under the Shared Folders panel. Navigate to the folder you wish to share (such as Movies, as shown here) and click on Add. It appears in the Shared Folders panel. If you want to unshare a folder, highlight it and click '-'.
4. Add users
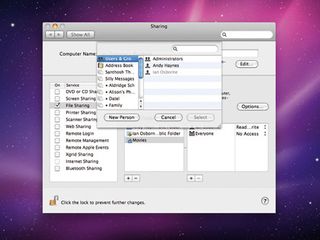
You can add new users in the Users panel. Highlight the shared folder you wish to give access to, and click the '+' button under the panel. Choose a user or group that's already set up in the Accounts pane, or click New Person.
5. Access Privileges
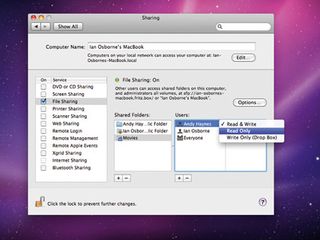
Modify a user's access privileges via the pull-downs in the second column of the Users panel. Read & Write gives full access to a folder, Read Only lets them take files but not put any in, and Write Only lets them copy to, not from it.
6. Use the Info Window
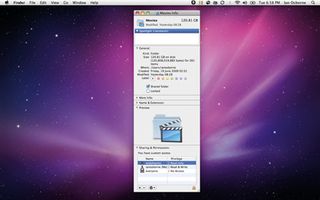
Most of these functions can be accessed via a folder's Info window. Highlight the folder in question, press Command-i, or right-click and select Get Info. From this window, you can share and unshare the folder and modify permissions.
