The release of the highly anticipated follow up to Vista, Windows 7, is here. Over the coming weeks and months, thousands of systems will be upgraded.
While many people will kill two birds with one stone by taking the opportunity to buy a new computer with Windows 7 preinstalled, a large proportion of computer users will go down the upgrade route.
Depending on whether Windows XP or Vista is the base operating system, the upgrade process will be vastly different.
Only Vista users will be able to perform a standard upgrade installation. If you have XP installed, you're going to have to perform a clean install, even if you've bought the upgrade edition of Windows 7.
This means that files and system settings will have to be backed up and restored if the transition to Windows 7 is to be as painless as possible. We're going to take a look at this process over the coming pages.
Prepare to back up
Backing up data is never fun, so it's one of those tasks that most computer users tend to avoid. While backups prove very useful in the event of a hard drive failure or other computing disaster, they're also invaluable when the time comes to reinstall or upgrade Windows.
Get daily insight, inspiration and deals in your inbox
Sign up for breaking news, reviews, opinion, top tech deals, and more.
Manually backing up files and folders is simple enough – the process can involve little more than copying the relevant files to a separate hard drive.

Program and Windows settings are a different matter, and this is where a specially designed tool can be helpful. The Windows Easy Transfer wizard is a great tool for anyone upgrading from XP to Windows 7 as it takes the hard work out of safeguarding data and also backs up other data such as email accounts and system settings.
The Windows Easy Transfer wizard can be found on the Windows 7 installation DVD. It simplifies the process of backing up documents and settings, which can then be restored once a clean installation has been performed.
Unlike an in-place upgrade, going down this route will mean that any software that is already in place will not be retained, so each program will have to be reinstalled afterwards. While a migration is the only real option available to users of Windows XP, it may also appeal to anyone upgrading from Vista.
This is because it results in a cleaner system that's not bogged down with remnants of the previous operating system.
Windows Easy Transfer also comes in handy if you're making the move from a 32-to a 64-bit OS, because this also requires a clean install.
Install Easy Transfer
The transfer tool is located in the Support folder of the Windows 7 disc in a subfolder called Migwiz.
Double-click the executable named 'migwiz.exe' to start the program and click 'Next' to skip the intro screen. Several options for how to transfer data will be presented, including using an Easy Transfer cable or making use of network or removable storage.

In the majority of cases, opting to back up files to an external hard drive will be the easiest option, but the ability to back up to another computer over an existing network may also be useful.
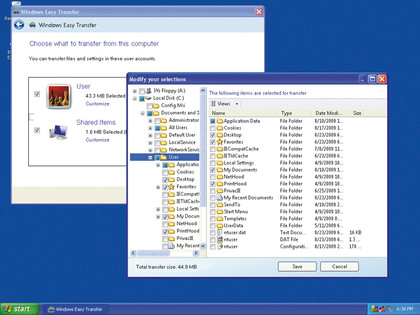
After you've indicated that you're currently working with your old computer, the wizard will perform a scan for items that can be transferred and should be backed up. The results screen will show a list of user accounts that have been detected complete with the amount of data each contains.
While it's possible to trust that the wizard has managed to correctly identify everything you would like to back up, it is a good idea to double-check by clicking the 'Customize' link that appears beneath each entry on the results page.
From the submenu that appears, tickboxes can be used to select the type of data that should be backed up, while by clicking the 'Advanced' link you can select individual folders to add to the transfer set. Having made the required selections, click 'Save' followed by 'Next'.
Backup protection
As a security measure, Windows Easy Transfer allows data to be password-protected, but this is optional. Click 'Save', choose where the backup should be created, enter a suitable name and click the 'Save' button.
While the data saving process is taking place, it's important that Windows is left to its own devices in case an operation makes use of files that are being backed up.
When the wizard has done its work, the folders and settings will have been saved in a '.mig' file in your chosen location. It's a compressed file, so space requirements can be dramatically reduced.
With this step of the migration process complete, spend a little time ensuring that the discs and set-up files for applications that will be installed post-installation are available along with any necessary serial numbers.
It is also worth individually backing up settings for any third-party programs that cannot be included in the migration wizard's backup – such as browser configuration and plug-ins, FTP client settings, feed readers and anything else that would be time-consuming to reinstate manually.