How to hide your personal data in Windows

Criminals aren't the only ones who need to keep the sensitive data on their computers safe from prying eyes. Unsurprisingly, if you're on the move, the chances of your laptop being stolen are greatly increased.
If a thief is intent on discovering your secrets, your Windows login password won't protect your data for long when it's possible to boot your machine using a Linux live CD distribution and simply mount your hard disk for reading.
There are plenty of ways in which Windows itself can help you hide the things you want to keep safe. These are fine for keeping things like Christmas lists away from little eyes, but there are also several free third-party utilities available to download that will keep your more important secrets safely locked up and private.
Hide in the streams
Ever since Windows 2000, Microsoft has supported something called Alternate Data Streams (ADS), which allows you to add a secret section to a filename.
Open a command prompt. The directory it opens into will be your home directory (C:\ users\).
Enter the command notepad.exe secret_file.txt:hidden and press [Enter].
The text file secret_file.txt won't exist, so Notepad will ask if you'd like to create it. Click 'Yes' and enter some text. Save the file and exit Notepad.
Sign up for breaking news, reviews, opinion, top tech deals, and more.
Open Windows Explorer, then navigate to c:\users\ and into your username's directory. There you will find secret_file.txt. Double-click to open it and, lo and behold, there's nothing visible in it.
Go back to the command prompt and enter type secret_file.txt. Again, there's no content, but if you enter the command more < secret_file. txt:hidden.txt, the content returns. You can also read it back into Notepad using the command notepad.exe secret_file.txt:hidden.txt
The extra file extension after 'hidden' is added by the OS when the file is created, and is necessary to access it.
There are some restrictions to using ADS in filenames. First, the disk must be formatted as NTFS. Second, though Explorer and the command prompt's dir command will show secret_ file.txt as having no bytes stored in it, we can discover the ADS portion of the filename by adding /r after dir. This reveals the filename as secret_file.txt:hidden. txt:$DATA, indicating that ADS is being used.
However, as a first line of defence on a computer that you must share with others, ADS is a good temporary measure.
Hiding folders

To defeat dir /r, we can hide the folder containing secret_ file.txt, and the file itself. In Windows Explorer, create a folder called 'Hidden', then drag secret_file.txt into it.
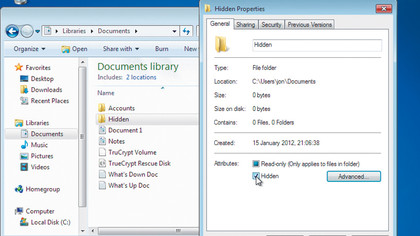
Next, right-click the folder and select 'Properties'. In the sub-window that appears, down in the 'Attributes' section, select the tick box for 'Hidden'. Click the radio button to apply the change to any sub-folders and files contained within Hidden and click 'OK'.
The folder disappears from Windows Explorer. Back in the command prompt, the dir command doesn't reveal the hidden directory, but there are ways around this.
Type dir /a to show all files. The hidden directory appears. Enter the command cd Hidden to move to it. Type dir again and the command prompt says that there are no files here. However, dir /a does show the file, but doesn't show the ADS extension. Anyone attempting to type the file as is will see an empty file, just as we did earlier. Entering dir /r will show the ADS extension, but an interloper must know about both the /a and /r switches to the dir command to stand a chance of revealing your concealed files.
Because of this, simply placing sensitive documents in a hidden folder under your home folder isn't a very good idea. A more sensible approach is to put them out of harm's way in another part of the filesystem - under a subdirectory of Program Files, for example, or within an installed program's folder.
For this, you need to close the existing command prompt and open a new one, but this time right-click it and select 'Run as administrator'. This gives you the privileges necessary to create ADS enhanced files and folders in parts of the filesystem with restricted access.
Easy File Locker

Hiding files this way is fine for keeping things away from kids on the family computer at home, but for more serious applications we need better options.
One free utility you can use is Easy File Locker from XOSLab, available to download from www.xoslab. com. This provides you with centralised control over individual documents and complete folders. You can make them invisible, password protect them, and make them undeletable in the command line and Windows Explorer.
To install Easy File Locker, simply download the installation executable, double-click it and accept the defaults. Easy File Locker will run after installation.
The first thing we need to do is password-protect the locker itself. To do so, click the button marked with a key, then enter and confirm the password. Whenever you run Easy File Locker, you will need to enter this password.
This also goes for when you uninstall it, because the act of uninstalling will return all the files that were protected by Easy File Locker to their original, unprotected status. We don't want someone to simply come along, uninstall the program and read all our fi les!
Now create a file that you want to protect. To protect it in Easy File Locker, click the button marked with a plus sign. A dialog box appears. Click the button to the right of the path to navigate to and select the file you just created.
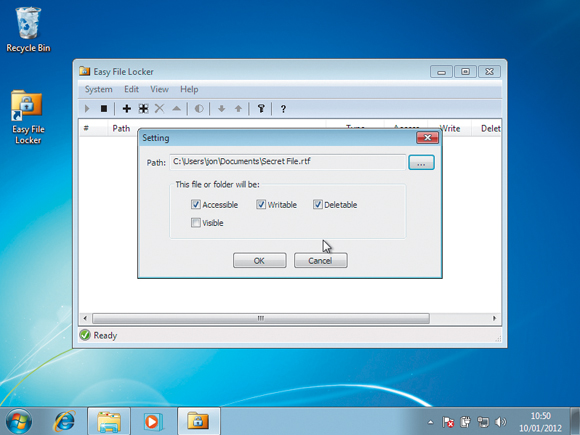
A selection of tick boxes appears and controls the protection options. By default, the file will not be visible but will be accessible in all other respects. This means that if you created a text file, you can still access it with notepad.exe from the command line by entering its filename, but it will be invisible in Internet Explorer and the graphical user interface to Notepad.
The other protection options give us greater control over the file's access. First, 'Accessible' means that the file can be opened by anyone. However, the file will still be read only as long as the 'Writable' box is not ticked.
We can also make the file unable to be deleted by un-ticking the 'Deletable' box. To take the file out of the locker for editing, simply select it in Easy File Locker and then click the button marked with a half moon symbol. This toggles the file's protected status on and off. If you made the file invisible to Internet Explorer, this action instantly makes it visible again.
To protect entire folders, simply click the button marked with a cross surrounded by a square. The same protection options are available. You can leave files and folders you no longer wish to protect inside Easy File Locker and simply open up their access rights by double-clicking them and selecting all the tick boxes.
Finally, as hinted at above, you can empty the locker by uninstalling Easy File Locker, but you will need the password you set initially.
TrueCrypt

For heavy duty data protection we need encrypted storage, but Microsoft has only put its BitLocker encryption system in the high end versions of Windows.
Luckily, there's an open source solution in the form of TrueCrypt. This lets you check files in and out of an area of the disk called a volume, which is protected with strong encryption. Download TrueCrypt from www.truecrypt.org, then run the executable to install.
As before, simply accept the defaults during installation. Once complete, run TrueCrypt and the user interface appears.
Our first task is to create a volume, so start by clicking 'New volume'. A wizard appears to guide us through the process. We'll create a file container, so simply click 'Next' to accept this option. Also accept the option to create a standard TrueCrypt volume by pressing 'Next' again.
On the next screen, click 'Select file', enter a filename and click 'Save'. This creates the volume as one long block of space within a file. Clicking 'Next' takes us to the selection of the encryption algorithm.
Leave this as AES. Clicking 'Next' again lets us enter the size of the volume we want to create. The size will be down to the amount of data you want to store, but 10MB should be sufficient for things like accounts and other personal information. Pressing 'Next' again asks us to set a password on the volume. Make this as long as possible.
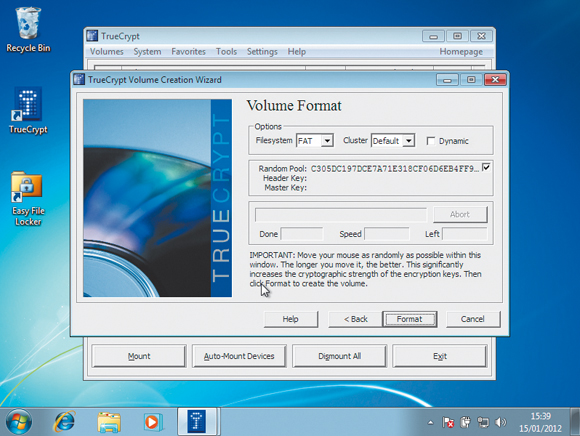
Next, TrueCrypt needs a source of randomness. To obtain this, it asks you to move the mouse about. Do this for a few seconds and the hex on the screen changes. Click 'Format', then 'Next' to end the wizard.
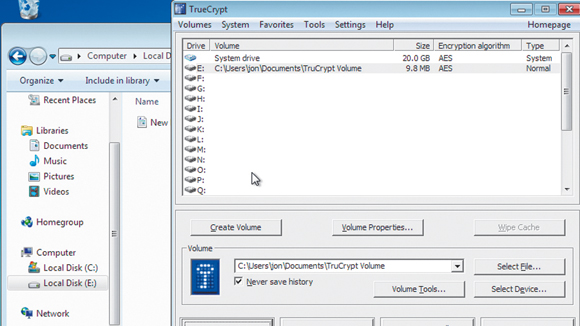
To mount the volume, click 'Select file' and select it in the file browser. Next, click one of the drive names (we'll use E:) in the main window and click 'Mount' to mount the volume we just created as logical drive E:. Enter your password and the new drive becomes visible to Windows Explorer.
The TrueCrypt volume is currently unlocked, meaning you can use it like any other disk to store files and folders. If you dismount it by clicking 'Dismount all' in TrueCrypt, or by right-clicking the logical drive associated with it and selecting 'Dismount', it is no longer available to the OS, and is locked.
If you now go into Windows Explorer and double-click to open, you're asked to associate it with a program. Click 'Browse' and associate the TrueCrypt executable with it. Clicking 'OK' opens TrueCrypt with the file selected. Click 'Mount' and enter your password.
If you exit the TrueCrypt interface, the service keeps running in the background. You can still access files stored on drive E:, but if you reboot, the drive and your protected files will not be available to the system.
To remedy this, we can automount the volume when Windows boots up. In TrueCrypt, right-click the mounted volume and select 'Add to favourites'. This opens a new menu with lots of useful options. Here, you can enter a name for the volume, as well as opt to mount it read-only. Select 'Mount selected volume upon logon' and when you next log on, TrueCrypt will pop up its password input box and mount the volume when the correct one is entered.
Another option is to open Windows Explorer on the mounted drive to access the files it contains. You should change your passwords regularly. To do so in TrueCrypt, select a volume, then click 'Volume tools > Change volume password'.