Top ten time-saving tips – Word
The top ten Microsoft Word tips for small business
5/ Quick scroll through documents
Word has quite a lot of undocumented commands and the auto scrolling option is one of the better ones
First click the File tab of the ribbon and then click Options, select the Customize Quick Access Toolbar then choose "All Commands" from the "Choose Commands From" drop-down box on the left.
In the list of available commands at the left side of the dialog box select the AutoScroll command.
Click Add. Word will move the command to the right side of the dialog box. You should probably also add the "Options" option as you'll be using this frequently and it's so much easier to just click on the File Options tab. Now click OK.
To use your new command, simply click on the command on the Quick Access Toolbar. When you do, the mouse pointer changes. Move the mouse pointer up or down and the document starts scrolling in that direction. The distance you move the mouse pointer up or down controls the speed at which scrolling occurs. To exit the scrolling mode, you can either press the Esc key or click the mouse button.
6/ Adding special symbols
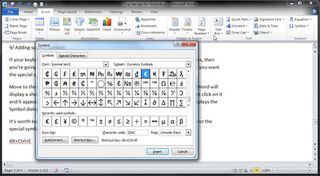
If your keyboard hasn't got a Euro symbol, or you want to type a temperature in degrees, then you're going to need the special symbols dialog box.
Position the insertion point where you want the special symbol inserted. Move to the Insert tab on the ribbon interface, click Symbol, in the Symbols group and Word will display a short list of various symbols you can insert. If your symbol is on there, then just click on it and it appears in your text. If you can't see it then click on More Symbols, and Word displays the Symbol dialog box.
Are you a pro? Subscribe to our newsletter
Sign up to the TechRadar Pro newsletter to get all the top news, opinion, features and guidance your business needs to succeed!

It's worth looking at the Symbol dialog box as this also gives you a list of the shortcuts for the special symbols, for example;
€ = ALT+CTRL+E
© = ALT+CTRL+C
7/ Edit HTML without the formatting
Word includes a feature that allows you to open HTML documents and have them appear on your screen just as they would appear in your browser. However if you want to use Word as an HTML editor program you need to make a few changes.
Click the File tab on the Ribbon interface then click Options and word displays the Word Options dialog box. At the left side of the dialog box click Advanced. Scroll through the options until you see the General section. Then select the check box on "Confirm File Format Conversion On Open" and click on OK.
Now, whenever you open a document with an HTML extension, Word will display a Convert File dialog box. The box will ask you how you want Word to treat the file you are opening, by default the HTML Document option is selected, however by selecting the Text Only option, Word will then treat the file as plain text, without doing any formatting.
8/ Skipping numbering on a title page
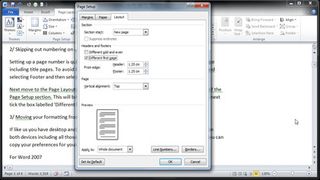
Setting up a page number is quite simple to do in Word, but by default it will number every page including title pages. To avoid this, first set up page numbering, by choosing the Insert Tab and selecting Footer, and then selecting the type of page numbering you want.

Next move to the Page Layout tab before clicking the button in the lower right-hand corner of the Page Setup section. This will bring up the Page Setup dialog box with the layout tab selected, next tick the box labelled 'Different first page', before clicking OK.
9/ Jump to a page
Scrolling through a document to a specific page can be time consuming particularly on large documents, but there's a much quicker way, if you know the page number of the place you want to be.


