TechRadar Verdict
Few other 3D printers have packed in so much innovation into one small machine. For those just starting out the plug and play nature offered makes it ideal for home and educational use, while the scalability will suit industry.
Pros
- +
Plug and Play
- +
Dual Extruder
- +
Expandable
- +
Open to 3rd party filament
Cons
- -
Noisy
- -
Small print area
Why you can trust TechRadar
Launched in 2016 the CEL-UK RoboxDual lead 3D print innovation. Dual extruder, smart reels, autoloading, self-levelling and flexible print platform were just some of the new and unique features that made this compact printer stand out.
The hardware innovation was undoubtedly ahead of its time, and only now are other 3D printer manufacturers catching up with the technology that CEL-UK showcased years ago.
Since the initial release the printer has come along way, improvements in software, structure, materials and additional hardware have kept the RoboxDual up to date. Now with the release of the Cura 4 slicer, the 3D print quality has leapt forward.
The RoboxDual is an appealing machine and one of the few printers that is genuinely able to adapt to its user base; from home through to education and industry.
But with the launch of the Prusa i3 MK3S and other 3D print manufactures hot on the heels of CEL-UK's innovation can the small RoboxDual still hold it's own?
Design
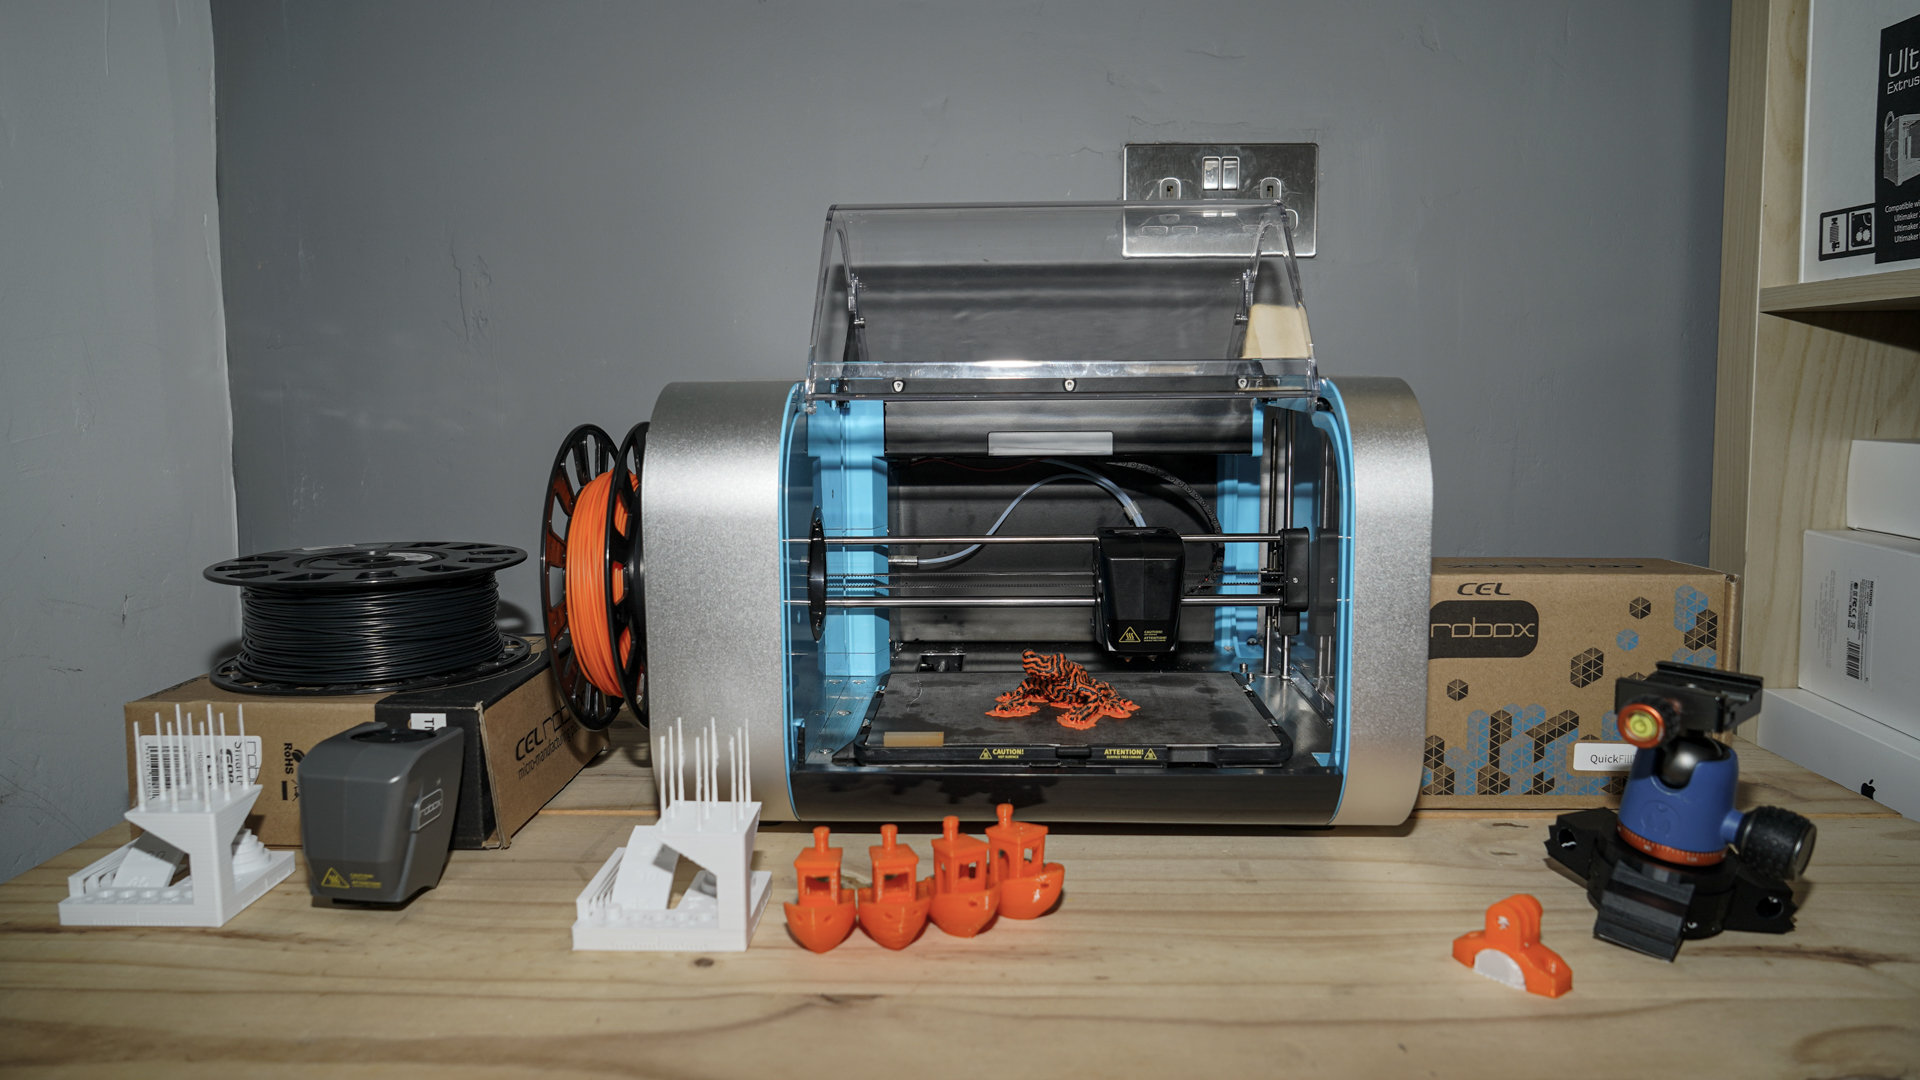
The RoboxDual (RBX02) is unique, it's evolved through engineers and product design rather than just the open source community, and this shows from the instant the machine is removed from the box.
It's about the size of a bread bin and fully contained with a rising top door covering the print platform, this has the practical advantage of keeping unwanted noses and fingers out, and technically controls the print environment temperature for improved print quality with specialist materials.
Everything about the design is neat, uninformed and with purpose. Features are there because they're useful and not just because they could.
What makes the RoboxDual different is that the size means that it will happily sit on your desktop alongside your monitor, keyboard and mouse, the footprint is relatively small, unlike other printers.
Upgradability is one feature that is common amongst 3D printers, and that's certainly the case for the RoboxDual, from the original single extrusion printer launched in 2012 through to the present day each model can be upgraded to the next.
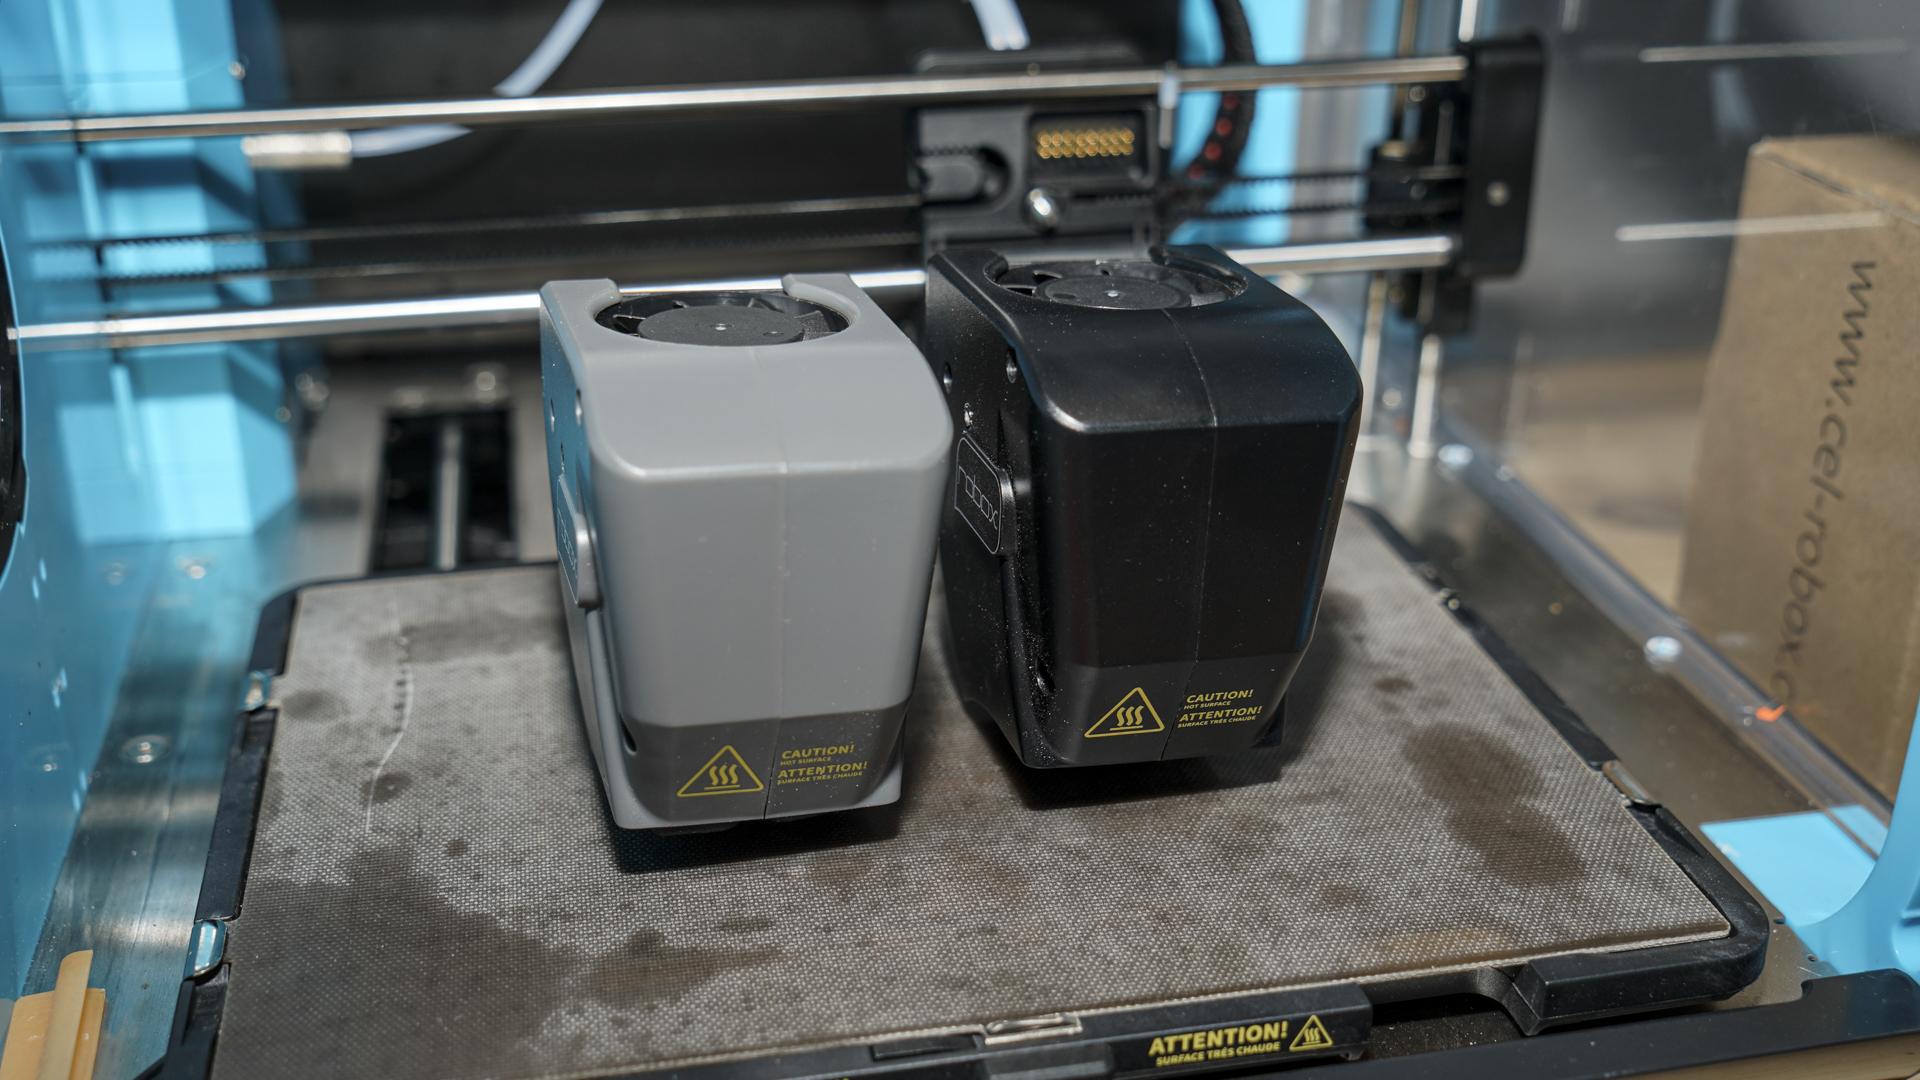
The most prominent and probably the most swapped component within any 3D printer is the head. Here the RoboxDual has a choice of three, the 'DualMaterial' as standard, 'QuickFill' for fast printing and 'Robox SingleX' for printing specialist materials such as carbon fill.
There is one further significant design aspect that few other printers can boast and that's scalability. The RoboxDual is small and has one of the smallest print platforms of any printer on the market, but it's also one of the cheapest dual extrusion systems out there.
But what of that 3D print scalability? CEL-UK has produced the Root and Mote two systems that enable you to connect several RoboxDuals. Once connected, these 3D printers are Network enabled and controlled through the AutoMaker software.
CEL-UK also produces plenty of accessories, including the Stacker, a piece of furniture that enables you to create a highrise print platform of multiple printers. Then there's the extractor, designed to remove harmful fumes from materials such as ABS.
Although small, the CEL-UK RoboxDual is one of the only printers to offer such a complete package.Regarding the size, CEL argues that more than 95% of prints ordered though the now defunct 3D hubs platform were able to be printed within the build envelope of RoboxDual. Those few large prints make it difficult to justify the cost difference for a larger printer.
Features
Scrolling through the manual, and the list of features reads like a wish list for the latest machines.
QuickFill head for faster printing, Auto Z height calibration, essentially auto bed levelling, Tapeless PEI print platform that can be removed and flexed to remove prints rather than attacking with a scraper, HeadLock quick change print heads, SmartReels for automatic material recognition, enclosed build chamber, fast heating and plug and play.
That just the basics of the kit, then you have the optional extras which give you the choice of other print heads, Root or Mote for networking, Stacker or Tree for those multi printer setups and then the extractor.
There's plenty here for anyone wanting to build a 3D print empire.
Specifications
Build Volume: 210 x 150 x 100mm
Memory: Built-in up to 32GB (For internal use only)
Nozzle size: DualMaterial dual 0.4mm / QuickFill 0.3mm and 0.8mm
Layer Height: 20 - 300 Microns
Bed: Auto leveling Z-Axis
Print Surface: Heated Polyetherimide (PEI)
Software: AutoMaker
Materials: Extensive material support
Included Material: 2 Reels, 120m Orange PLA and 120m Polysupport
Power: AC 100-250V~, 50/60Hz, 3A max
One of the big advantages of the RoboxDual is its size measuring 370mm x 340mm x 240mm with a desk footprint of 370mm x 340mm meaning that it's perfectly suited to sitting anywhere that you would normally place a standard 2D printer.
Although small the printer weighs in at 8kg, this may seem a lot for such a small box, but weight is an essential feature of 3D printers, and to the print quality as that weight helps to reduce vibrations.
One issue with many 3D printers is their print temperatures, essentially how hot the nozzle and print platform can get for specialist materials.
The RoboxDual has a broad temperature range with a max print platform temperature of 150º. That's complemented by a Nozzle temperature of 280º with the 'Dual Material' and 'QuickFill' head, and then this rises to 300º with the optional Robox SingleX head. The heating period from sending a print to the print actually starting is impressively short reaching 130°C in four minutes thanks to the AC bed heater. Nozzles heat in under one minute.
The print head known as 'HeadLock' can be quickly removed and replaced as needed. In the kit, you get the 'Dual Material' and 'QuickFill' heads.
The 'Dual Material' Head features dual 0.4mm nozzles and enables preset layer resolutions of; Super 20 microns, High 100 micros, Standard 200 microns and low 300 microns.
The 'QuickFill' Head has dual nozzles of 0.3mm and 0.8mm, the smaller nozzle prints the fine detail exterior perimeters while the larger quickly fills the infill.
Both of these heads are included in the box. There's also the specialist Robox SingleX head with 0.6mm Olsson Ruby Nozzle designed for printing carbon fill and other specialist materials; this can be purchased for an additional £160 ($199).
Connectivity comes through a USB 2.0 port. It's through this USB connection that all communication between the AutoMaker slicer software and the printer happens.
As standard, USB is the only connection to RoboxDual, but with the Root or Mote you get wireless or network, and with an upgrade to AutoMaker Pro you get direct printing from a USB stick.
There's a MicroSD Card port on the back, although this is used for internal storage by the machine and not for storing STLs or other printable formats.
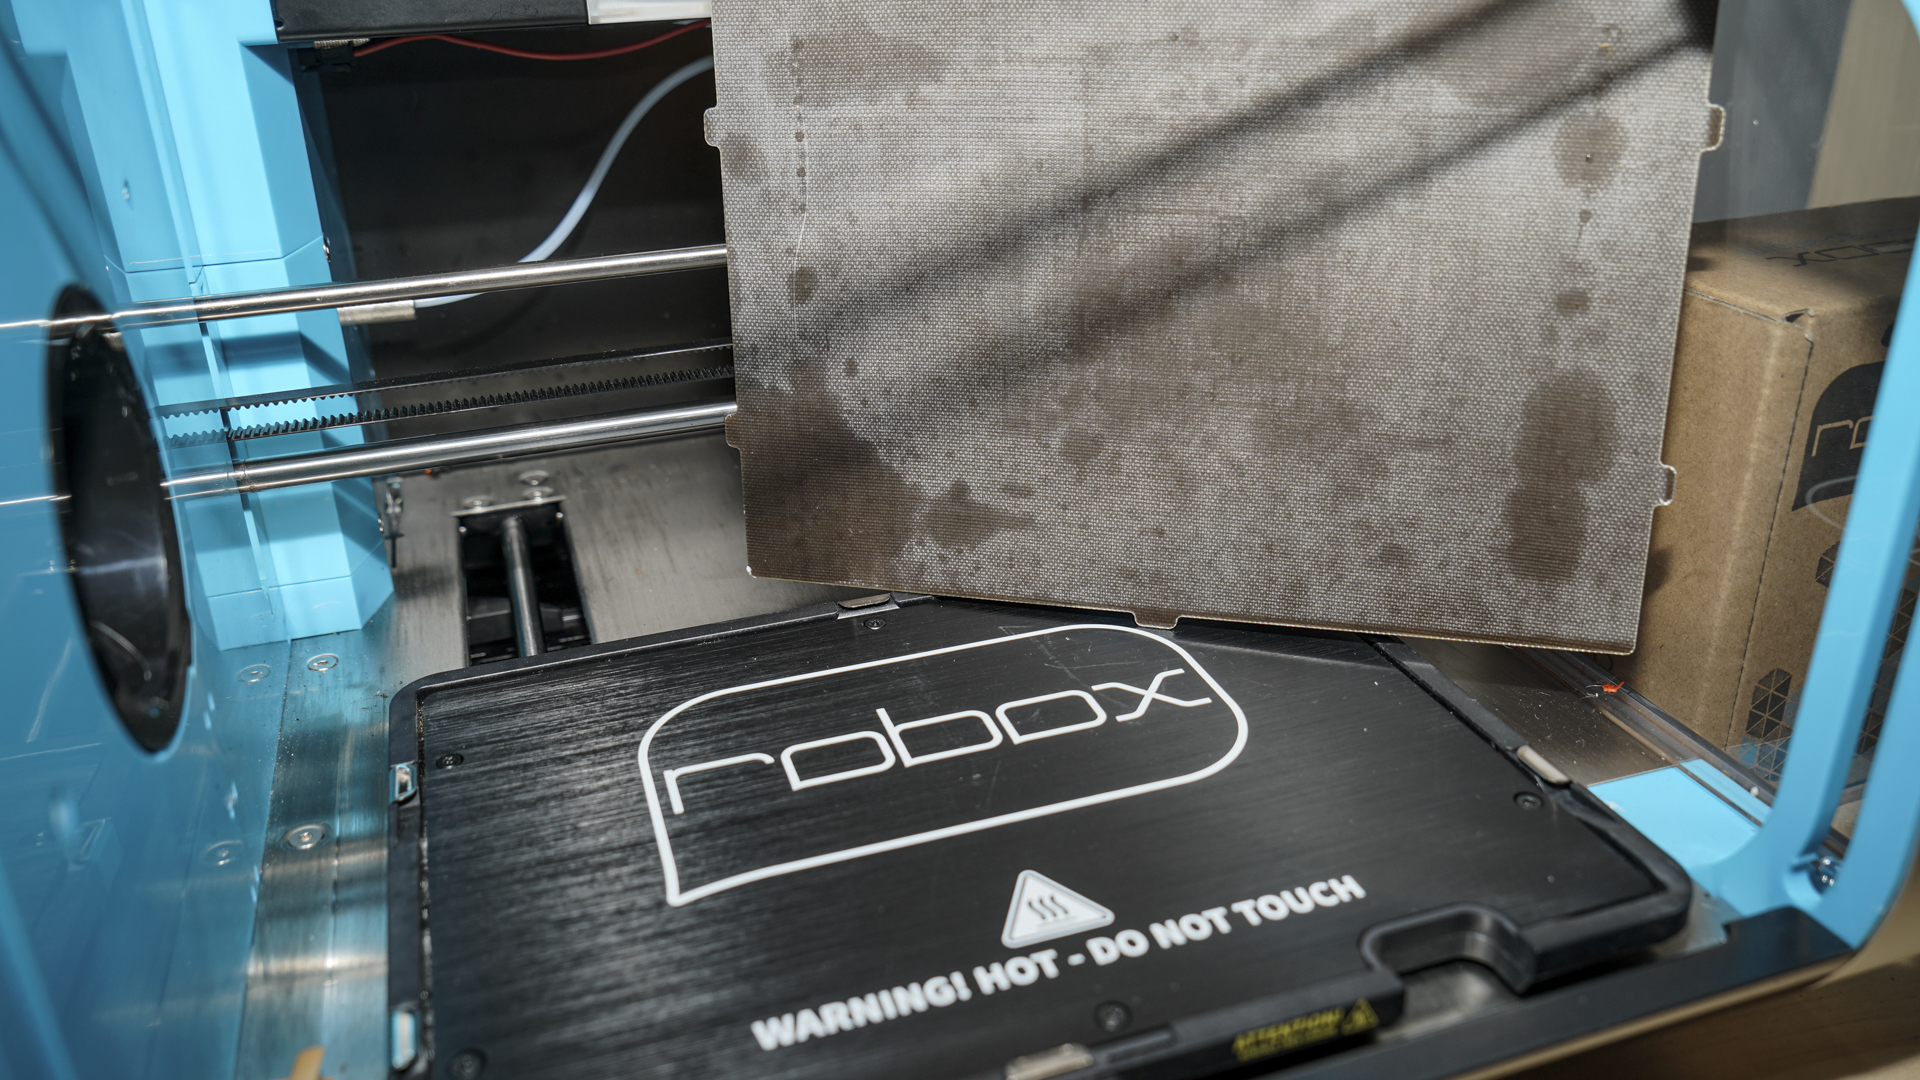
The print platform 'ThermoSurface' is a heated Polyetherimide (PEI) and doesn't require tape or glue to hold prints. It's designed to be easily slipped out of the machine and flexed to remove models once printed.
Filament wise there's plenty of choice with the machine taking standard 1.75mm diameter. What makes the Robox system different is that this filament can comes on 'SmartReels'.
These 'SmartReels' tell the machine what the filament is and how much filament is left. All this and more information can be viewed in the AutoMaker software.
CEL-UK sell a vast amount of materials, and it's reasonably priced, but if you do want to use your own, then you do have that option, but the Robox warranty will not cover parts damaged through the use of these materials.
You can even use an old 'SmartReel' or purchase an empty one and program in the filament details through AutoMaker.
The filament material options include; PLA, ABS, Nylon, PC, PET, TPU, PC-ABS and others. As this is a Dual extrusion system, there's also a variety of support materials, including PVA, HIPS and PLA.
Software wise the printer uses AutoMaker, and this is available as a free download, there's also a Pro version that adds a few more features including Offline printing if you're using CEL-UK RoboxPro printer or Mote.
As the software is Java-based, it will work on almost any system you wish, including Windows (7, 8, 10), Mac OSx (10.8+) and Ubuntu Linux (12.04+).
Notable features
CEL-UK has given all the major innovations contained within the RoboxDual names, here's a brief outline of some of the technology that comes in the box.
HeadLock
First up is are the two heads; 'DualMaterial' and 'QuickFill' these are part of the HeadLock system and enable you to swap heads depending on what you're doing.
To swap a head you first release the head in the AutoMaker software, then once prompted and the fans on the head come to a stop you can switch off the printer and unscrew the head using the large wheel at the back.
Once done the new head screws in, the printer and software will automatically recognise the head as you power up, with all settings and options automatically applied. No messing around with code and settings, it just works.
The technology inside the HeadLock system is also very interesting. It uses a needle valve system, this is unique and has several advantages over more traditional hotends. Primarily as the filament flow is cut off dead by a physical needle there is no retraction which leads to less stringing and material waste. This feature is particularly clever when used in dual extrusion prints. Because there is no stringing of material there is no need for wipe towers or the many other methods used to reduce the effect of stringing.
SmartExtruder
Extruders can be troublesome devices as different materials can act differently when pulled through the system.
The machine features two 'SmartExtruder's' which feed the dual hot ends. It also has fully automatic filament loading, you feed the filament in, and the extruder will grab it and push it through the system.
The extruder also features 'SurePrint' technology that ensures the filament is feeding through as it should and that there are no breakages or filament run outs.
The 'SmartExtruder' was one of the first standard extruders that could handle flexible materials with its dual pinch-wheel feed system pushing filament through a Bowden tube. This works particularly well thanks again to the needle valves providing control over the flow.
SmartReels
This is one of the greatest innovations, and although companies like XYZ Printing feature a similar system, CEL-UK's is ultimately more flexible and open.
Each Reel of CEL-UK Robox filament features a chip with all the details of the filament stored. As soon as that filament is loaded onto the machine, the contents are detailed in AutoMaker. Everything from the material type, how much is left and the cost to print a model once loaded.
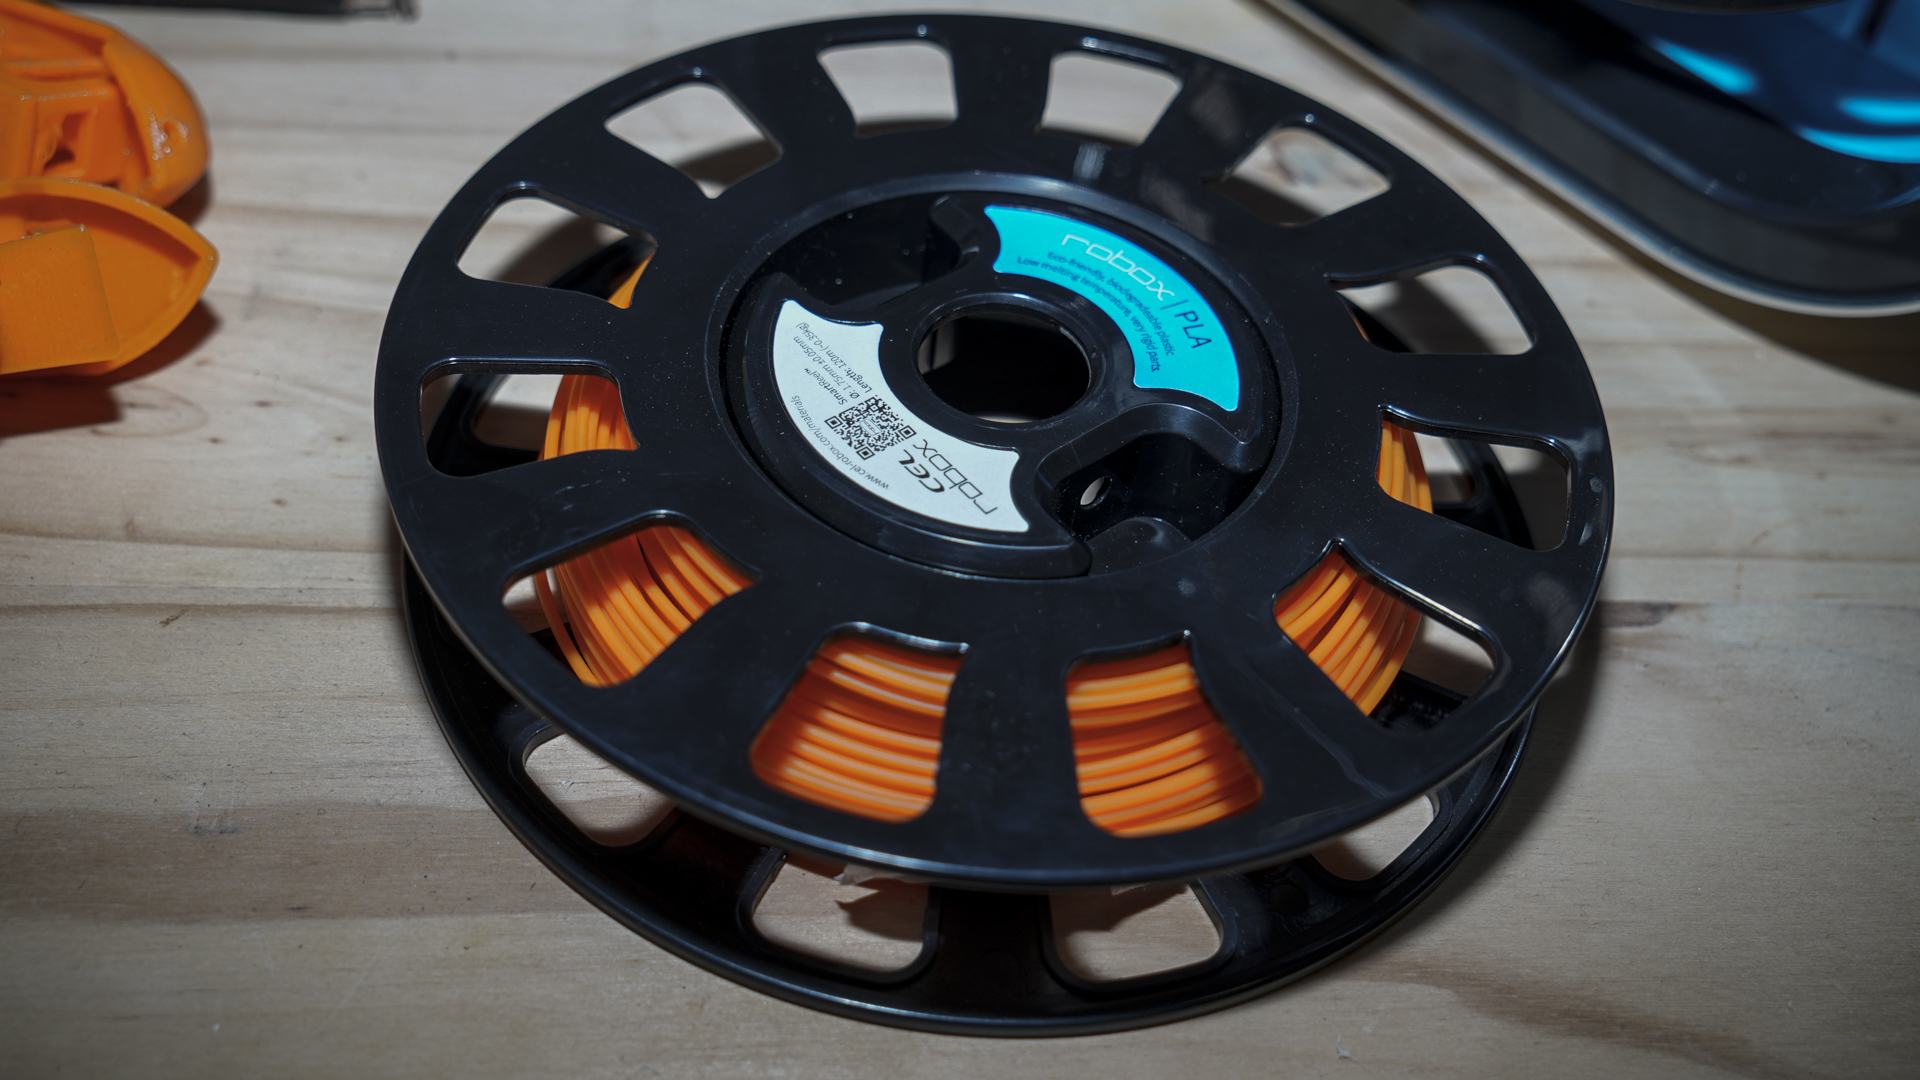
A great feature of the 'SmartReels' is that you can update the settings, so if you find a PLA model is printing to hot, then you can lower the nozzle temperature and write the details to the Reel.
If you want to use your own filament, warranty allowing, then that's fine as well. You can load material directly into the machine and use AutoMaker to select from a series of preset filaments or customise your settings. Or you can load it into a blank 'SmartReel' and program in the data to emulate the typical Robox automated setup.
Thermosurface
This is a feature that is suddenly becoming essential in 3D printing machines but has been in the Robox since the beginning. The print platform is designed to be used without tape or glue, and after every few prints, a quick wipe ensures that models stay firmly attached during printing.
The heated Polyetherimide (PEI) sheet enables prints to stick firm, then as they cool ABS, and other materials tend to release naturally. If a print does stick, then the sheet can be removed and flexed, and the print will pop off.
Once you've started to use PEI, you won't go back to glass or other platform options.
SafeLock
This is a straightforward idea and essentially means that the entire print build area is enclosed. This has a dual purpose, firstly it stops fingers, both child and adult, from entering during the print, and it also provides a controlled print environment that helps to minimise shrinkage.
Once a print starts the door to the print area automatically locks, then once the print finishes it will then automatically unlock. It's a simple system but essential at home and in schools. There is an option to disable this feature.
Setup and materials
Of all 3D printers, few are as easy to set up as the RoboxDual. Take it out of the box, strip away the packaging and assemble the reel holder.
A slight novelty here is that the RoboxDual can be placed on to your desktop, the small footprint is essentially the same as the standard 2D printer.
Then install the AutoMaker software and plug-in and power up the printer, grab a pair of scissors and cut the ends of each filament to 90º and feed them into the printer. There's a reel 1 and reel 2 slot all clearly marked.
Once the filament installation has taken place, which takes a few seconds, you're ready to load your first model into AutoMaker and print.
Of all the 3D printers I've used the process for setting up and getting started with the RoboxDual is by far the easiest, although other printers are catching up. There's nothing to work out and the process of powering up and loading a model is all straight forward.
The one difference between this and many other printers is that there is no offline option as standard. Without the Root or Mote add-on you can't just switch the RoboxDual on and print, it needs to be plugged into a computer to work.
The basic setup is straight forward, but unlike other printers, the machine as standard arrives with two head options; the 'DualMaterial' or the 'QuickFill'. Swapping these over is easy, as highlighted before, and the results from each while similar have quite different applications.
As standard the RoboxDual comes with the 'DualMaterial' head fitted, this is the most exciting of the two and enables you to print dual materials; either different colours or materials.
While dual material printing is cutting edge, I found that during the test swapping to the 'QuickFill' head meant that I could test ideas quickly and produce higher quality prints.
Having both options in the box is a unique feature and makes sense. For most 3D printing jobs such as printing prototypes, parts for various things around the house and small, simple products, the 'QuickFill' was an ideal choice.
However, when I needed to print complex structures that required support or dual materials, then the 'DualMaterial' head was a better option. Because it only takes a few minutes to make the swap heads with little fuss, it's all straightforward. But, it is essential that you follow the AutoMaker instructions when head swapping.
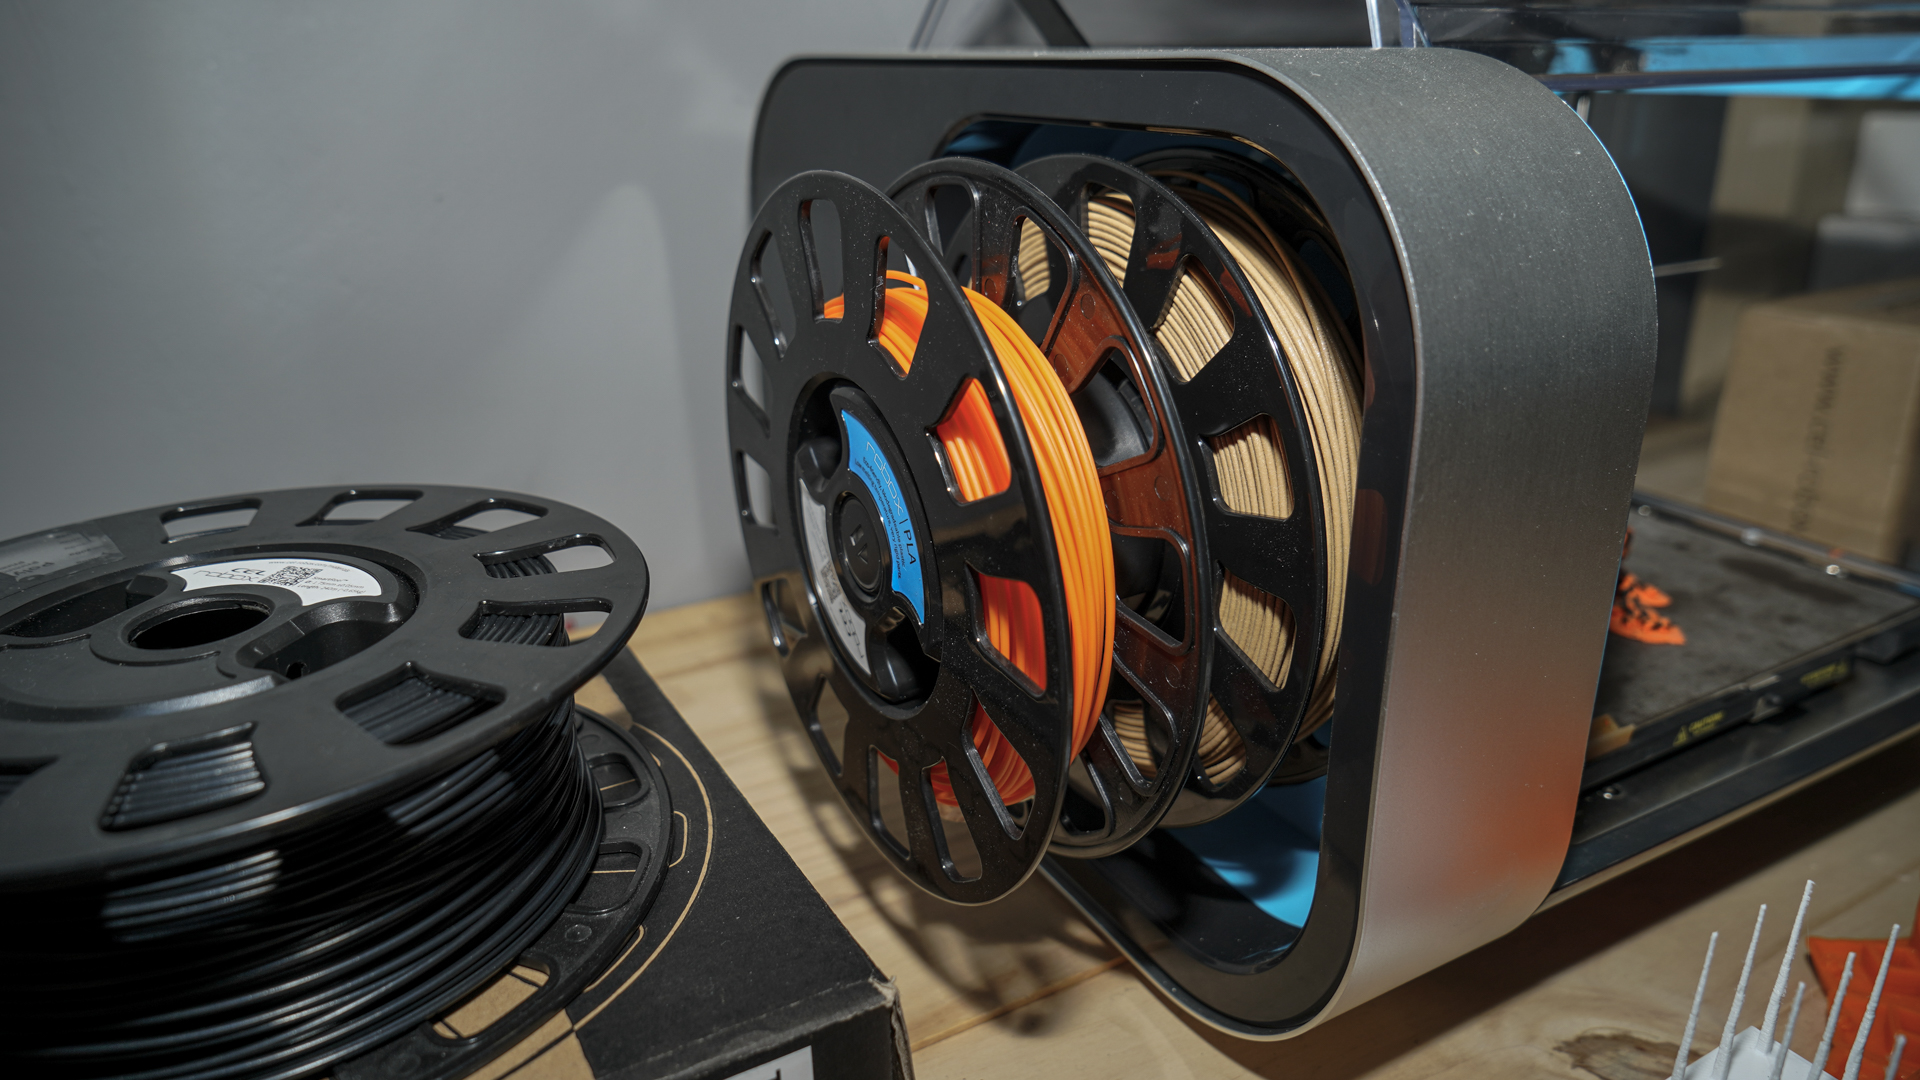
Although there are two head options and swapping between the two is easy, I did find myself longing for another printer so I could test ideas, mix parts and materials and expand to a stacker system.
AutoMaker
Software is at the heart of many 3D printers, and the usability of the application can greatly affect the quality of prints.
AutoMaker is one of the most complete applications out there, primarily loading a model selecting the print quality and printing is all obvious and straightforward.
What AutoMaker does and has done for some time is to highlight details about your printer and filament, meaning that you can monitor exactly what's going on.
For instance, if you load a model, AutoMaker will tell you the time that model will take to print, how much filament it will use and the cost. At the same time, because the machine uses SmartReel's, you can check whether you have enough filament to complete the job.
If you don't but want to use up the reel, then the software and printer communicate to make sure the printer stops so you can load a new reel.
It's through AutoMaker that all the control over the printer comes as there is no on machine interface or control.
AutoMaker has three screens, the first deals with the printer, ejecting filaments, purging, calibrating etc., the next screen enables you to bring in your model for printing and then the final screen before print allows you to adjust the print quality settings.
It's a one, two, three approach that makes things easy to understand.
Alongside the basics, AutoMaker features far more, but unlike other software, those options are neatly tucked away in the Menu at the top right of the screen. These sections are the Library and Preferences.
Filaments and print profiles
The first set of options 'Library' enables you to adjust the Filaments and Print Profiles.
How this works isn't immediately apparent as all the settings bar one are greyed out. Click onto the Filaments option, and it shows you the loaded filament, click the dropdown, and you can select other filaments.
If you want to change the settings for the filaments, for example, it may be a hot day, and you find that the PLA is too hot, then you need to click 'Save As' at the bottom of the screen, once clicked you can then adjust the settings. Once you're happy with the changes clicking Write to Reel will then save those settings to the Reel you choose; either 1 or 2.
The Preference options are more to do with the printer and enable you to check the head type, Networking and set up a GoPro to shoot Time-Lapses of your prints. Offline printing and g-code visualisation is available if you purchase the Pro Version.
AutoMaker has a great deal going for it and eases the 3D Print process for those new to the application. The Pro version, which does cost extra, adds valuable features for advanced application, but is not required for typical usage. Root is a package which adds wifi and other connectivity but this is only required if you're using several RoboxDual's or need to access these printers via a network.
Ali Jennings is the imaging lab manager for Future Publishing's Photography portfolio. Using Imatest Master and DxO Analyser he produces the image quality tests for all new cameras and lenses review in TechRadar's cameras channel. Ali has been shooting digital since the early nineties and joined Future's Photography portfolio back in 2003.
