Why you can trust TechRadar
These two features are brand new in Lightroom 6. Previously, if you wanted to stitch together multiple frames to make a panorama, or combine separate exposures into a single HDR (high dynamic range) image, you would have to send them to Photoshop.
But now, the same Photomerge technology used in Photoshop is built into Lightroom too – for these particular tasks, at least.
HDR Merge in action
HDR (high dynamic range) images can be tricky to get right. It's easy enough to shoot a series of exposures of the same scene and there are plenty of programs which can merge these into an HDR image – Photoshop is one – but getting results which look realistic or pleasing takes a bit more work.
But Lightroom 6 makes it disarmingly simple by keeping the technicalities to a minimum yet delivering really good results.

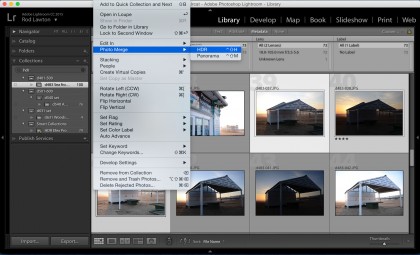
First, you select the images you want to merge and then you choose the Photo Merge > HDR option from the menus and wait while Lightroom creates an HDR preview in a separate HDR Merge window. You can check the Auto Align box to make sure Photoshop adjusts any misalignment between images and the Auto Tone box to automatically correct the contrast and brightness of the result.
There are options too for 'Deghosting' the image, but these may only be necessary if you have moving objects moving between the frames, such as leaves and branches, or passers by.
When you hit the Merge button it can take a minute or so to blend the images, and once it's done it's clear that Lightroom has done something different and rather good. Instead of creating a lurid, 'artistic' HDR image with dramatic tonal contrast and 'glow' effects, it produces a very realistic image with all the shadows and highlights intact but without unrealistic tonal compression or flattened contrast.
Panorama Merge in action
The Panorama Merge feature could hardly be simpler. First, you select the individual frames of your panorama in Lightroom, then choose 'Photo Merge' and then the 'Panorama' option from the menu.
If you've done this before in Photoshop you'll know that you're then presented with a fairly complex dialog listing different layout options and a list of source files. Here, it's much simpler. Lightroom offers three different 'Projections' – you can think of these as the surface you're creating the panorama on. You can leave it to 'Auto Select Projection' or manually choose 'Spherical', 'Cylindrical' or 'Perspective'. A cylindrical projection is usually best for regular single-strip panoramas.
Now you just decide whether you want Lightroom to 'Auto Crop' your panorama or not. The stitching process will leave ragged blank areas at the edges of the picture, and while Photoshop has special 'content-aware' technology to fill these in, Lightroom does not, so the Auto Crop option will save you having to crop the edges off manually afterwards.
And that's it. Lightroom will produce a perfectly-stitched panorama with no further effort on your part. It works extremely well, and its a simplified version of the panorama tools in Photoshop, which makes it all the more welcome.
Panoramas don't always have to be in a super-wide letterbox format, of course. Just two overlapping frames can be stitched together to produce a more normally-proportioned super-wideangle shot.
In a final twist, both the HDR and Panorama tools produce DNG files rather than JPEGs or TIFFs – and this gives much more scope for image manipulation and enhancement later.
Current page: HDR Merge and Panorama Merge
Prev Page Introduction and features Next Page Filter masking and brush changes
Rod is an independent photographer and photography journalist with more than 30 years' experience. He's previously worked as Head of Testing for Future’s photography magazines, including Digital Camera, N-Photo, PhotoPlus, Professional Photography, Photography Week and Practical Photoshop, and as Reviews Editor on Digital Camera World.
