TechRadar Verdict
TechSmith’s Camtasia is one of the best screen recorders we’ve ever reviewed. Setup is easy, recording is flawless, and the editing capabilities are both simple and incredibly powerful, setting it apart from the competition. Compatibility across macOS and Windows is just the icing on the cake.
Pros
- +
Multi-platform
- +
Very easy to set up
- +
Highly versatile
Cons
- -
Not a budget tool
Why you can trust TechRadar
If you’re on the lookout for one of the best screen recorders for your Mac or PC, you’ll find yourself in a crowded market. One candidate, which happens to be cross-platform, is TechSmith’s Camtasia, and to entice you to give it a try, it comes with a free 7-day trial.
We last reviewed the software in 2022, back when the free trial was a generous 60 days. That aside, how does Camtasia compare to rivals now? We put the screen recording software to the test.
Camtasia: Pricing & plans
- Premium pricing, premium product
We’ve taken a look at many apps which offer subscription-based services, some as low as $3 a month, like ScreenPal, and some of the best free screen recorders, albeit with limitations, such as Flashback Express.
Camtasia is a more expensive beast. If does offer different prices depending on the subscription tier you choose. For instance, Camtasia Essentials offers screen and webcam recording, video editing tools, and text-to-speech transcription, for $180 / £171 a year.
Camtasia Create brings in AI-generated scripts, text-based video editing, audio cleanup, and over 200 voices and styles, for $250 / £237 per year.
Whereas Camtasia Pro includes video reviews and collaboration, AI-translated captions, AI-generated chapters, titles and descriptions, AI-generated avatar videos, and millions of premium assets, for $500 / £474 a year.
If you’re looking for a perpetual licence, these are still available if you’re part of a business, in education or the government, and will cost a one-off $300, $213 or $270 per user respectively. Do be aware though that unlike subscriptions, future updates will not be included for that price.
So yes, it’s at the top end of the price range, but we’d recommend you do download the trial version to at least give it a go. Not only did we find it a breeze to set up, Camtasia also includes some of the best video editing software tools in its field, a feature lacking in many other competing software we’ve tested.
- Plans & pricing: 3/5
Camtasia: Setup
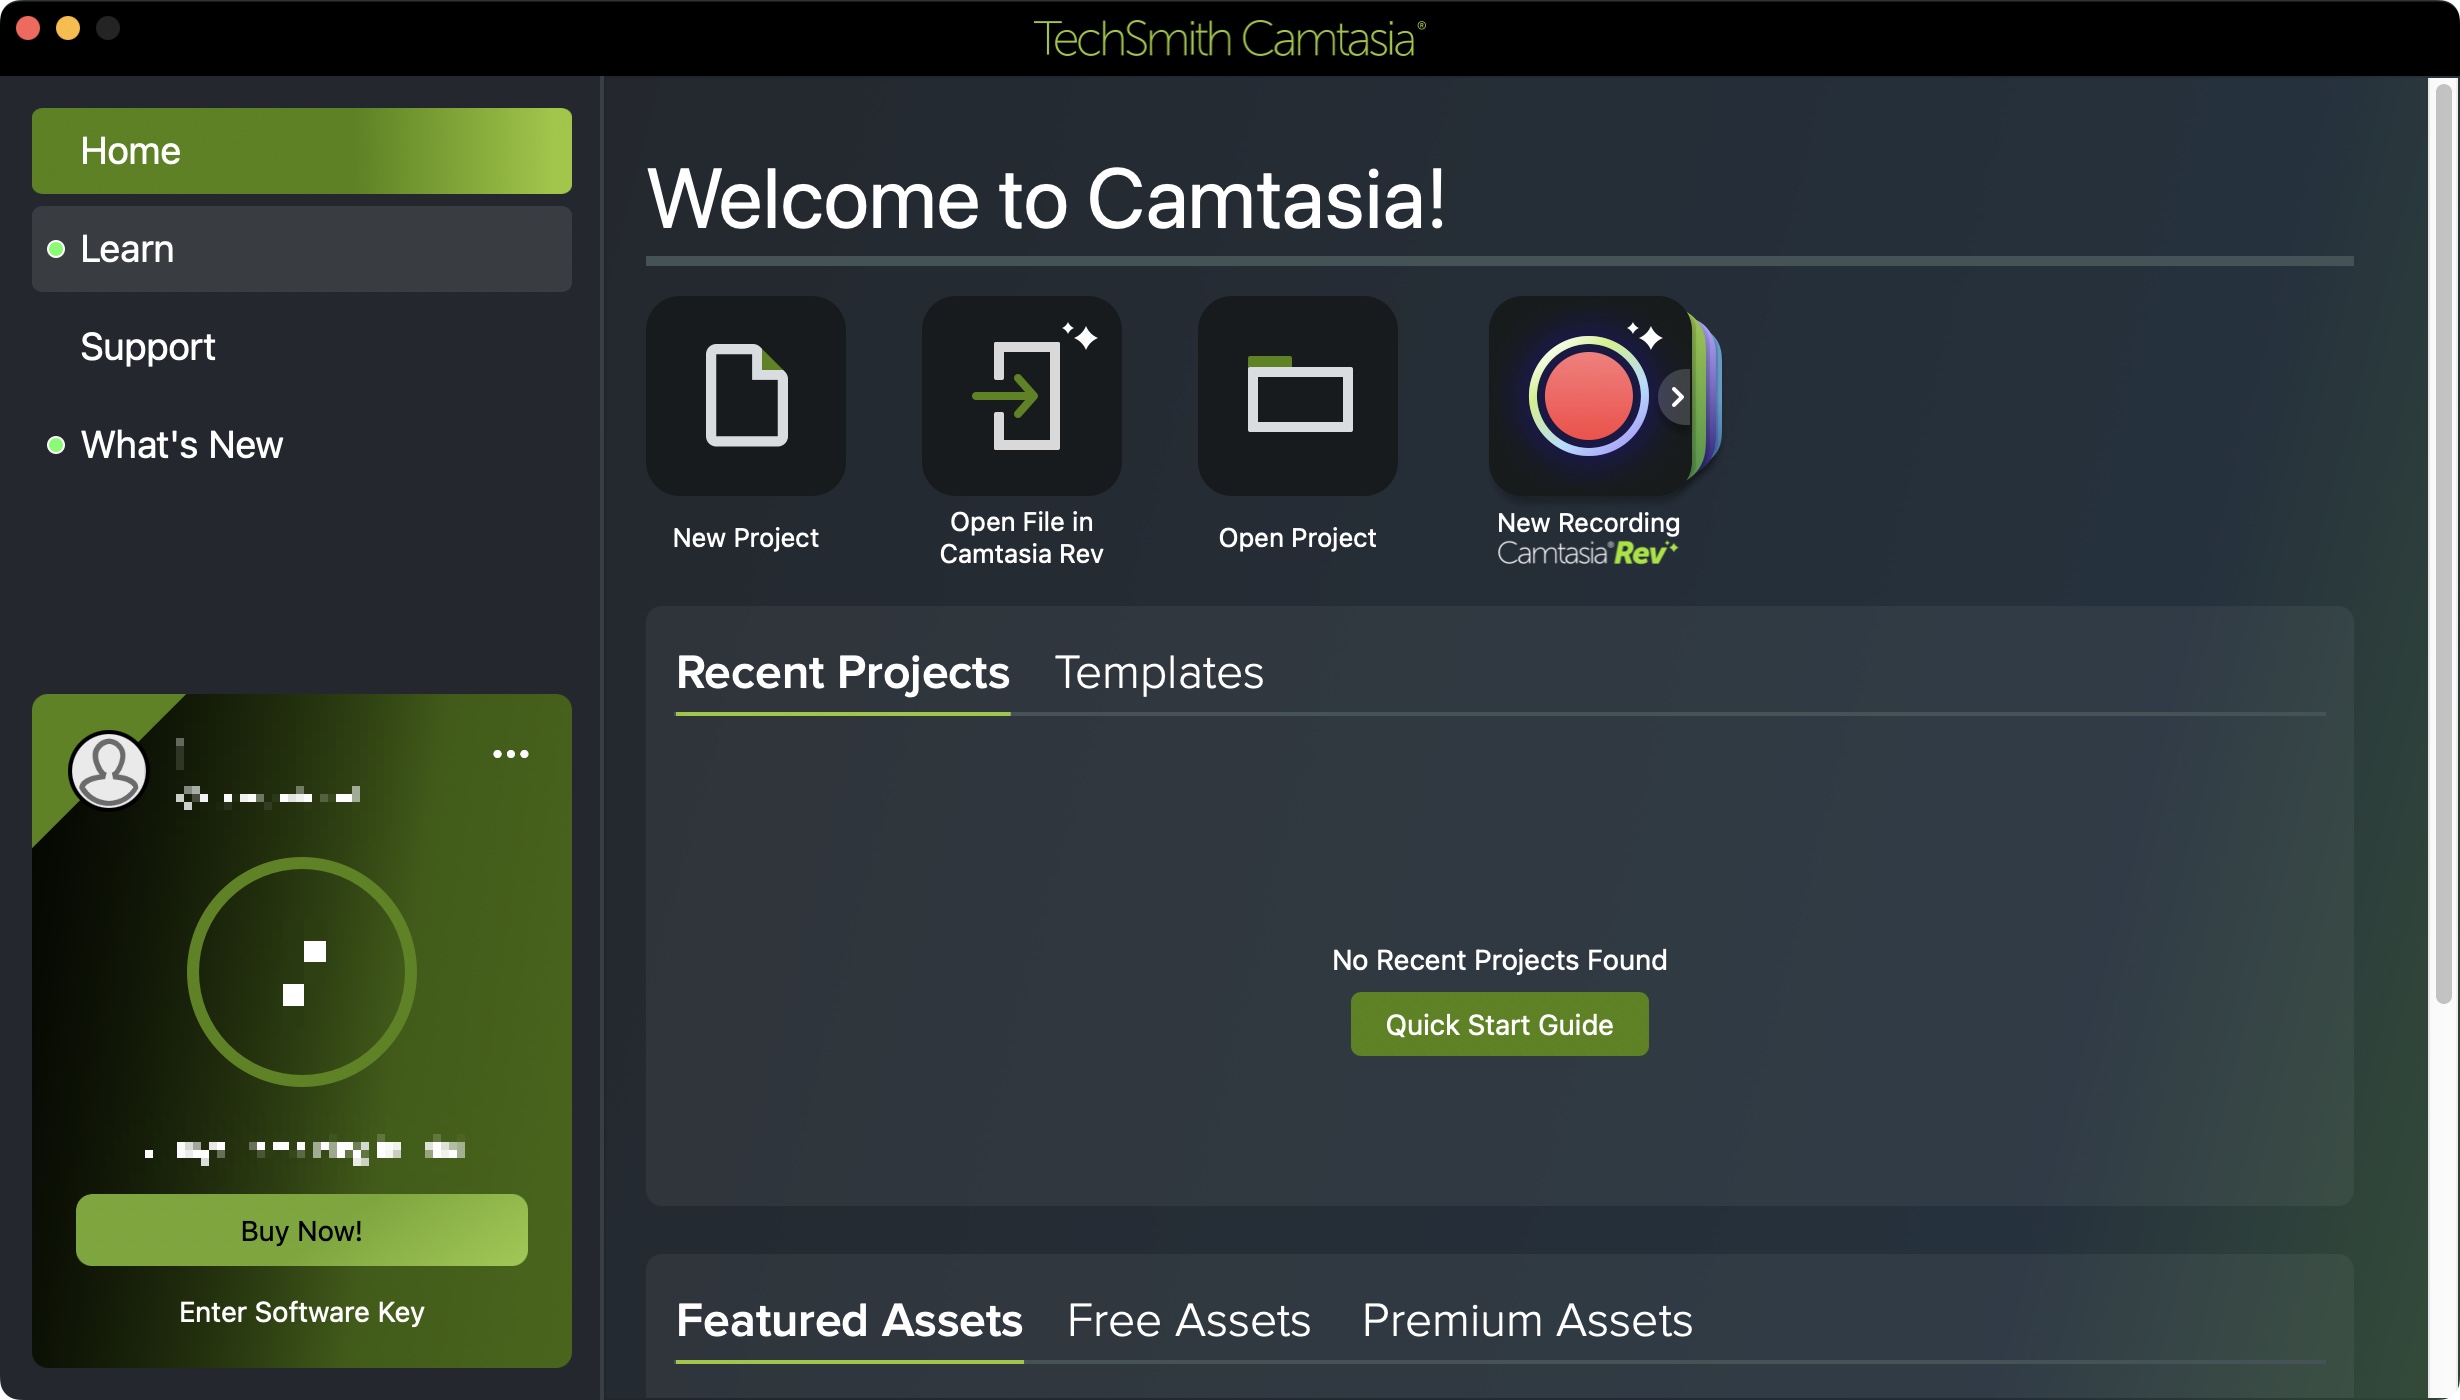
- Really simple authorisation process to enable all needed features
Like all other apps of this type, you’ll need to authorise it for recording your screen, webcam, along with any audio sources.
Other software can make this process opaque and confusing, but Camtasia does an excellent job at simplifying the process as much as possible: click on your webcam, and it’ll ask you to authorise the process. The same for your microphone, computer’s audio, and of course, your screen.
Camtasia will also open up your computer’s settings at the right location for you to do all of this. You’ll have to restart the app for the preferences to take effect, but once done, you won’t have to do it again, and Camtasia is ready to record.
- Setup: 5/5
Camtasia: Capturing
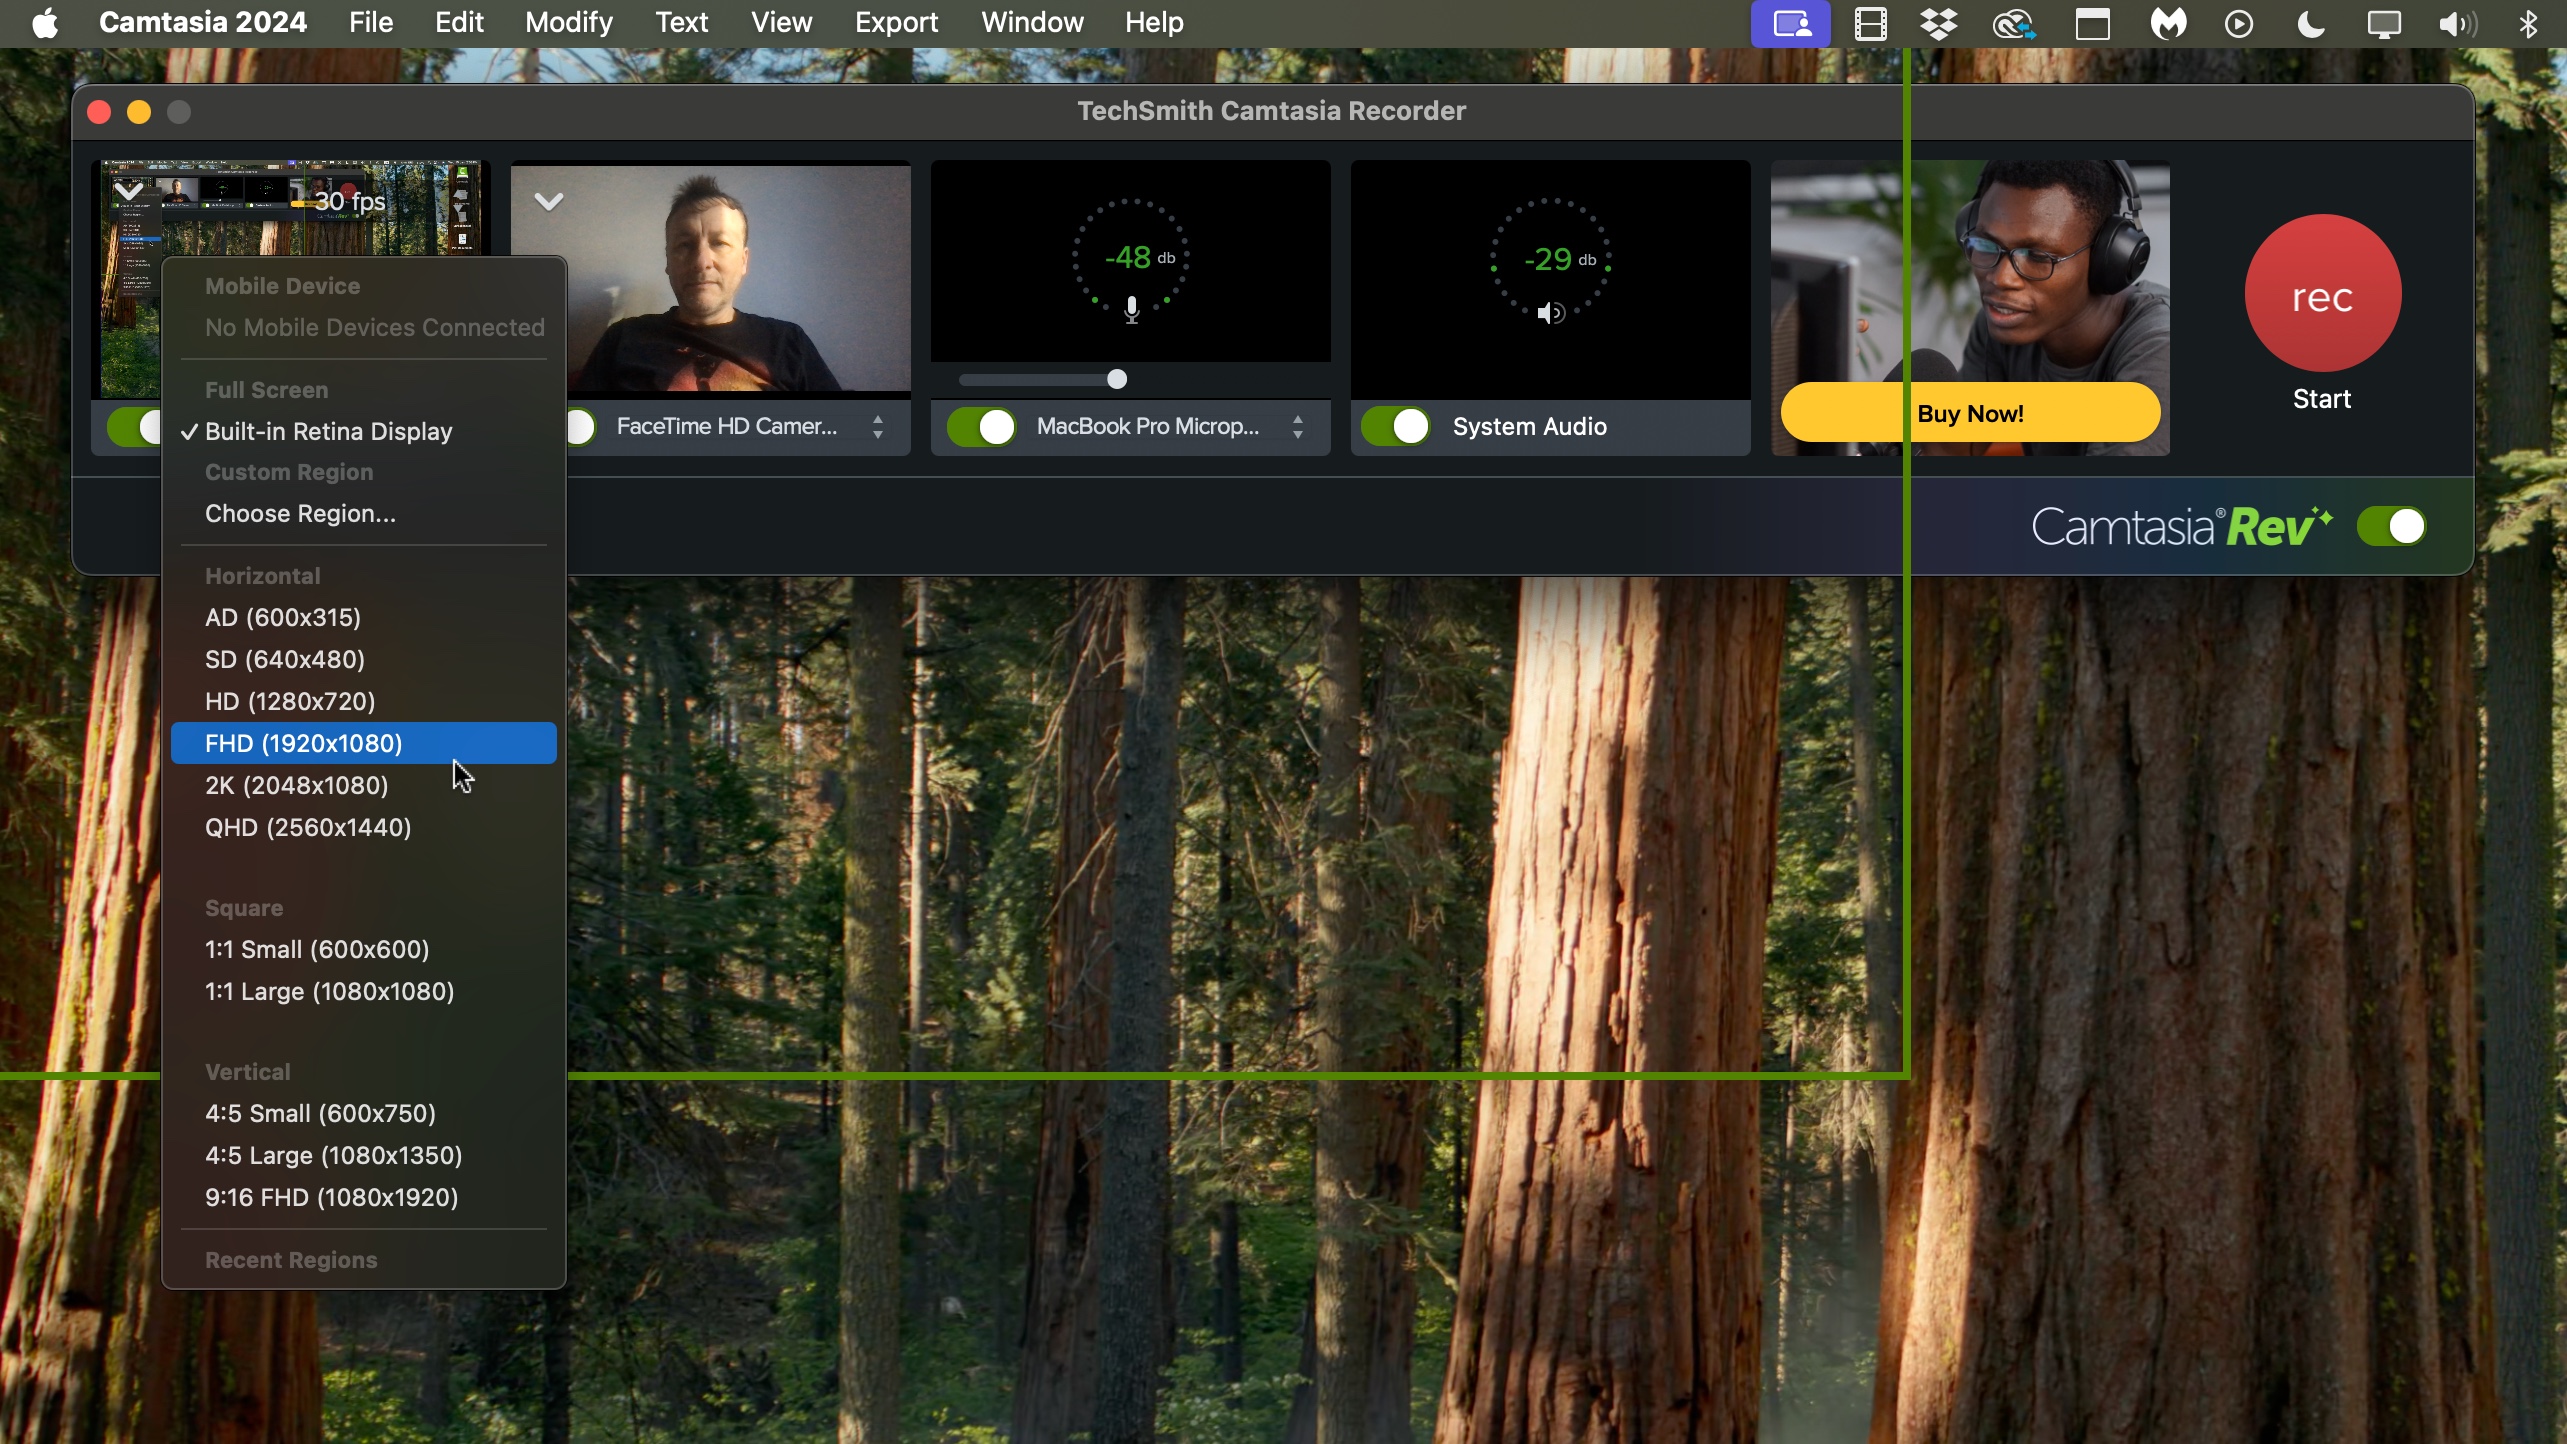
- Easy to set up your many recording parameters
Setting up a recording session is as easy as can be: you’re presented with a simple welcome screen offering you access to your most recent recordings, the option to create a new project from scratch, one based on a template (a wealth of which are available through Camtasia’s Asset Store), open a project not in the list of recent ones, or start a new recording.
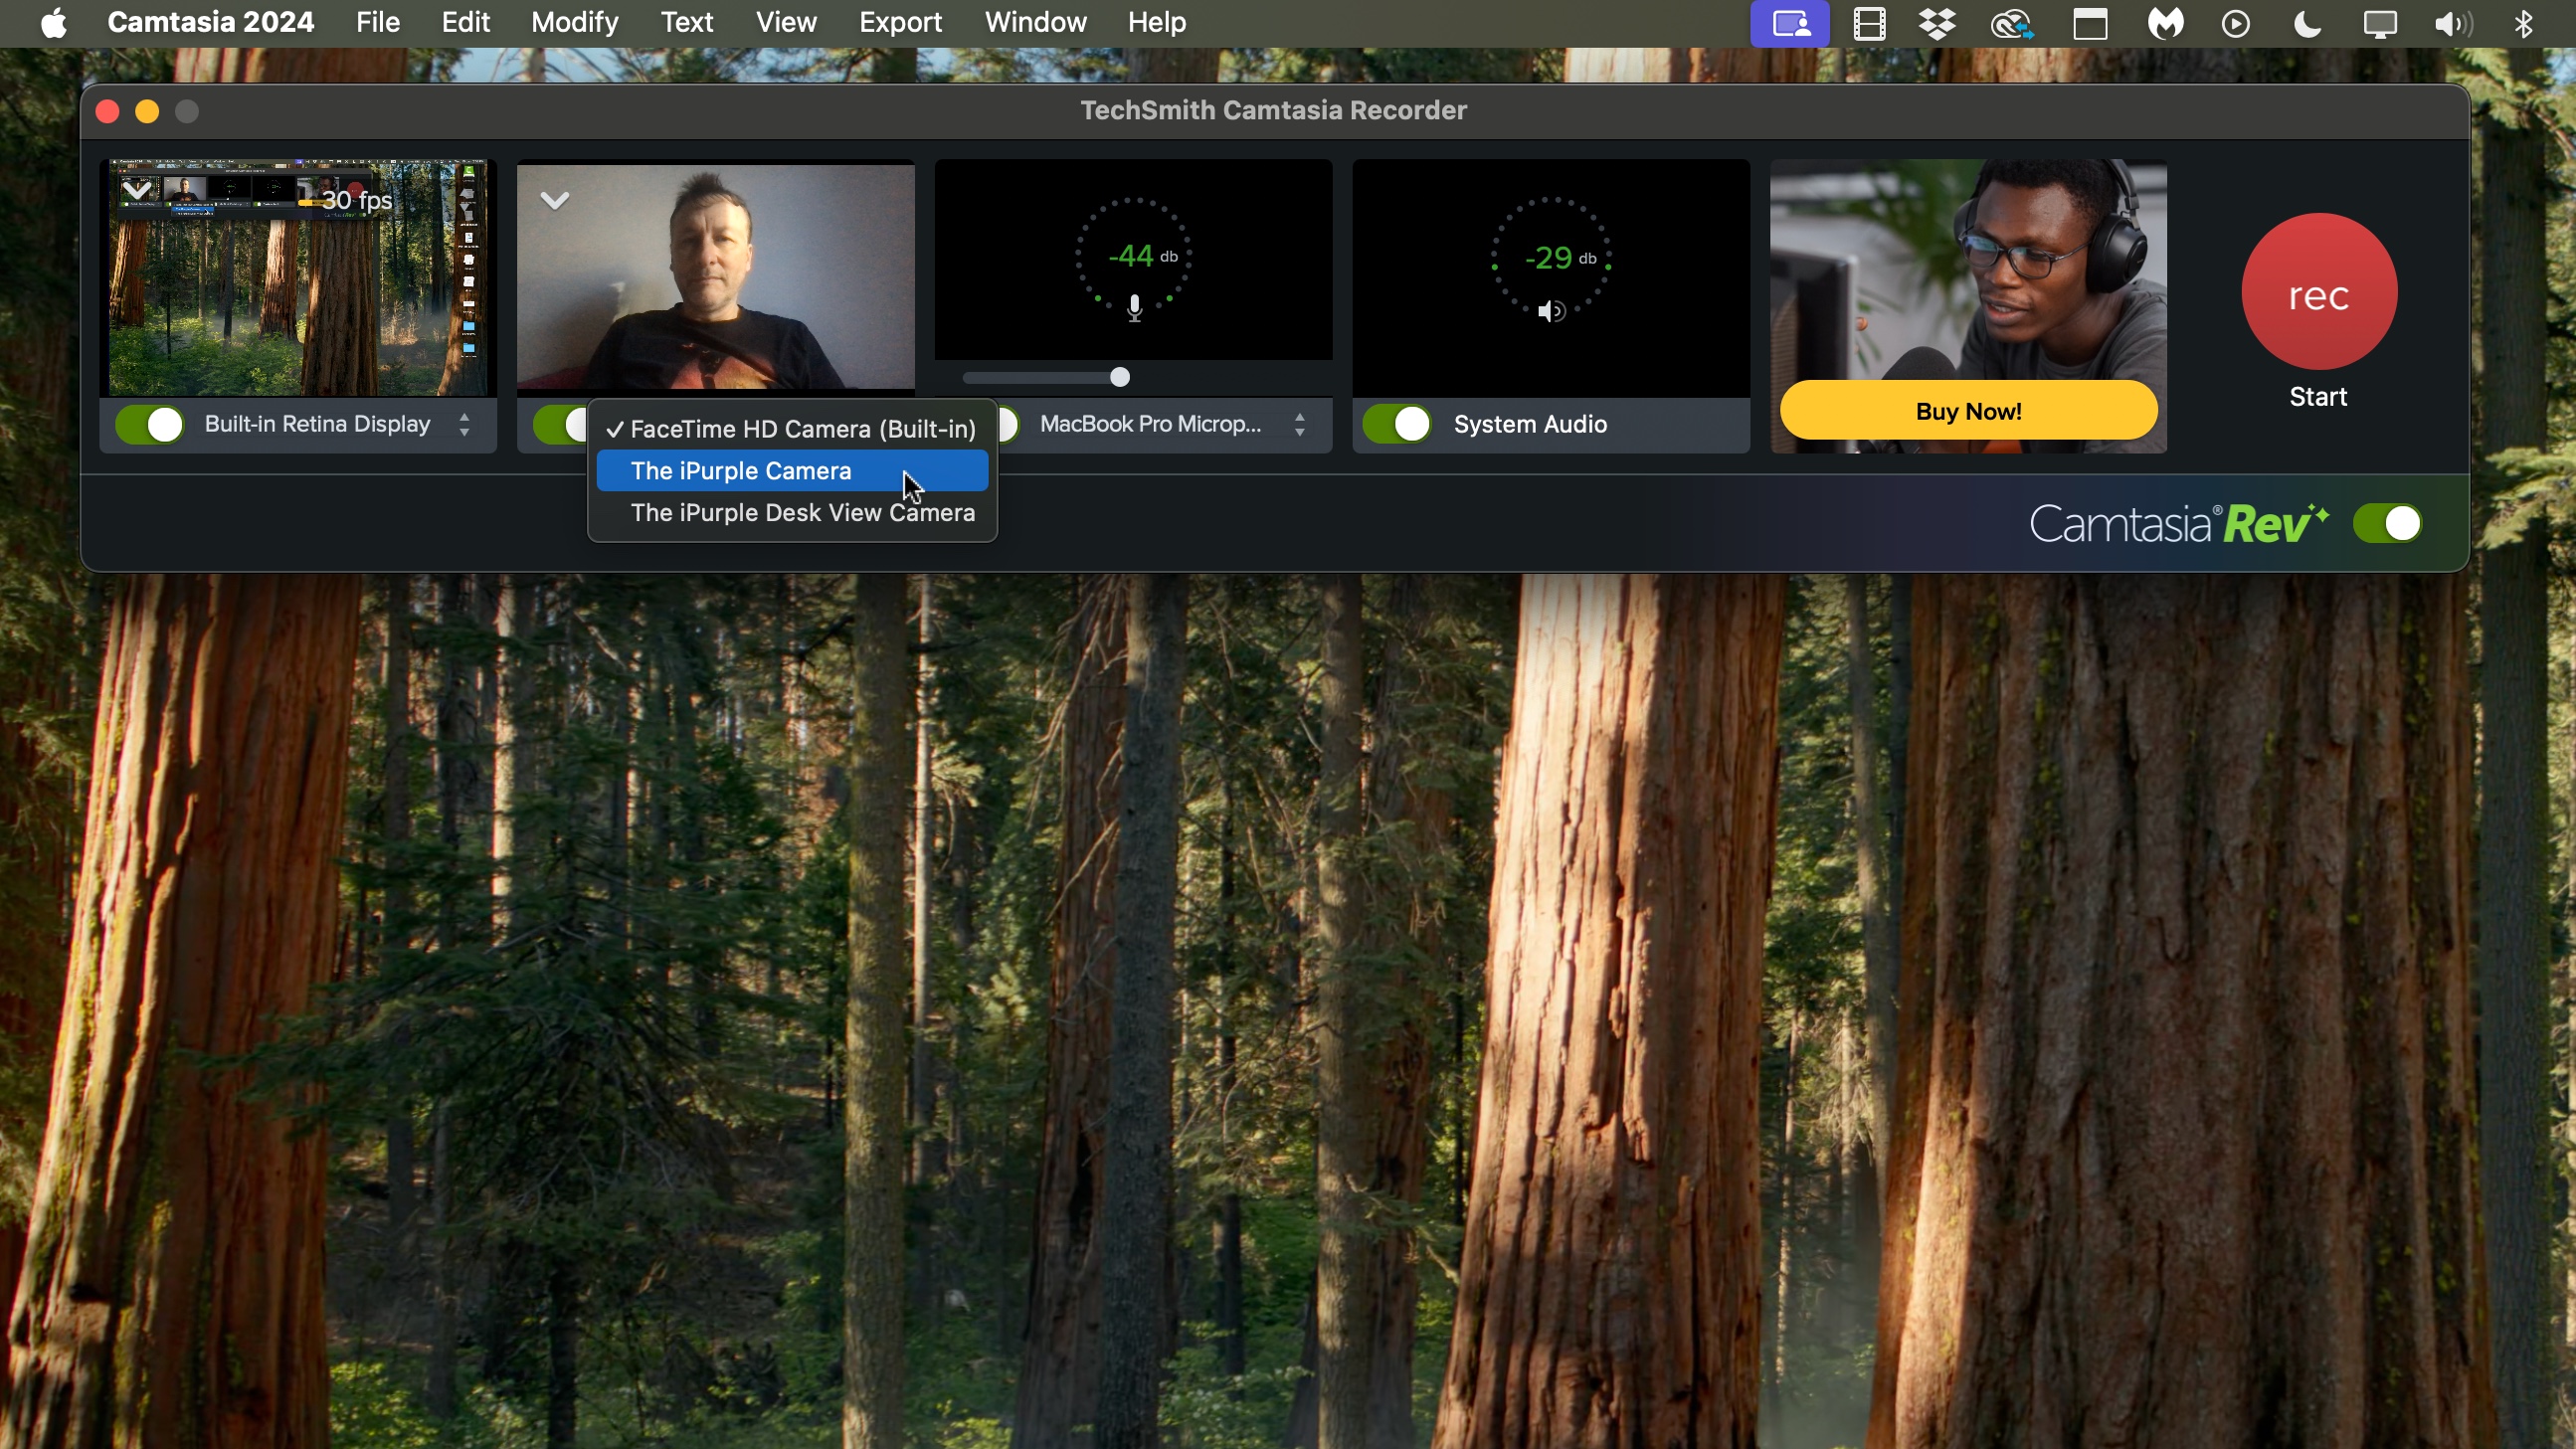
By default, when setting up a new recording, Camtasia will capture your entire Desktop, but there’s a drop down menu to let you select a specific size or region, with a green border appearing to show you what’s going to be in the shot, and what won’t be.
You also have the option of changing the frames per second value from 5 to 60 (the default is 30). If your webcam supports it, you can control its resolution. You get to choose which microphone to record the external audio from, and whether or not to capture the system audio as well.
Once you’re ready, click on the big red ‘Rec’ button. You’ll be given a 3-second countdown, and the controls will disappear, letting you capture with no windows or menus getting in the way.
Stopping the recording is done via a handy keyboard shortcut displayed during the countdown, or via the menu bar on your Mac. You’ll then be taken to the Workflow area.
- Capturing: 5/5
Camtasia: Workflow
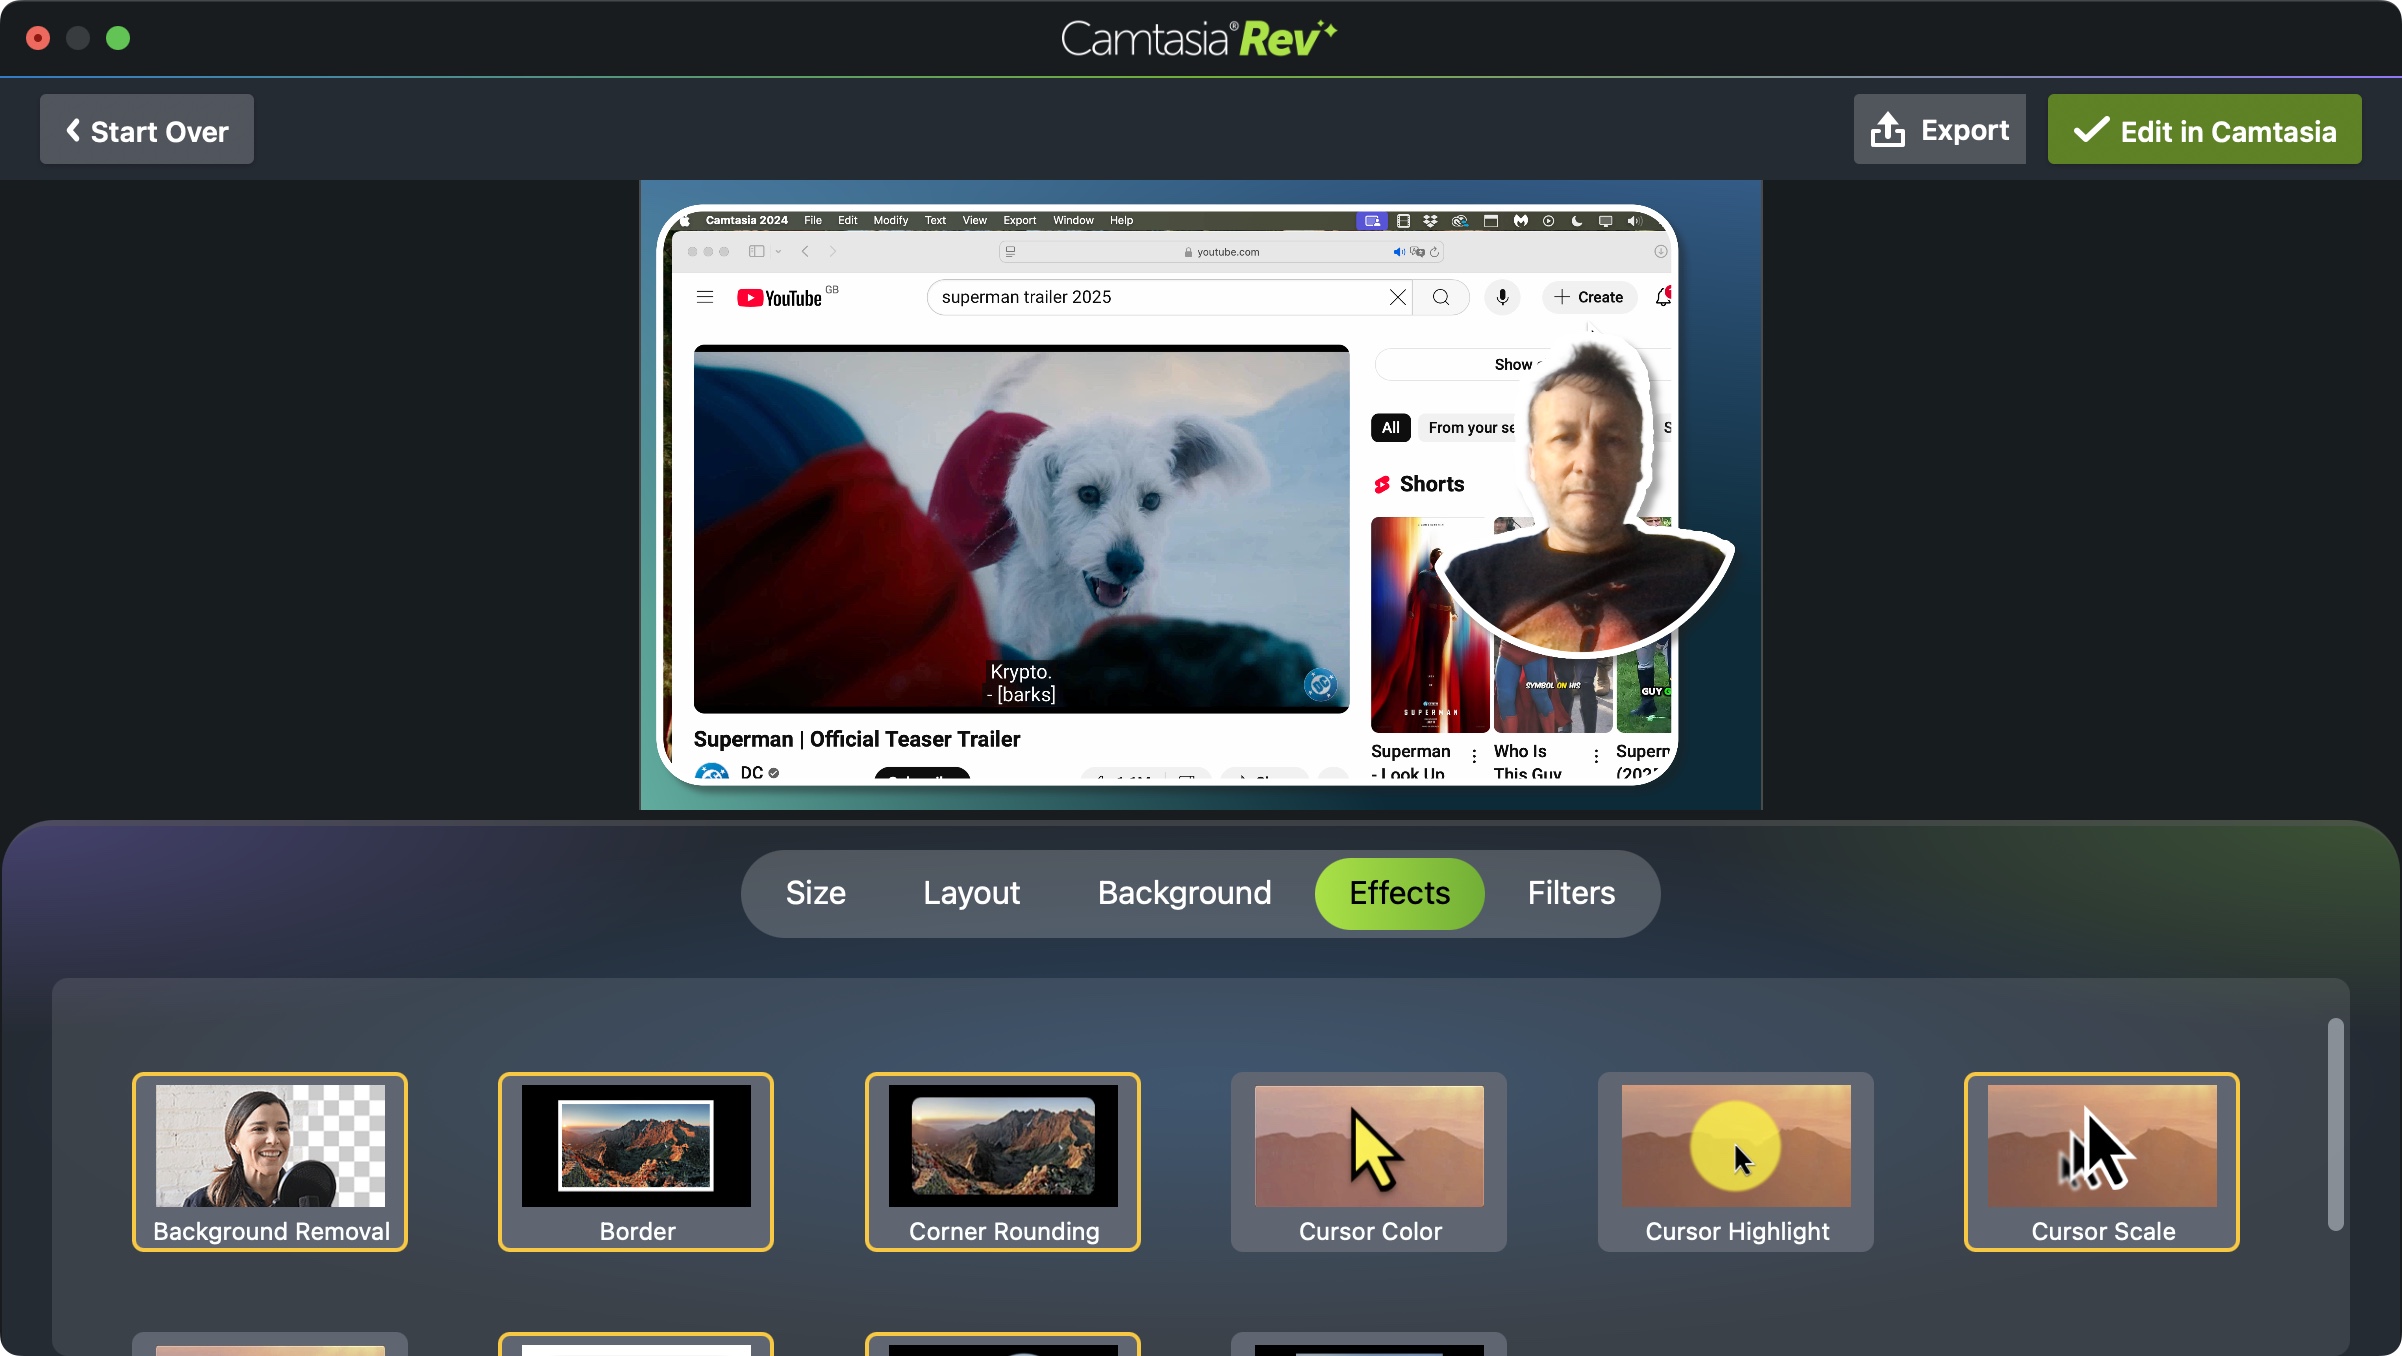
- A series simplified list of templates you cannot customise, but could be more than enough to give your project a professional look with next to no effort
Think of the Workflow as a staging area for your recording. You might be very happy with what you achieved during the recording, and don’t need to do any editing, so you can use Workflow to pretty up your project. For instance, you have 16 different layout templates to choose from, placing the webcam and your screen recording in different areas of the screen, with different effects applied to each. Should you need one, you can add a coloured background, or select additional effects such as increasing the size of the cursor, changing its colour, adding a reflection to your screen recording, a white border, etc, and finally you’ve got a bunch of filters to play with.
This is a great midway option, letting you quickly create a style you might like as long as you’re happy with the inability to fine tune the results. Still, this could satisfy most users, helping them finish in next to no time. If however you’re more of a hands-on, sweat-the-details kind of person, then it’s time to take a trip to Camtasia’s Editor (by clicking on the green button, top right of the interface).
- Workflow: 4/5
Camtasia: Editing
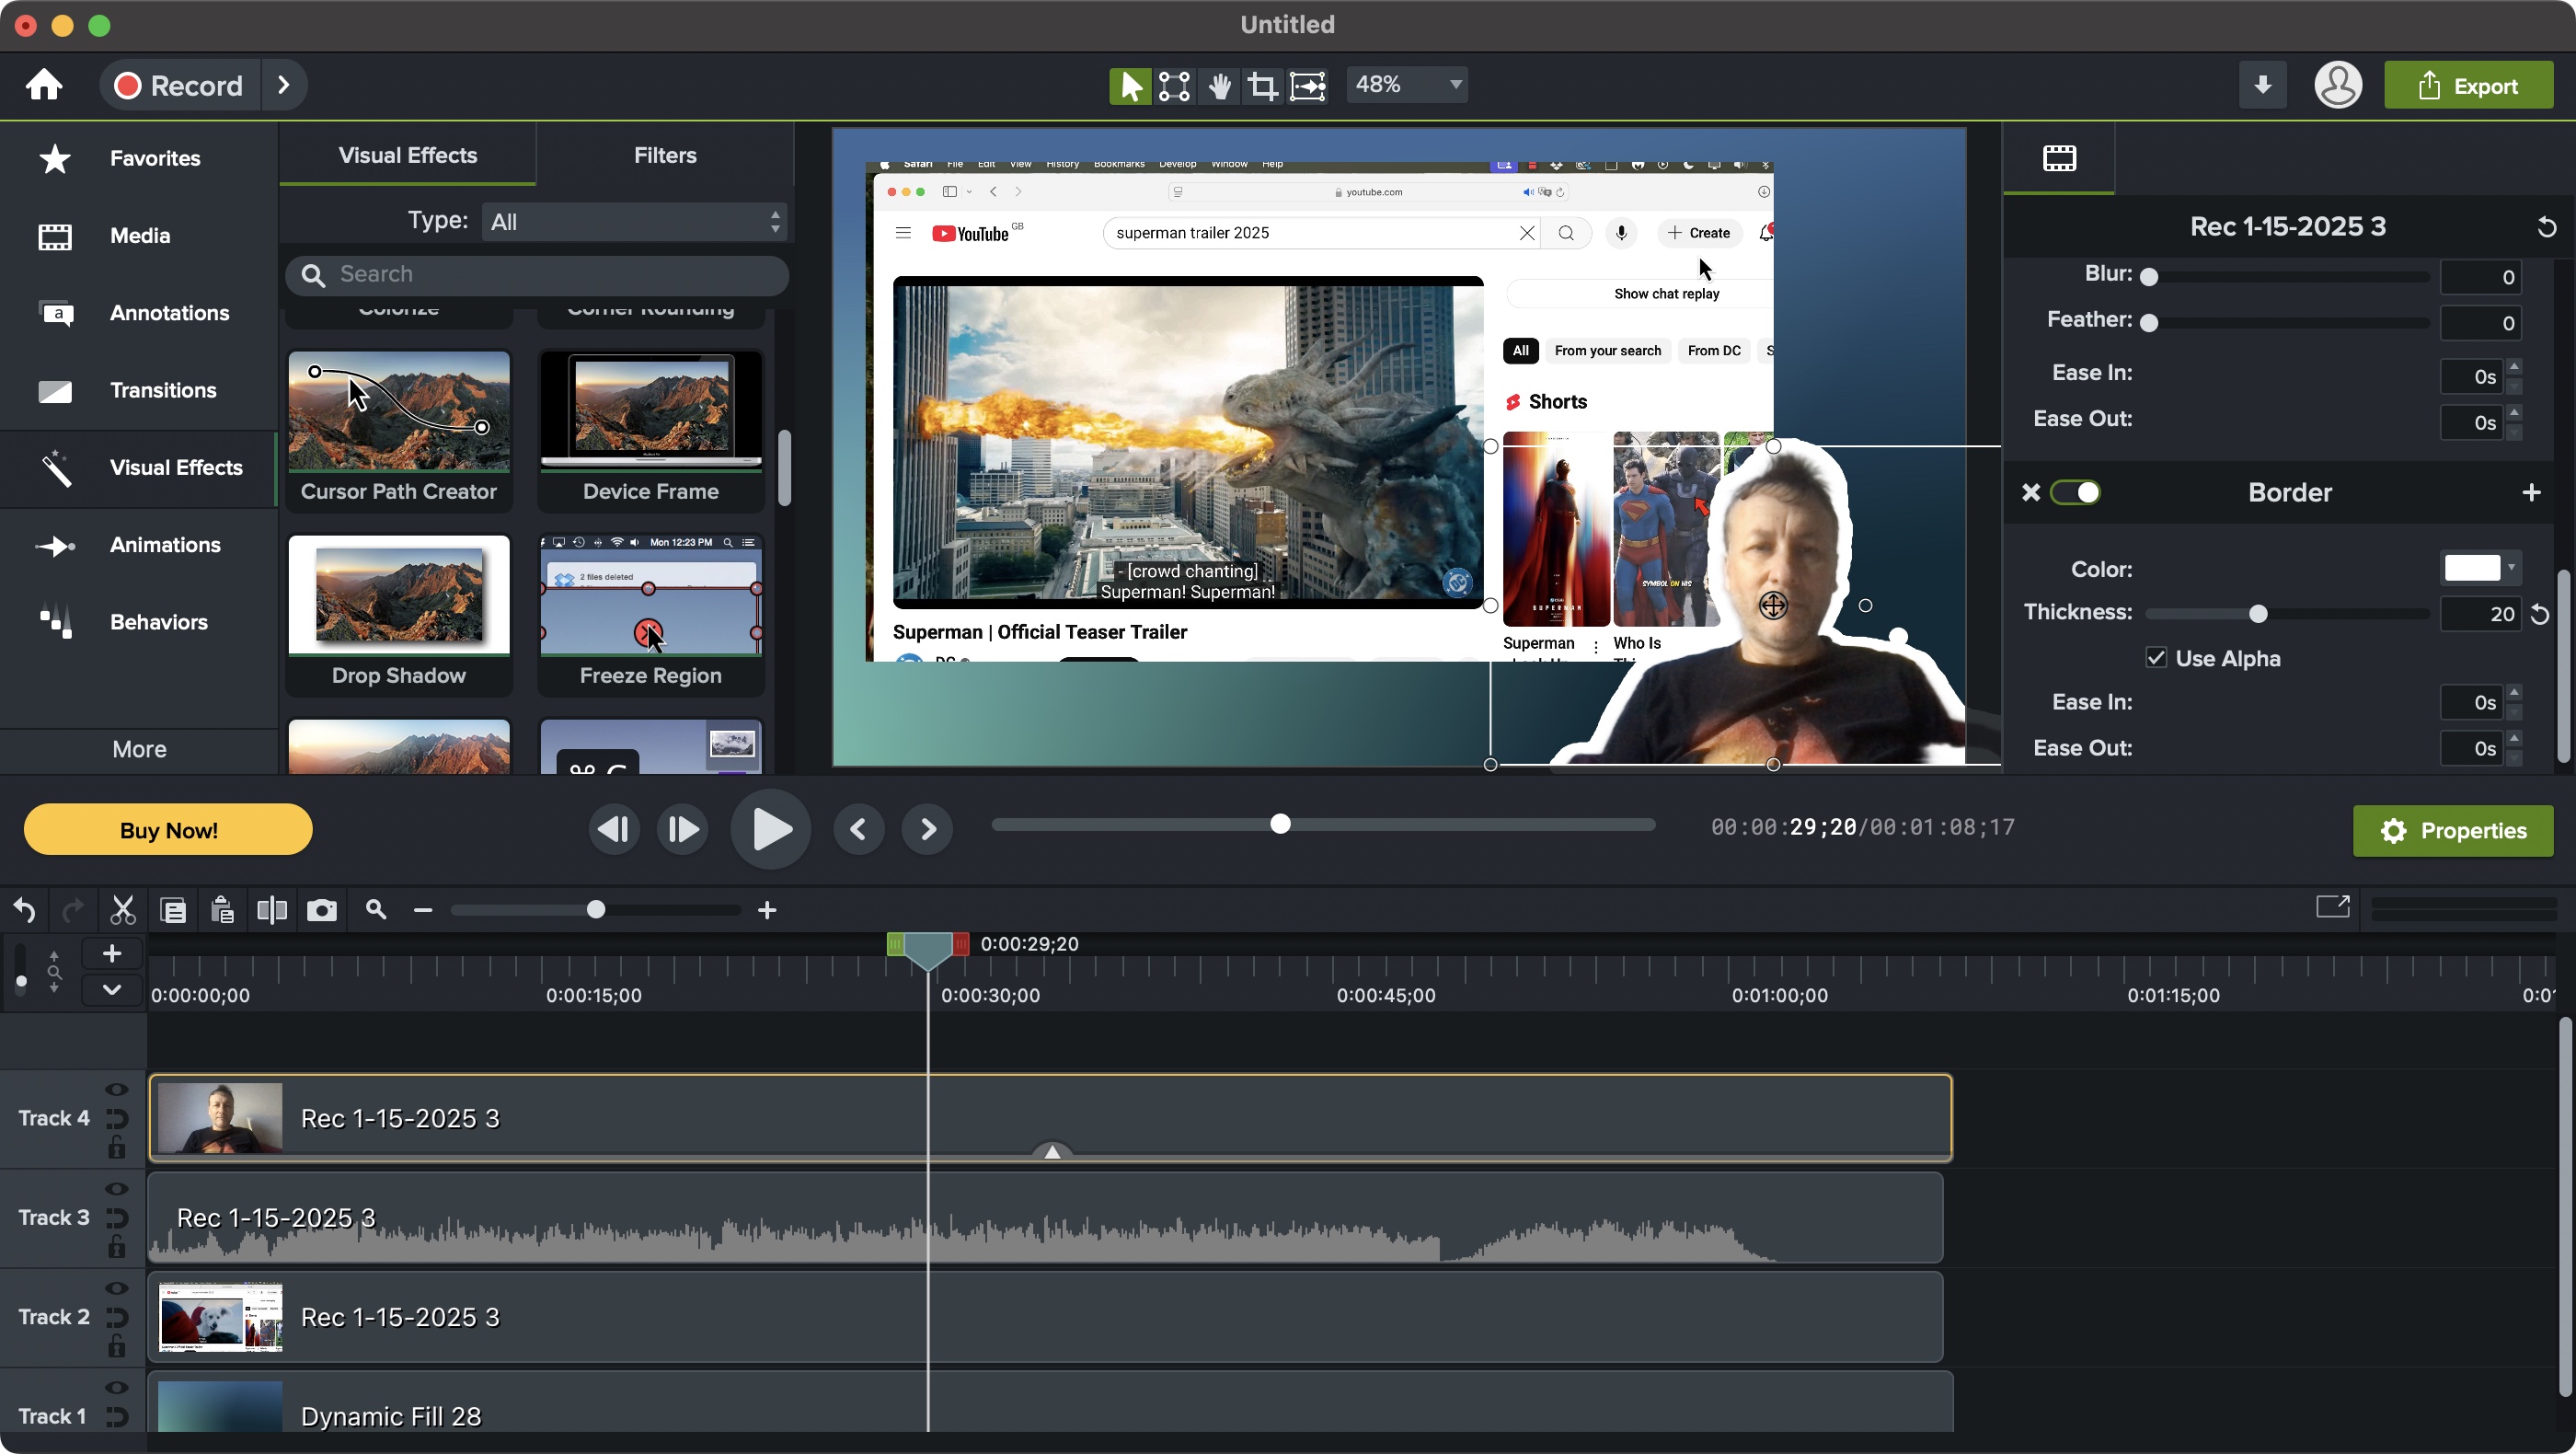
Camtasia includes some of the best video editing software for its market. Of course, this is no Premiere Pro, but it really sets Camtasia apart from most of its competition. It’s essentially a fully fledged non-linear video editing suite.
To the left is a sidebar giving you access to your recorded media, as well as a library of effects, transitions and animations, to help you professionally edit and composite your project.
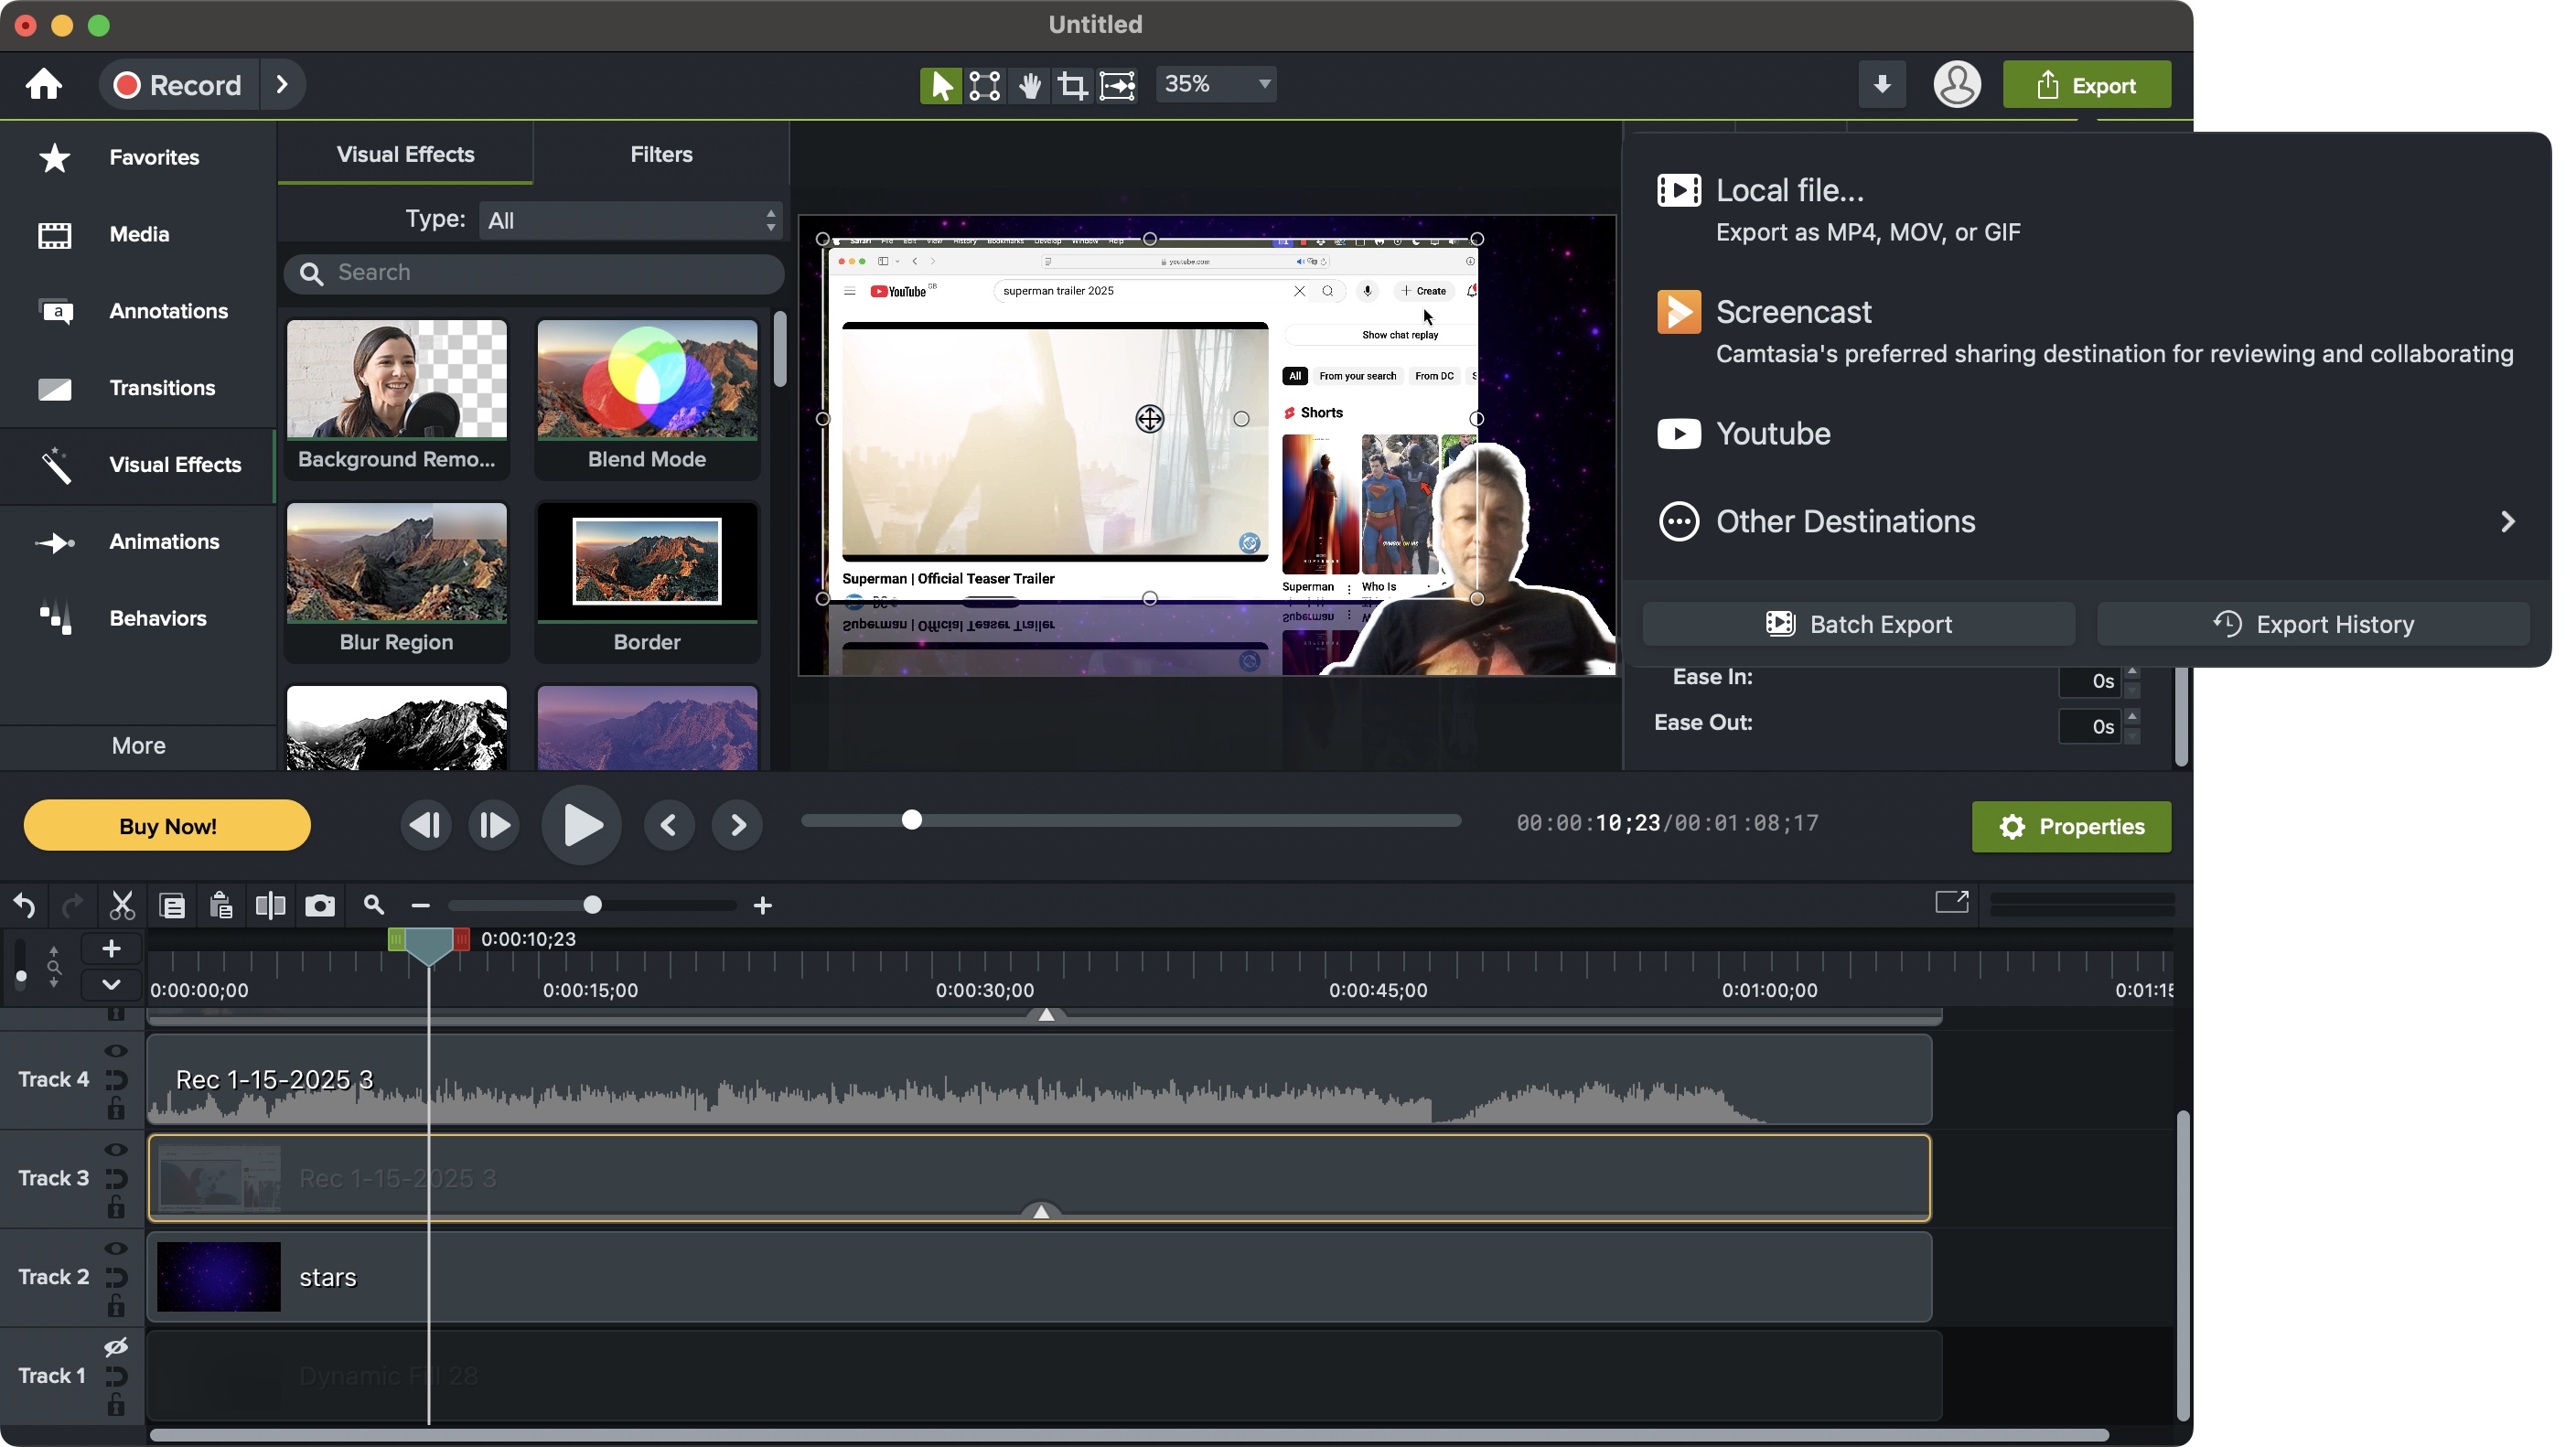
The lower part of the interface is devoted to the timeline. This is where you build your project, adding clip after clip on multiple layers. You’ll notice that your webcam footage has been saved separately to the screen capture. The same applies to your microphone and system audio (which is why it’s advisable to always record with headphones on, otherwise the sound from one will bleed onto the other, making it very hard, if not impossible, to separate).
The advantage of having all these layers is flexibility. You can move your webcam footage around the timeline, resize it, and even remove sections as you see fit. The same is true from your screen capture, and any other media you’d care to add to your project.
Essentially, you have full control over your clips. You can trim them, split them, move them to different layers, apply effects and transitions, etc. All the tools you find in the sidebar can be dragged onto a clip, and the properties parameters found on the right can be altered until you get the exact look you’re after. Any effects or filter you’ve added while in Workflow are preserved when you switch to the Editor, and are now fully customisable.
If you want to add additional media or effects, locate them from the left sidebar, and drag them to your project, or onto the clip you wish to alter. Some Assets are labelled as ‘Premium’ (their thumbnail has a little crown top left of them). From our understanding, they’re included with the Camtasia Pro subscription, but you can also subscribe to them separately, for $200 a year.
Once you’re happy with your project and are ready to share it with others, the Export button can save your work to your local drive or upload directly to services such as YouTube, Google Drive, and TechSmith’s own online offerings.
This last process is as simple as they can make it: simply choose your format (mp4 is the default), and click on Export. If you want to get more technical, click on Option to gain access to all changeable parameters. Bear in mind the trial version will watermark your output. Once you’ve paid, that hindrance will no longer be in effect.
- Editing: 4/5
Should I buy?
Buy it if...
You need a screen recorder that will take care of the complex stuff for you, while you focus on the recording, and also require either simple and template-based, or powerful and versatile editing capabilities, all wrapped in a single package.
Don't buy it if...
All you want to do is record something quickly, and you find all the extra bells and whistles an expensive hindrance.
For more creative tools, we've reviewed the best screenshot tools for Mac.
Steve has been writing about technology since 2003. Starting with Digital Creative Arts, he's since added his tech expertise at titles such as iCreate, MacFormat, MacWorld, MacLife, and TechRadar. His focus is on the creative arts, like website builders, image manipulation, and filmmaking software, but he hasn’t shied away from more business-oriented software either. He uses many of the apps he writes about in his personal and professional life. Steve loves how computers have enabled everyone to delve into creative possibilities, and is always delighted to share his knowledge, expertise, and experience with readers.
You must confirm your public display name before commenting
Please logout and then login again, you will then be prompted to enter your display name.

