50 iPad tips and tricks: how to make the most of your Apple tablet
Get the best out of your awesome device which these fantastic iPad tips and tricks that will help you organize your apps, stream via Airplay and more!
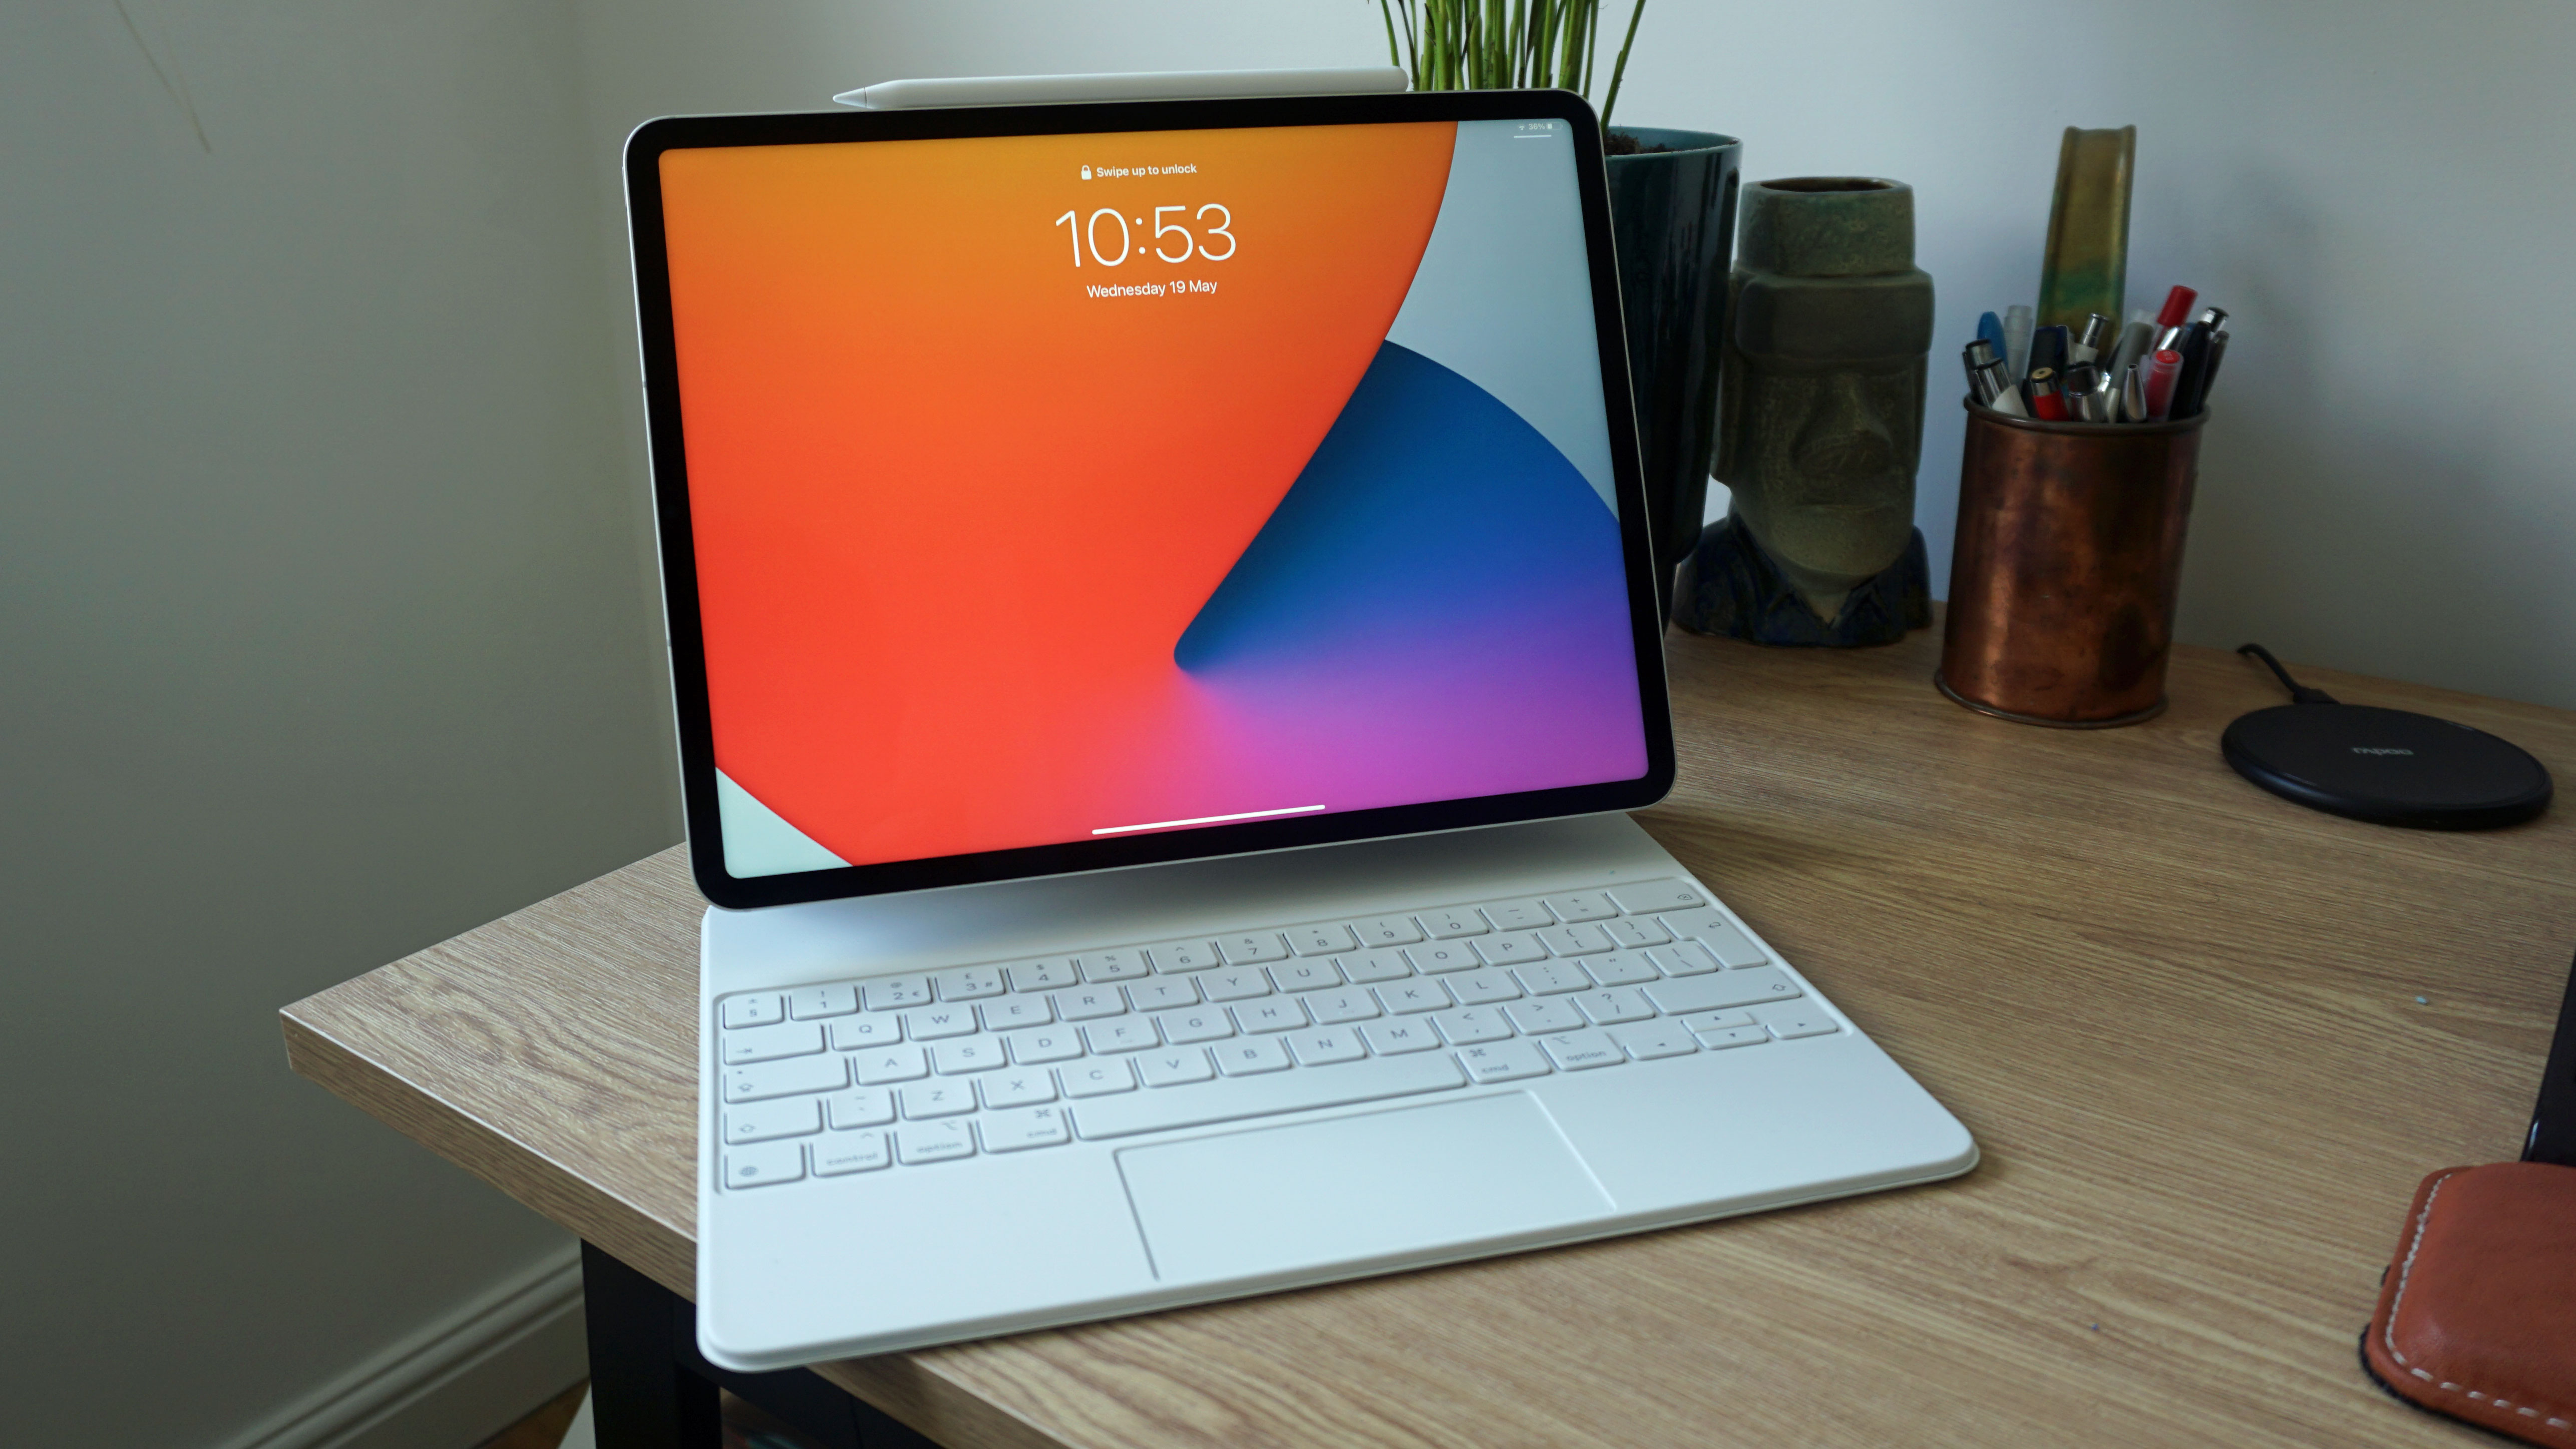
If you've been on the hunt for some nifty iPad tips and tricks to make the most of your phenomenal device then boy oh boy do we have a treat lined up for you! Today we're sharing not one, not 10, but 50 of our favorite best kept secrets that will have your iPad truly working for you and making your life a whole lot easier.
Can you believe it's been 12 years since the first generation of iPad hit the shelves back in 2010? Since then, the best iPads have gone through several evolutions that have turned them into the most flexible and useful device the world has ever seen.
While the best MacBooks and Macs can make your work life a breeze and the best iPhones are great for staying connected while you're out and about, there's something about an iPad that can't be beat. It's not as cumbersome or heavy as a laptop, which makes it great for taking on holiday and its screen is bigger than that of a smartphone, which means it's easier to operate Excel or Word.
Basically, the iPad is just darn brilliant in our minds! But not every user is familiar with the true breadth and depth of what this genius device can do. That's why we've put together this list of hidden gems to help you get the most out of this little beauty. From organizing your apps to making Siri sing, here are 50 of our favorite iPad tips and tricks.
1. Organize your apps
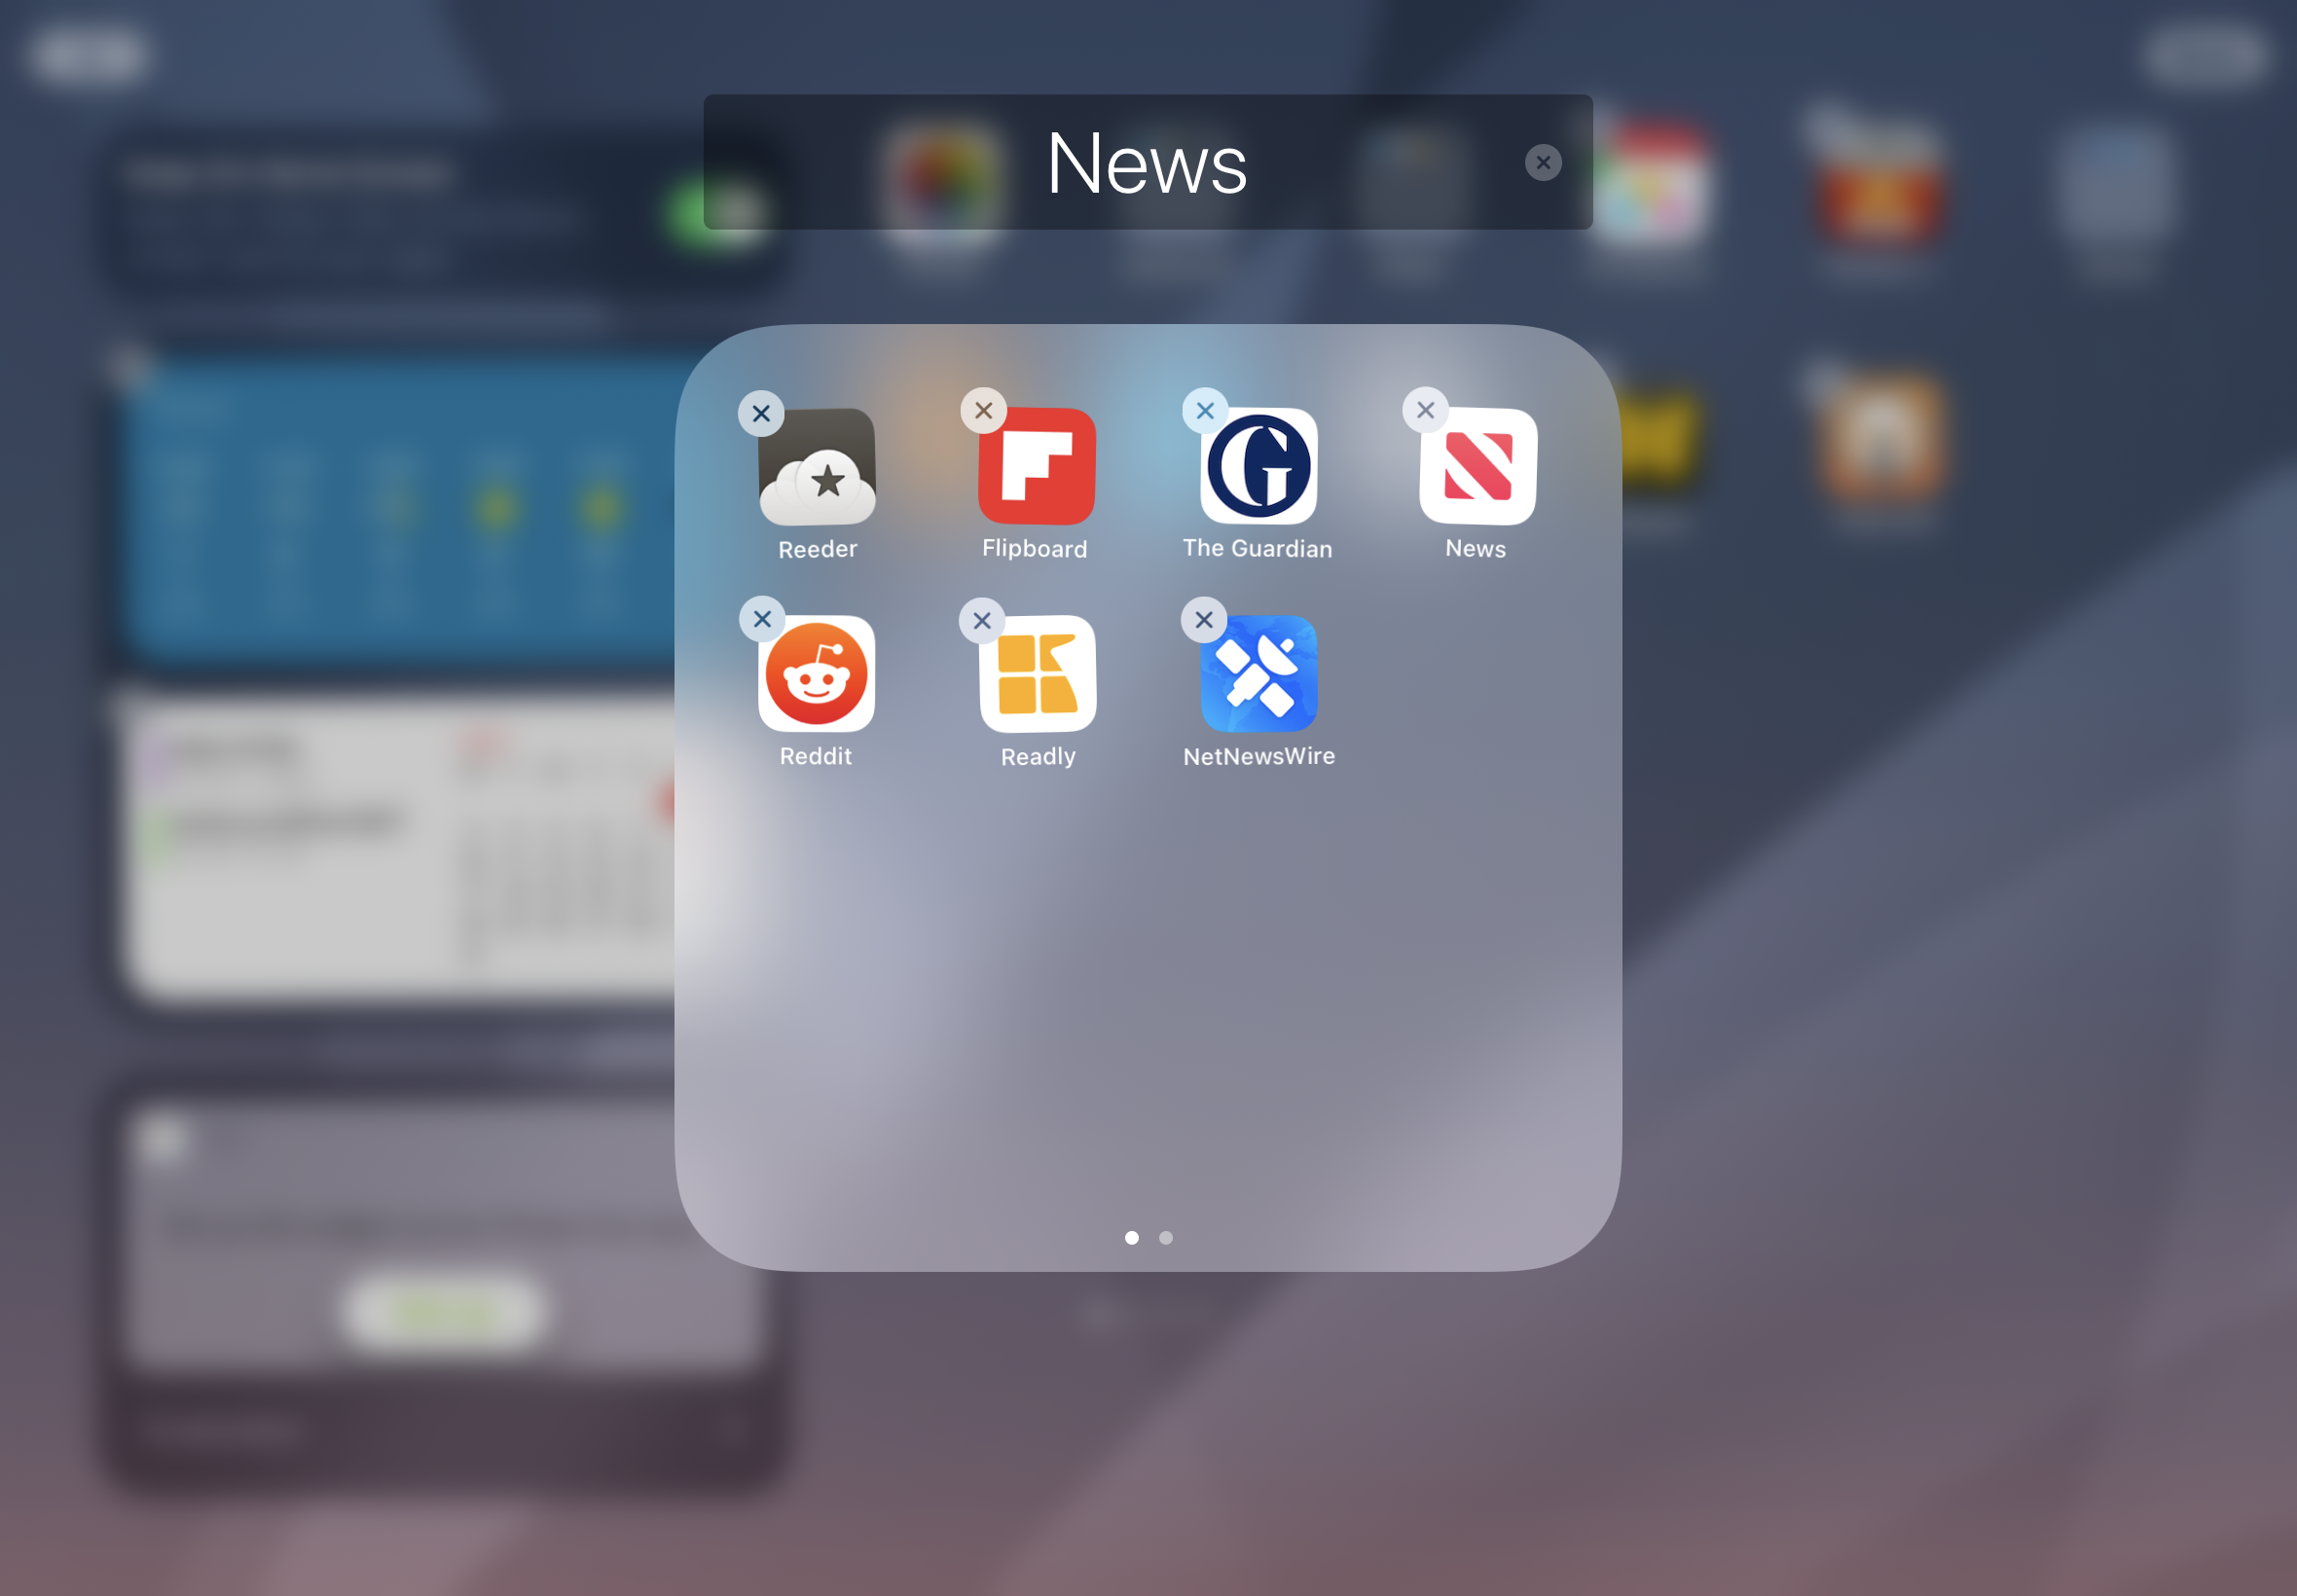
Are your apps sprawled over multiple Home Screens? Organize them into folders for like-minded apps and you can find what you want faster. You can even drag folders to your Dock for fast access to favorites, so for example we have Work and News folders in ours for our most-used apps.
To make a folder, just long-press on an app icon, tap on Edit Home Screen and then drag it over another app. Let go and you’ll see your folder.
2. See what’s running
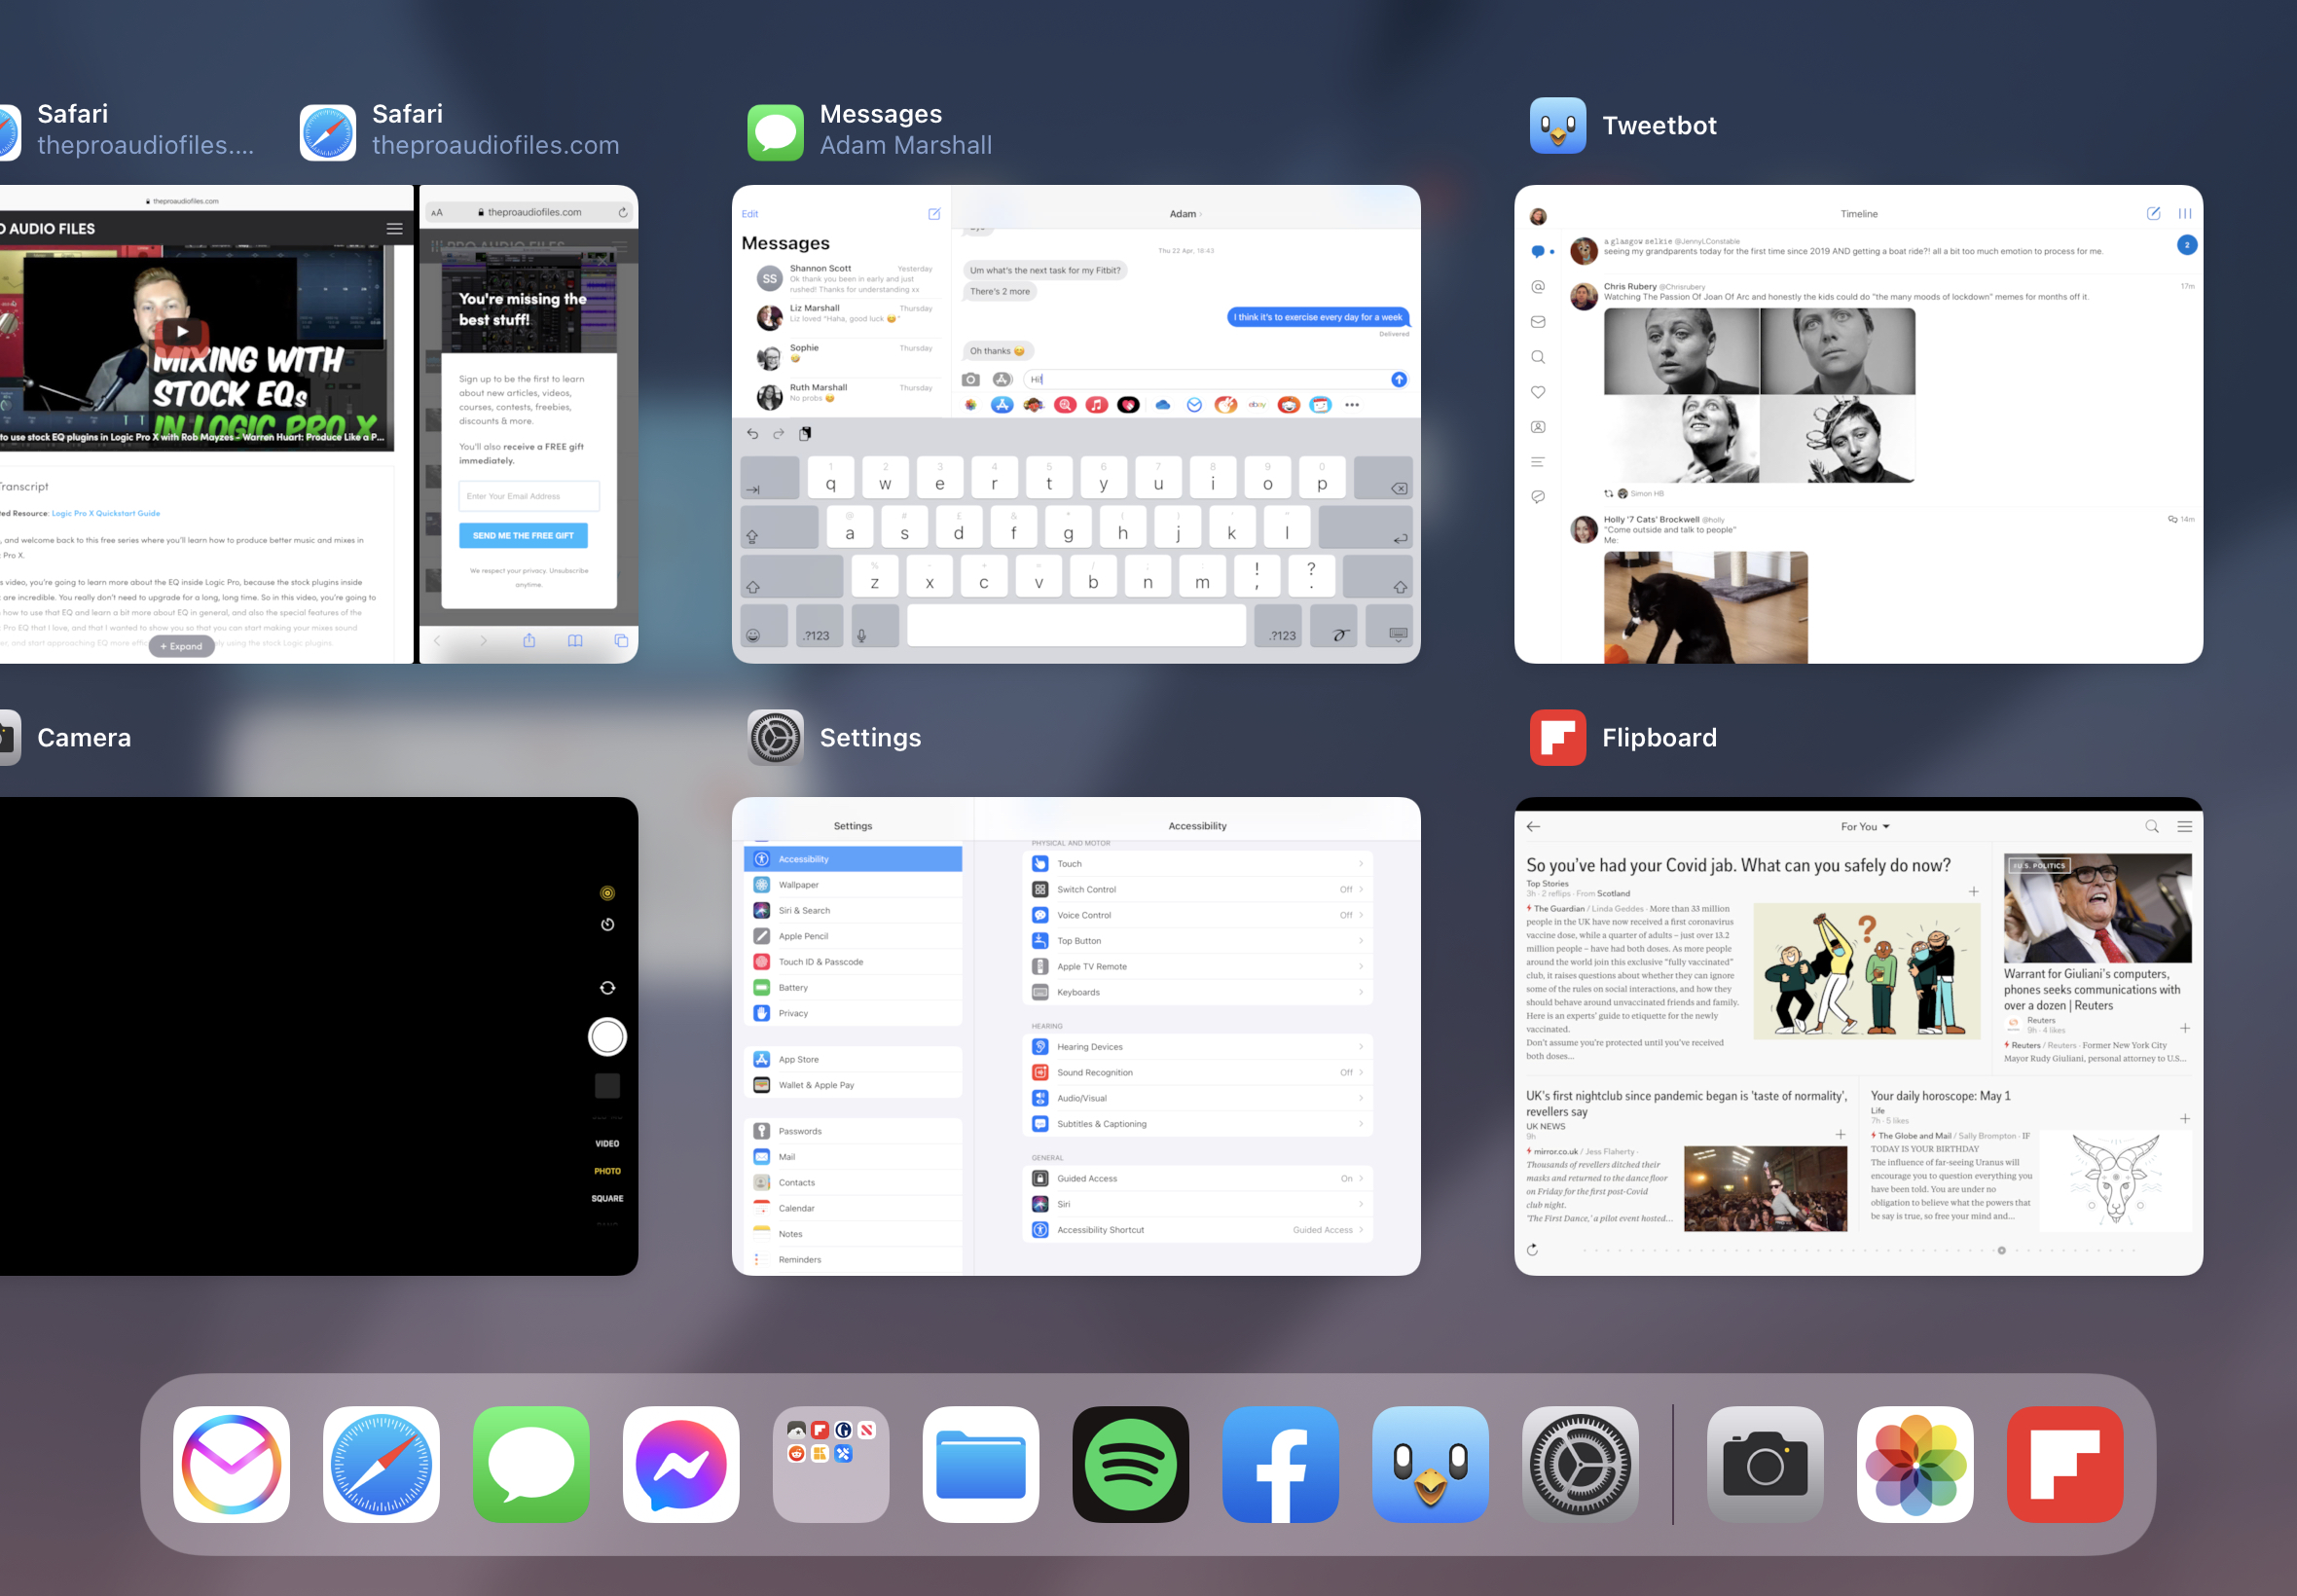
One of our favorite iPad tips and tricks, swipe up from the Dock and you’ll see your recent apps with large thumbnails to make them easier to identify. You can close an app from here by swiping it upwards, or switch to an app by tapping on it.
Get daily insight, inspiration and deals in your inbox
Sign up for breaking news, reviews, opinion, top tech deals, and more.
3. Get complete control

Swipe down from the top right of the Home Screen to show Control Center, which has shortcuts for everyday tasks such as adjusting the brightness and volume, turning Bluetooth on and off, locking the screen orientation and so on.
If you have smart home devices you can also control them from here. Control Center is customizable: go to Settings > Control Center and you can add or remove controls.
4. Booby-trap your data
Does your iPad store data you don’t want to fall into the wrong hands, such as your top secret plans for world domination? No problem. Go into Settings > Touch ID & Passcode and scroll down to Erase Data.
This enables you to automatically erase your iPad if there are ten failed passcode attempts. You can also specify what features, if any, can be accessed when your iPad is locked.
5. Use the secret trackpad
If you touch the on-screen keyboard with two fingers in an app such as Mail, it becomes a trackpad: as your fingers move so does the cursor. It’s a real boon for editing documents.
6. Say no to notifications
It seems like every app wants you to enable notifications, and some of them take advantage of your trust by blasting you with unwanted ads. Silence them by going onto Settings > Notifications where you can customize app notifications and silence specific apps.
7. Connect to a VPN
If you have access to a virtual private network, your iPad can connect to it. Just go into Settings > General > VPN and enter the relevant details. Unlike VPN apps, which may only protect data from within those apps, this setting applies system-wide.
8. Streamline Wi-Fi
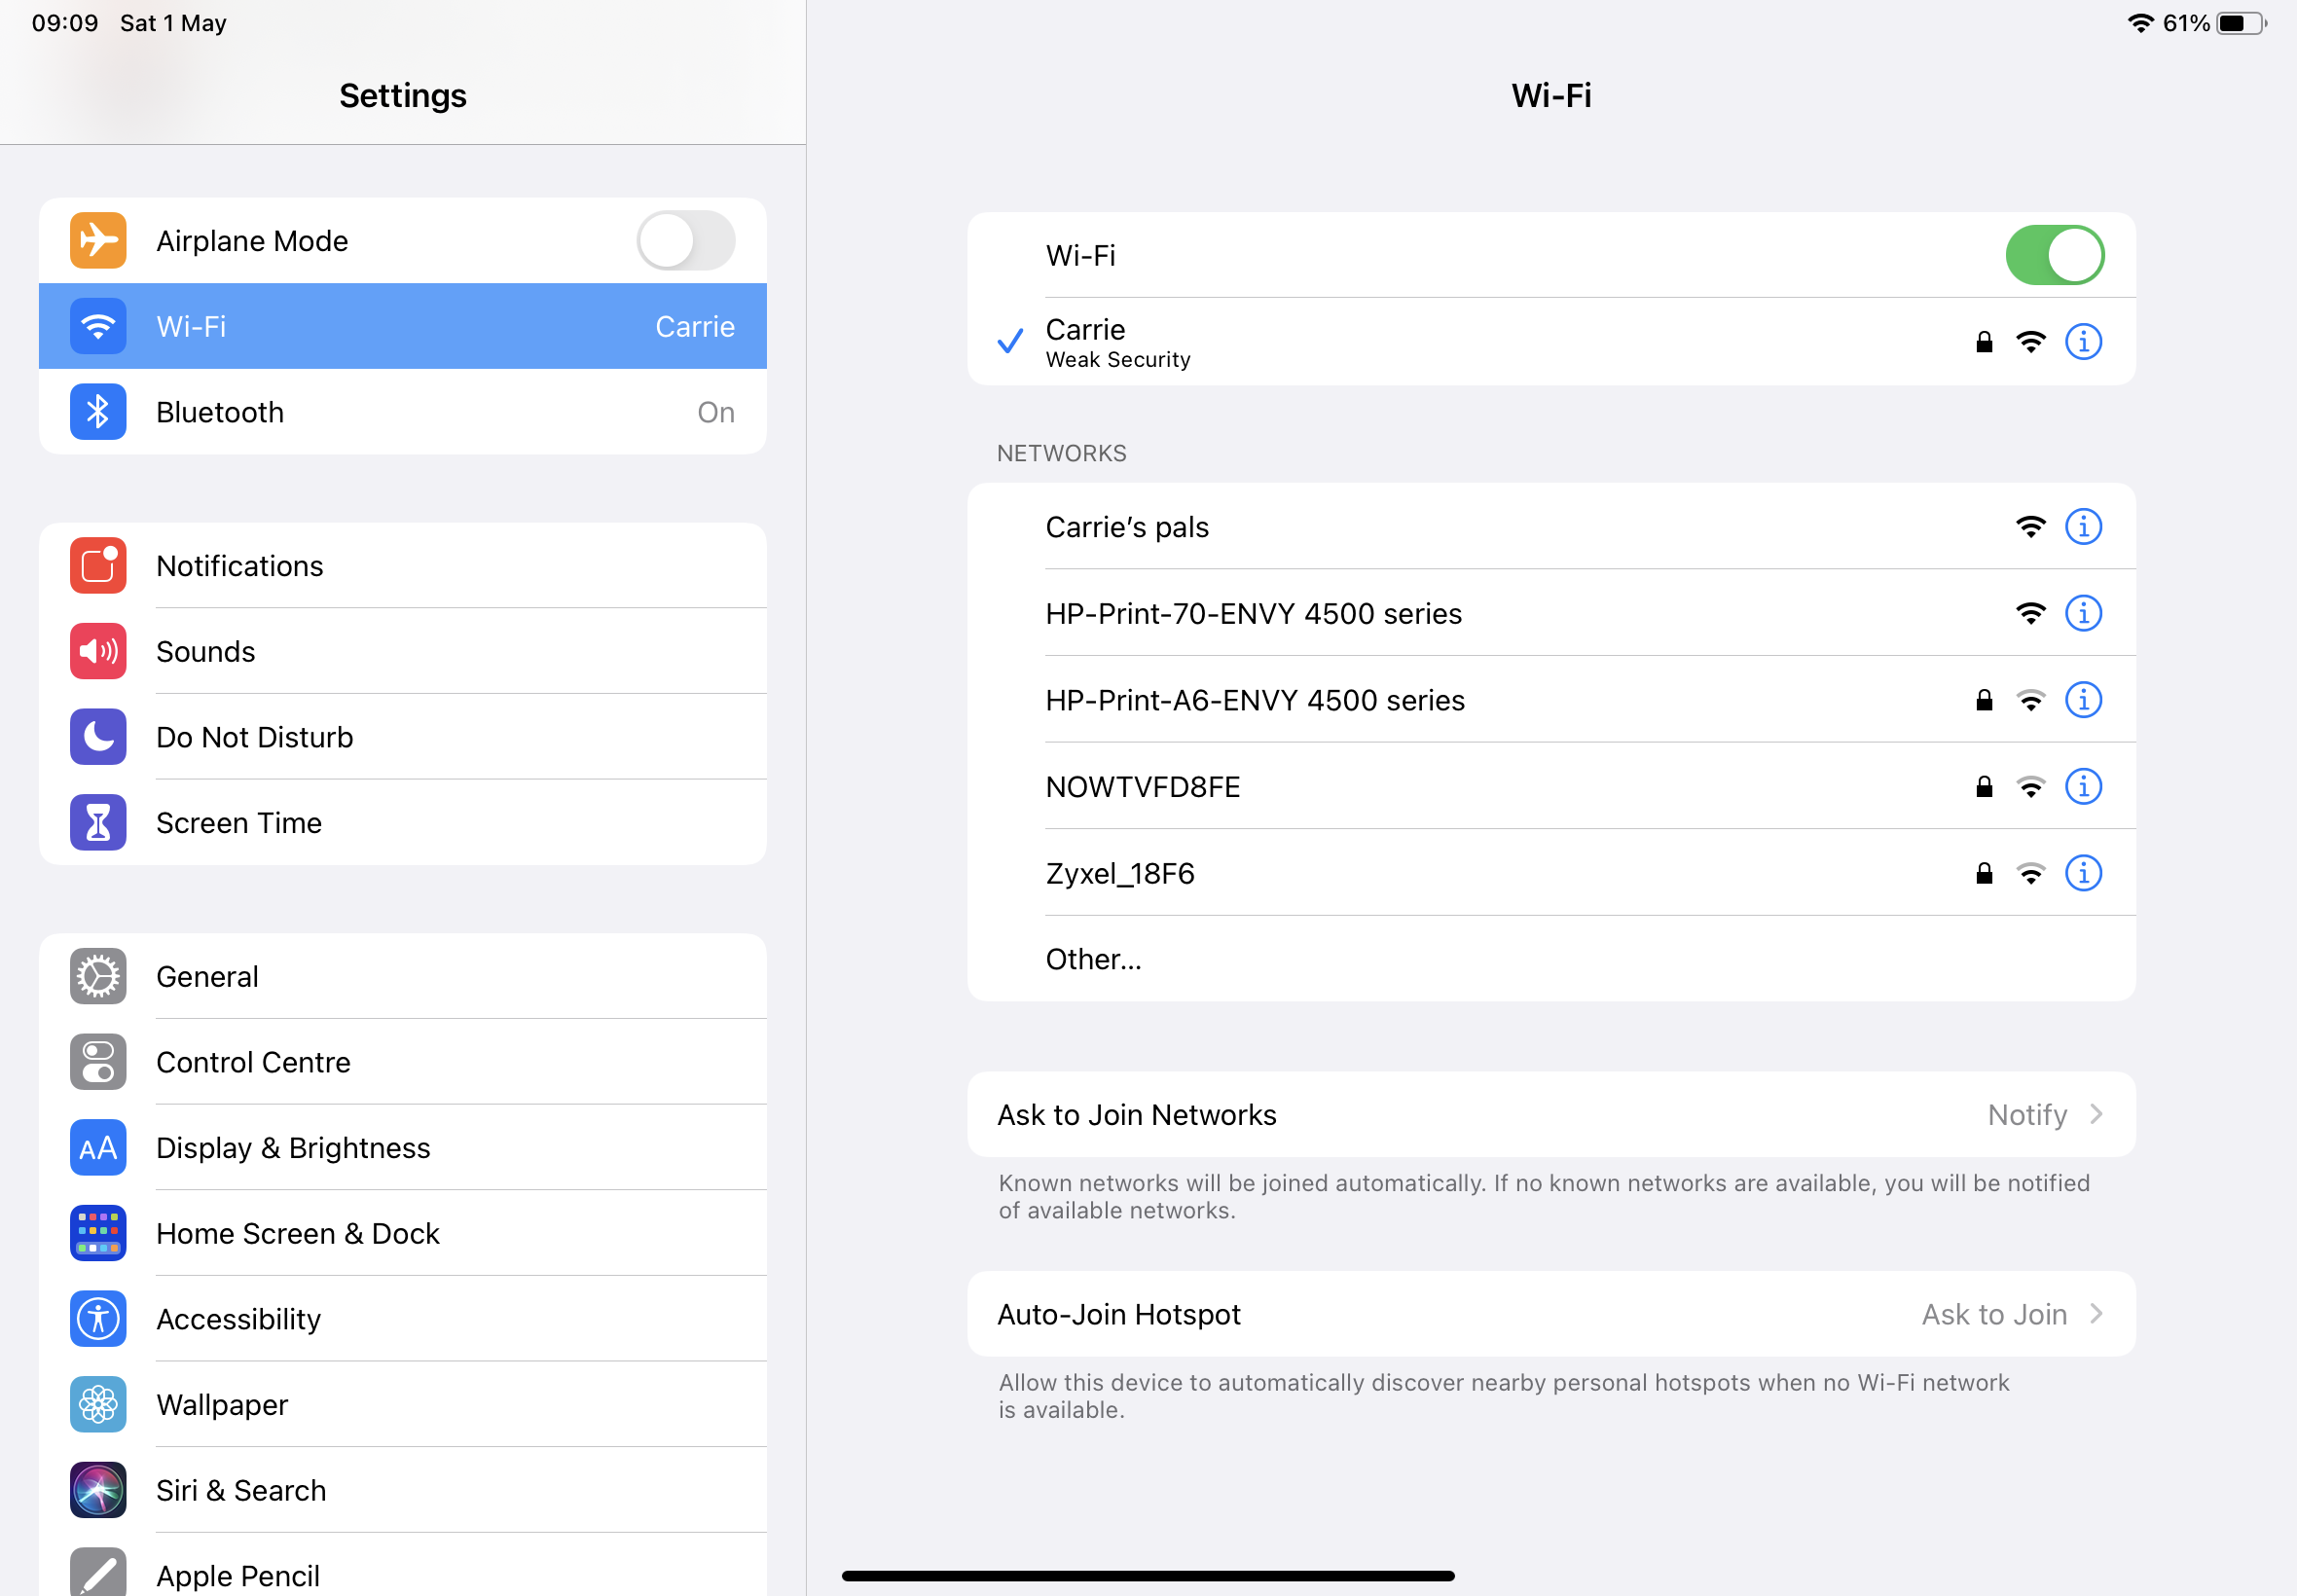
In Settings > Wi-Fi you can set your iPad to automatically join your iPhone Personal Hotspot by enabling the Auto-Join Hotspot option at the bottom of the screen. You can also disable the notifications that pop up when your iPad detects a new wireless network in the Ask To Join Networks section.
9. Discover energy hogs
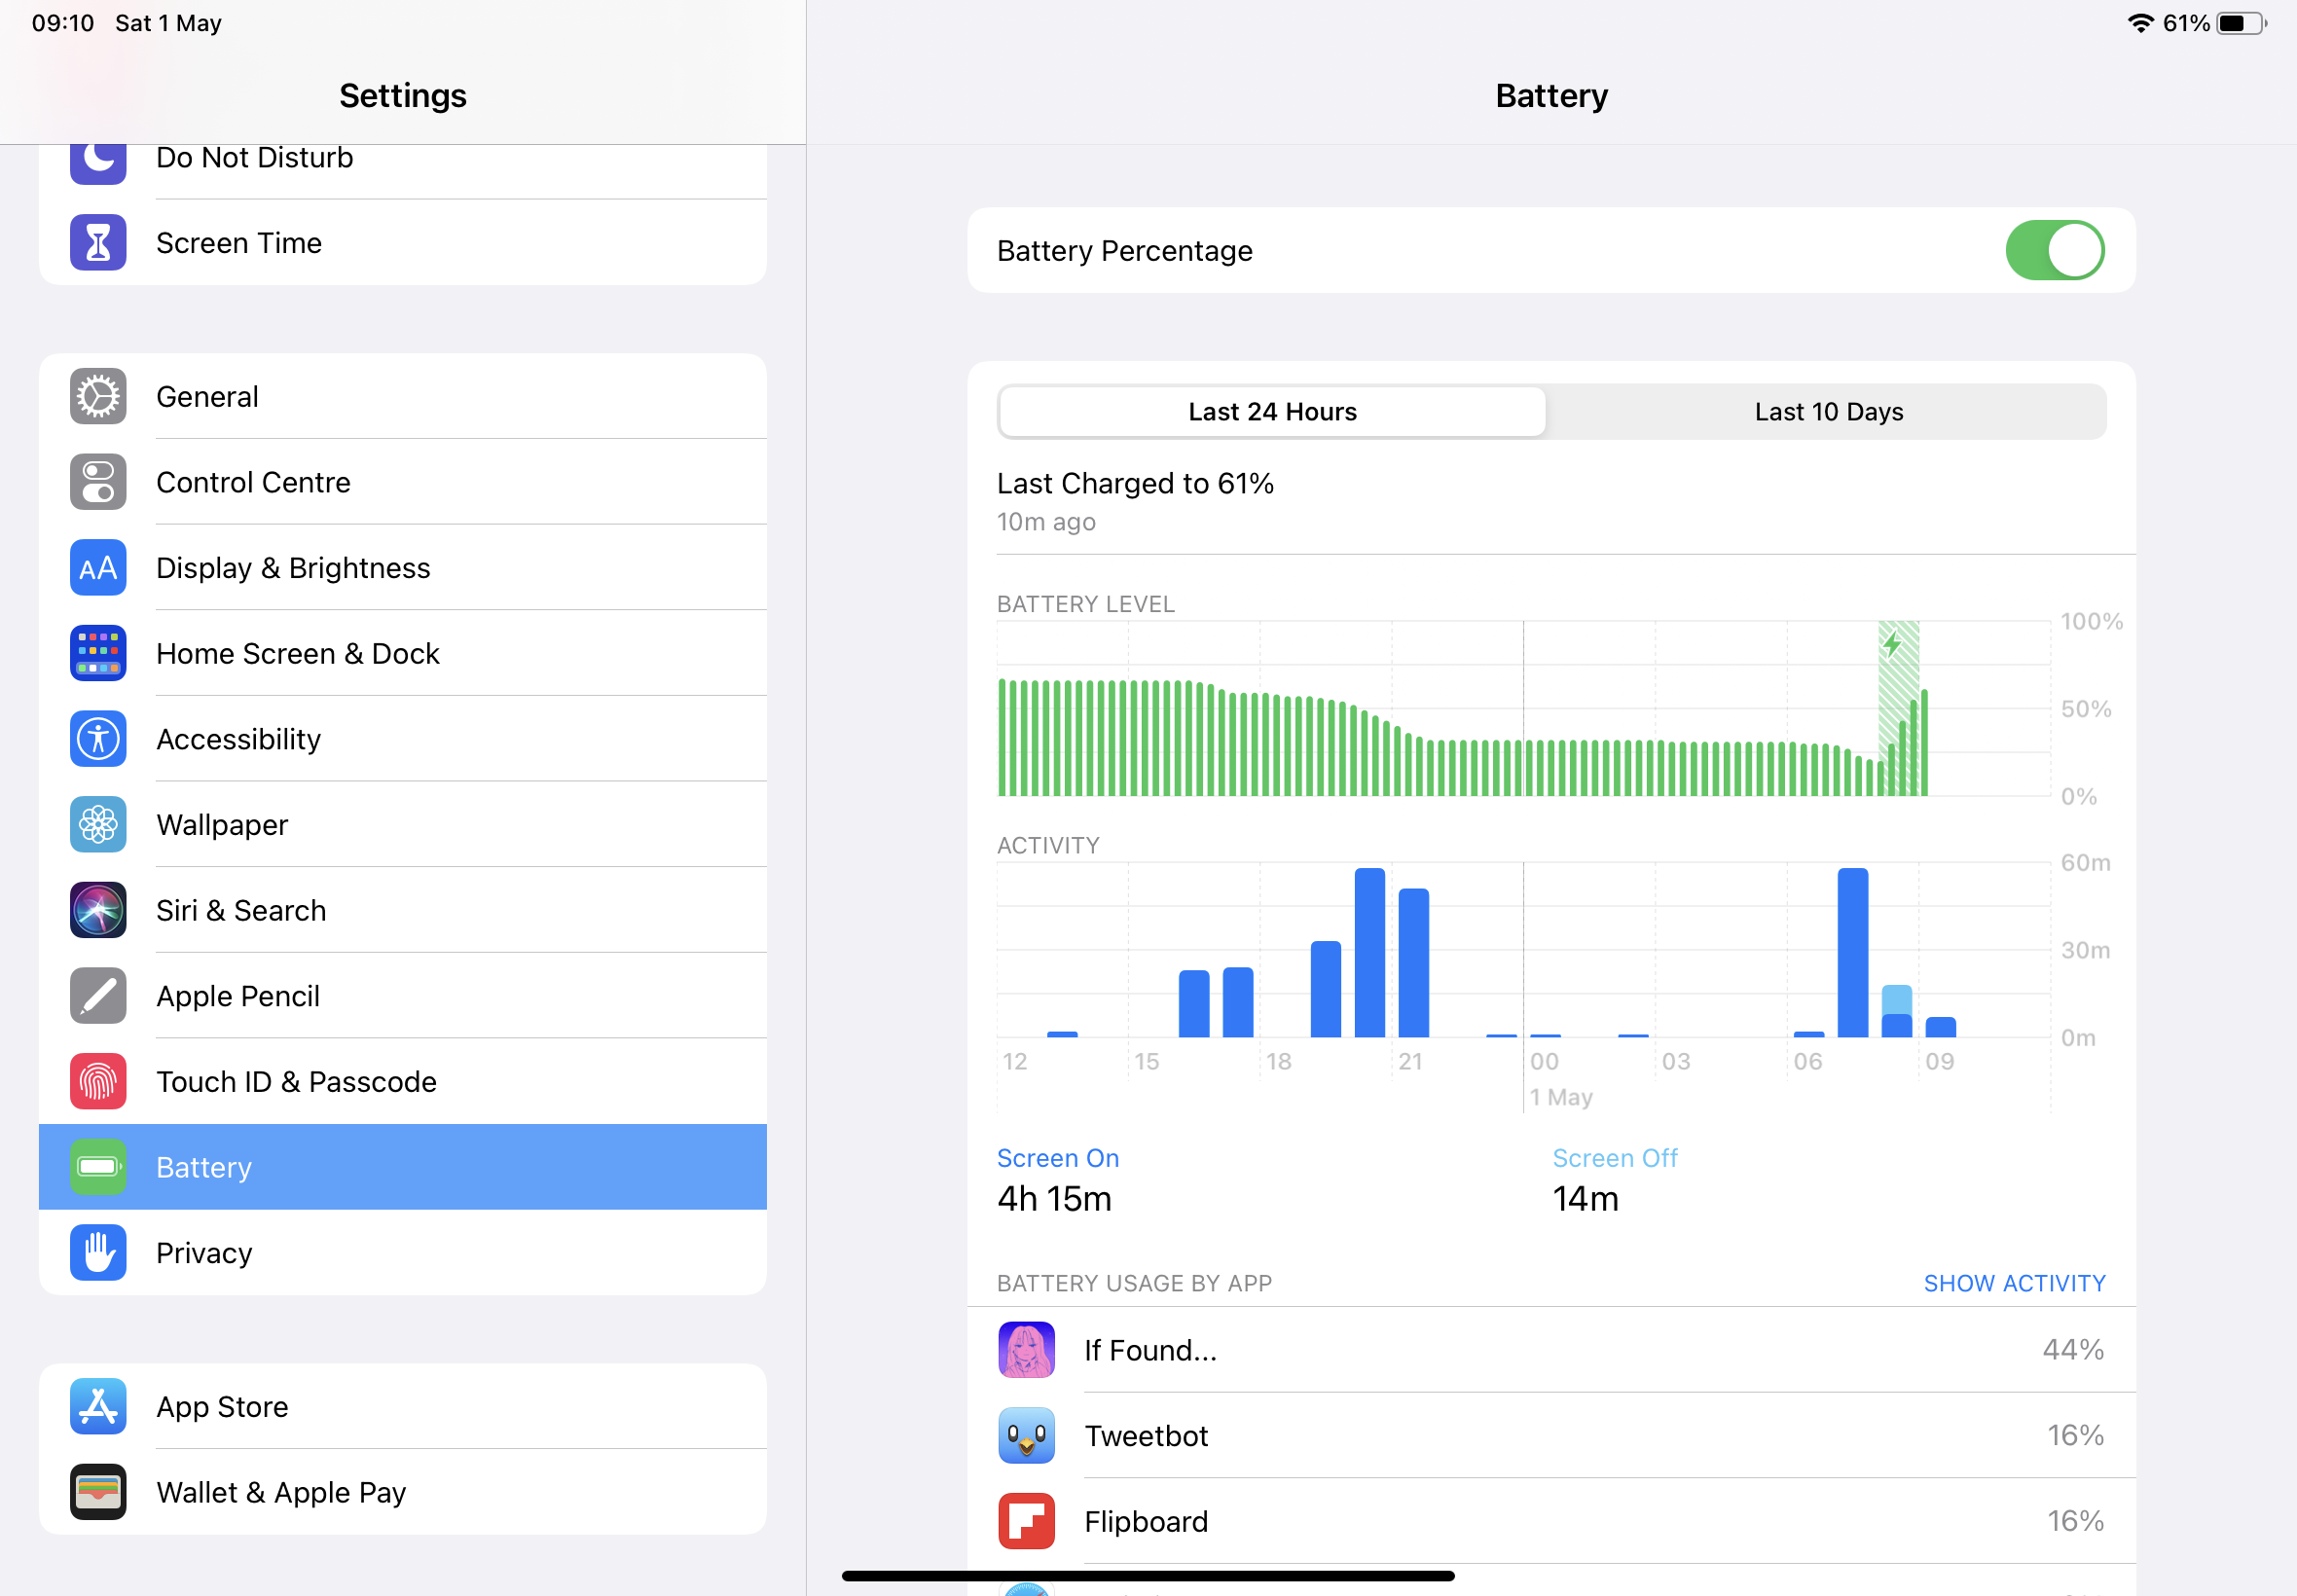
This is one of the best iPad tips and tricks around for those of us that are energy conscious.
Use Settings > Battery to discover the health of your iPad’s battery and which apps are doing the most draining: in our screenshot a single game has accounted for 44% of our battery usage in the last 24 hours. This app list can help you identify apps that may be too demanding, or apps that are running in the background that you didn’t know about.
10. Use text shortcuts
If you tend to use the same blocks of text again and again, set them up as Text Replacement items in Settings > General > Keyboards. This enables you to create shortcuts, so for example we’ve got a semicolon followed by “sorryno” to automate polite replies to product pitches.
11. Use Emoji
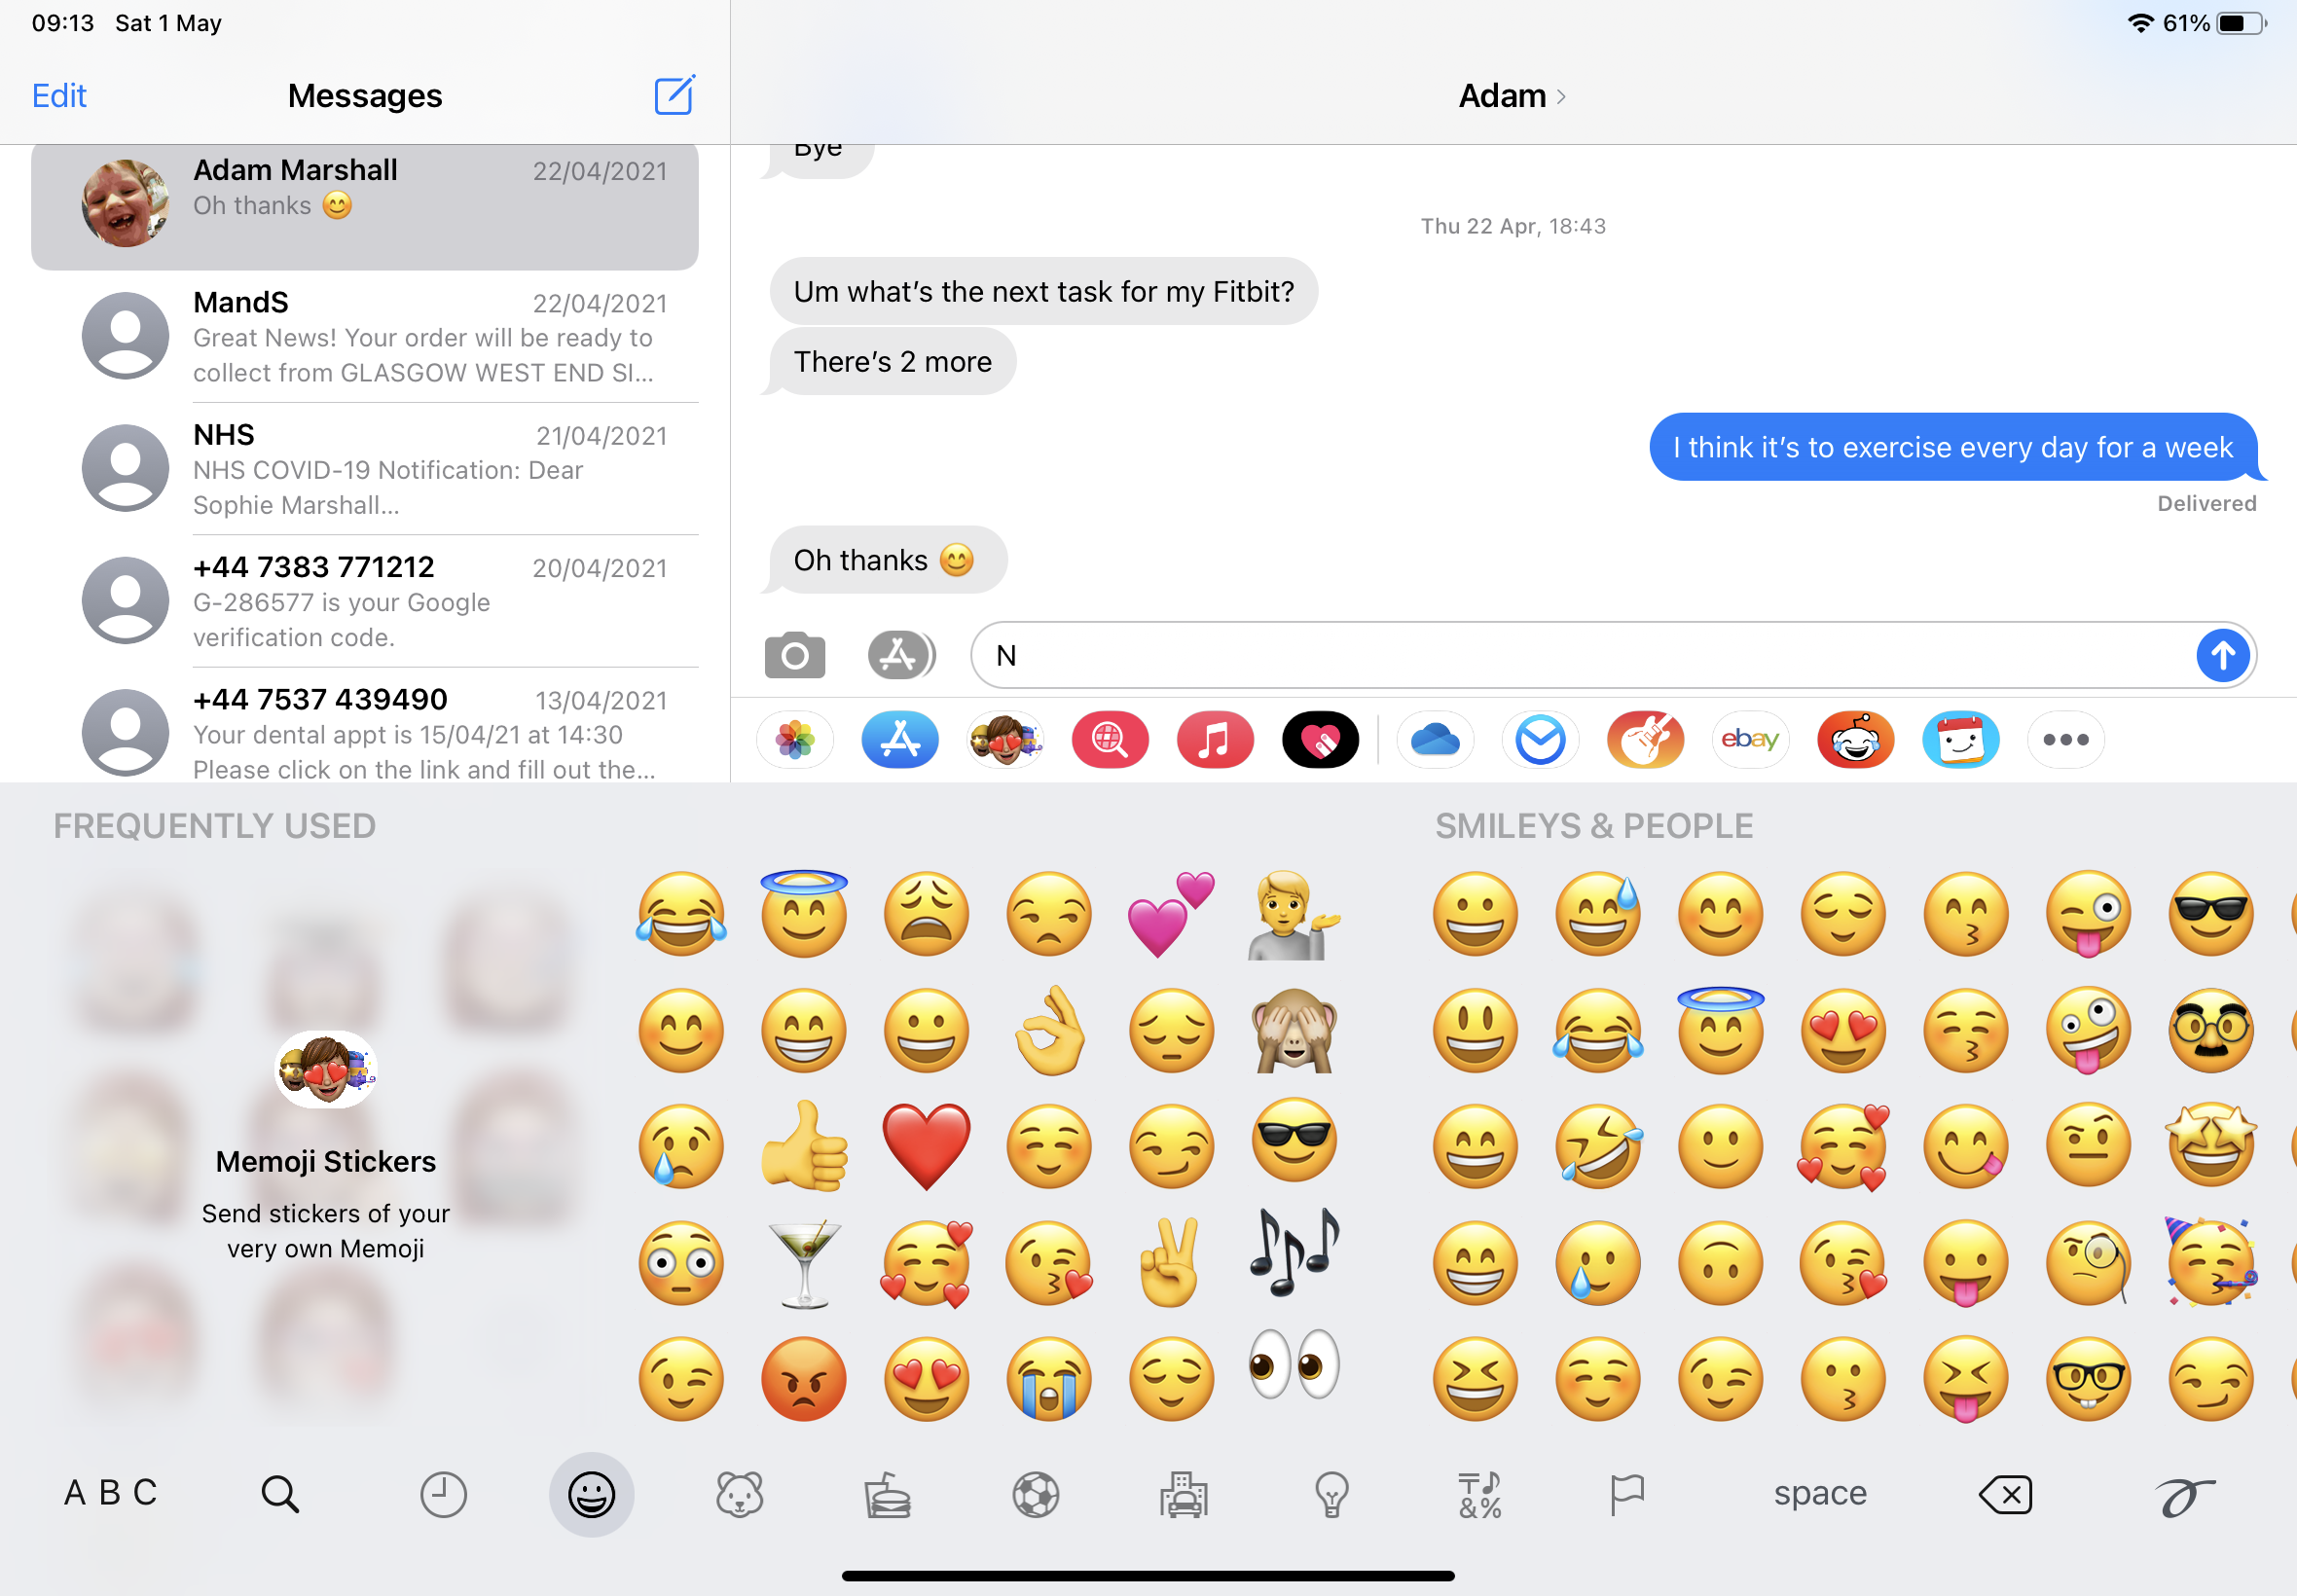
To use emoji, just tap on the smiley face key at the bottom left of your iPad’s on-screen keyboard; to return to normal, tap ABC. No smileys? Go to Settings > General > Keyboards > Add New Keyboard and select Emoji from the list.
12. Make the keyboard float
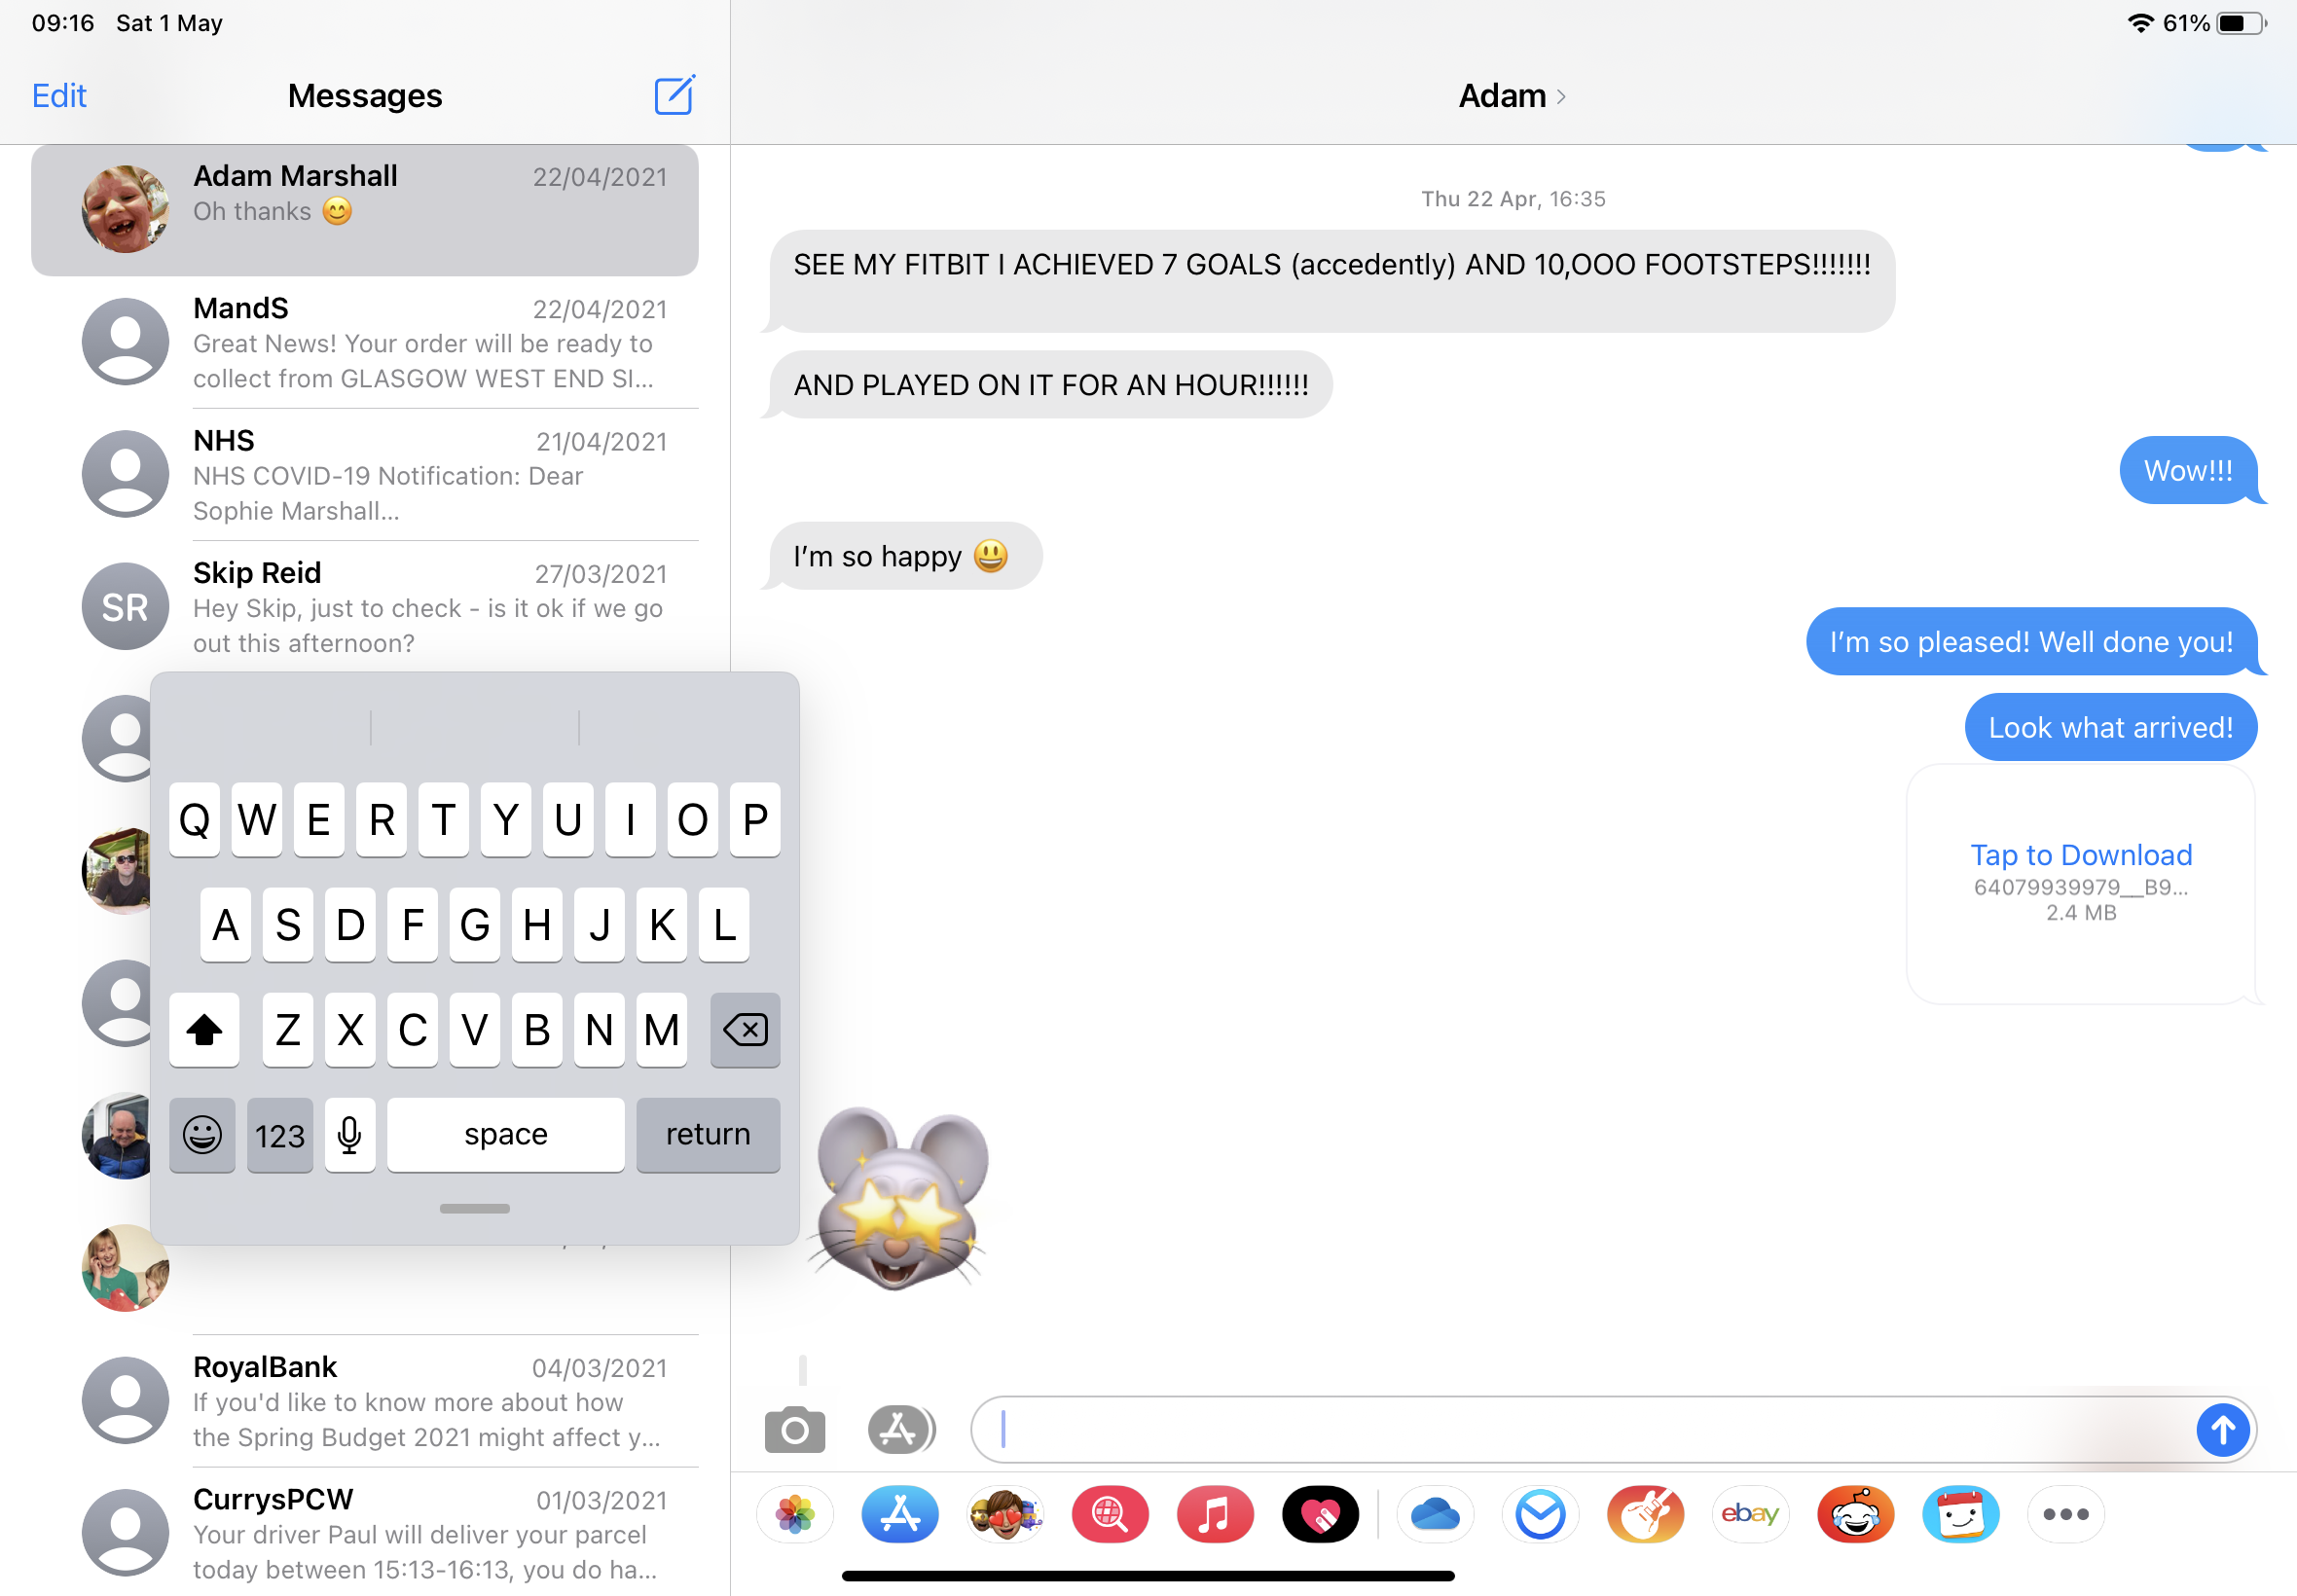
The default iPad keyboard takes up a lot of room, especially in landscape mode. If you’d rather make it smaller, press and hold on the keyboard icon at the lower left of the keyboard and then slide your finger over Float. The keyboard now becomes much smaller, and you can reposition it by dragging its bottom edge. Pinch out with two fingers to return it to normal size.
13. Stream via AirPlay
If you have an AirPlay compatible device - an Apple TV, an AirPlay speaker - you can stream movies and music from your iPad by tapping the AirPlay icon in Control Center. If your device isn’t AirPlay-enabled but has a rival system such as ChromeCast, look for an app such as Tubio, which streams to all kinds of things in pristine HD.
14. Take a screenshot
This works on the iPhone too: press the Home and Sleep/Wake buttons (or the Power and Volume Up buttons if you don’t have a Home button) simultaneously and you’ll hear a click. The screenshot is automatically added to your Photos library but a thumbnail appears on screen for a moment: tap on that and you can edit it before saving or sharing it.
15. See two apps at once
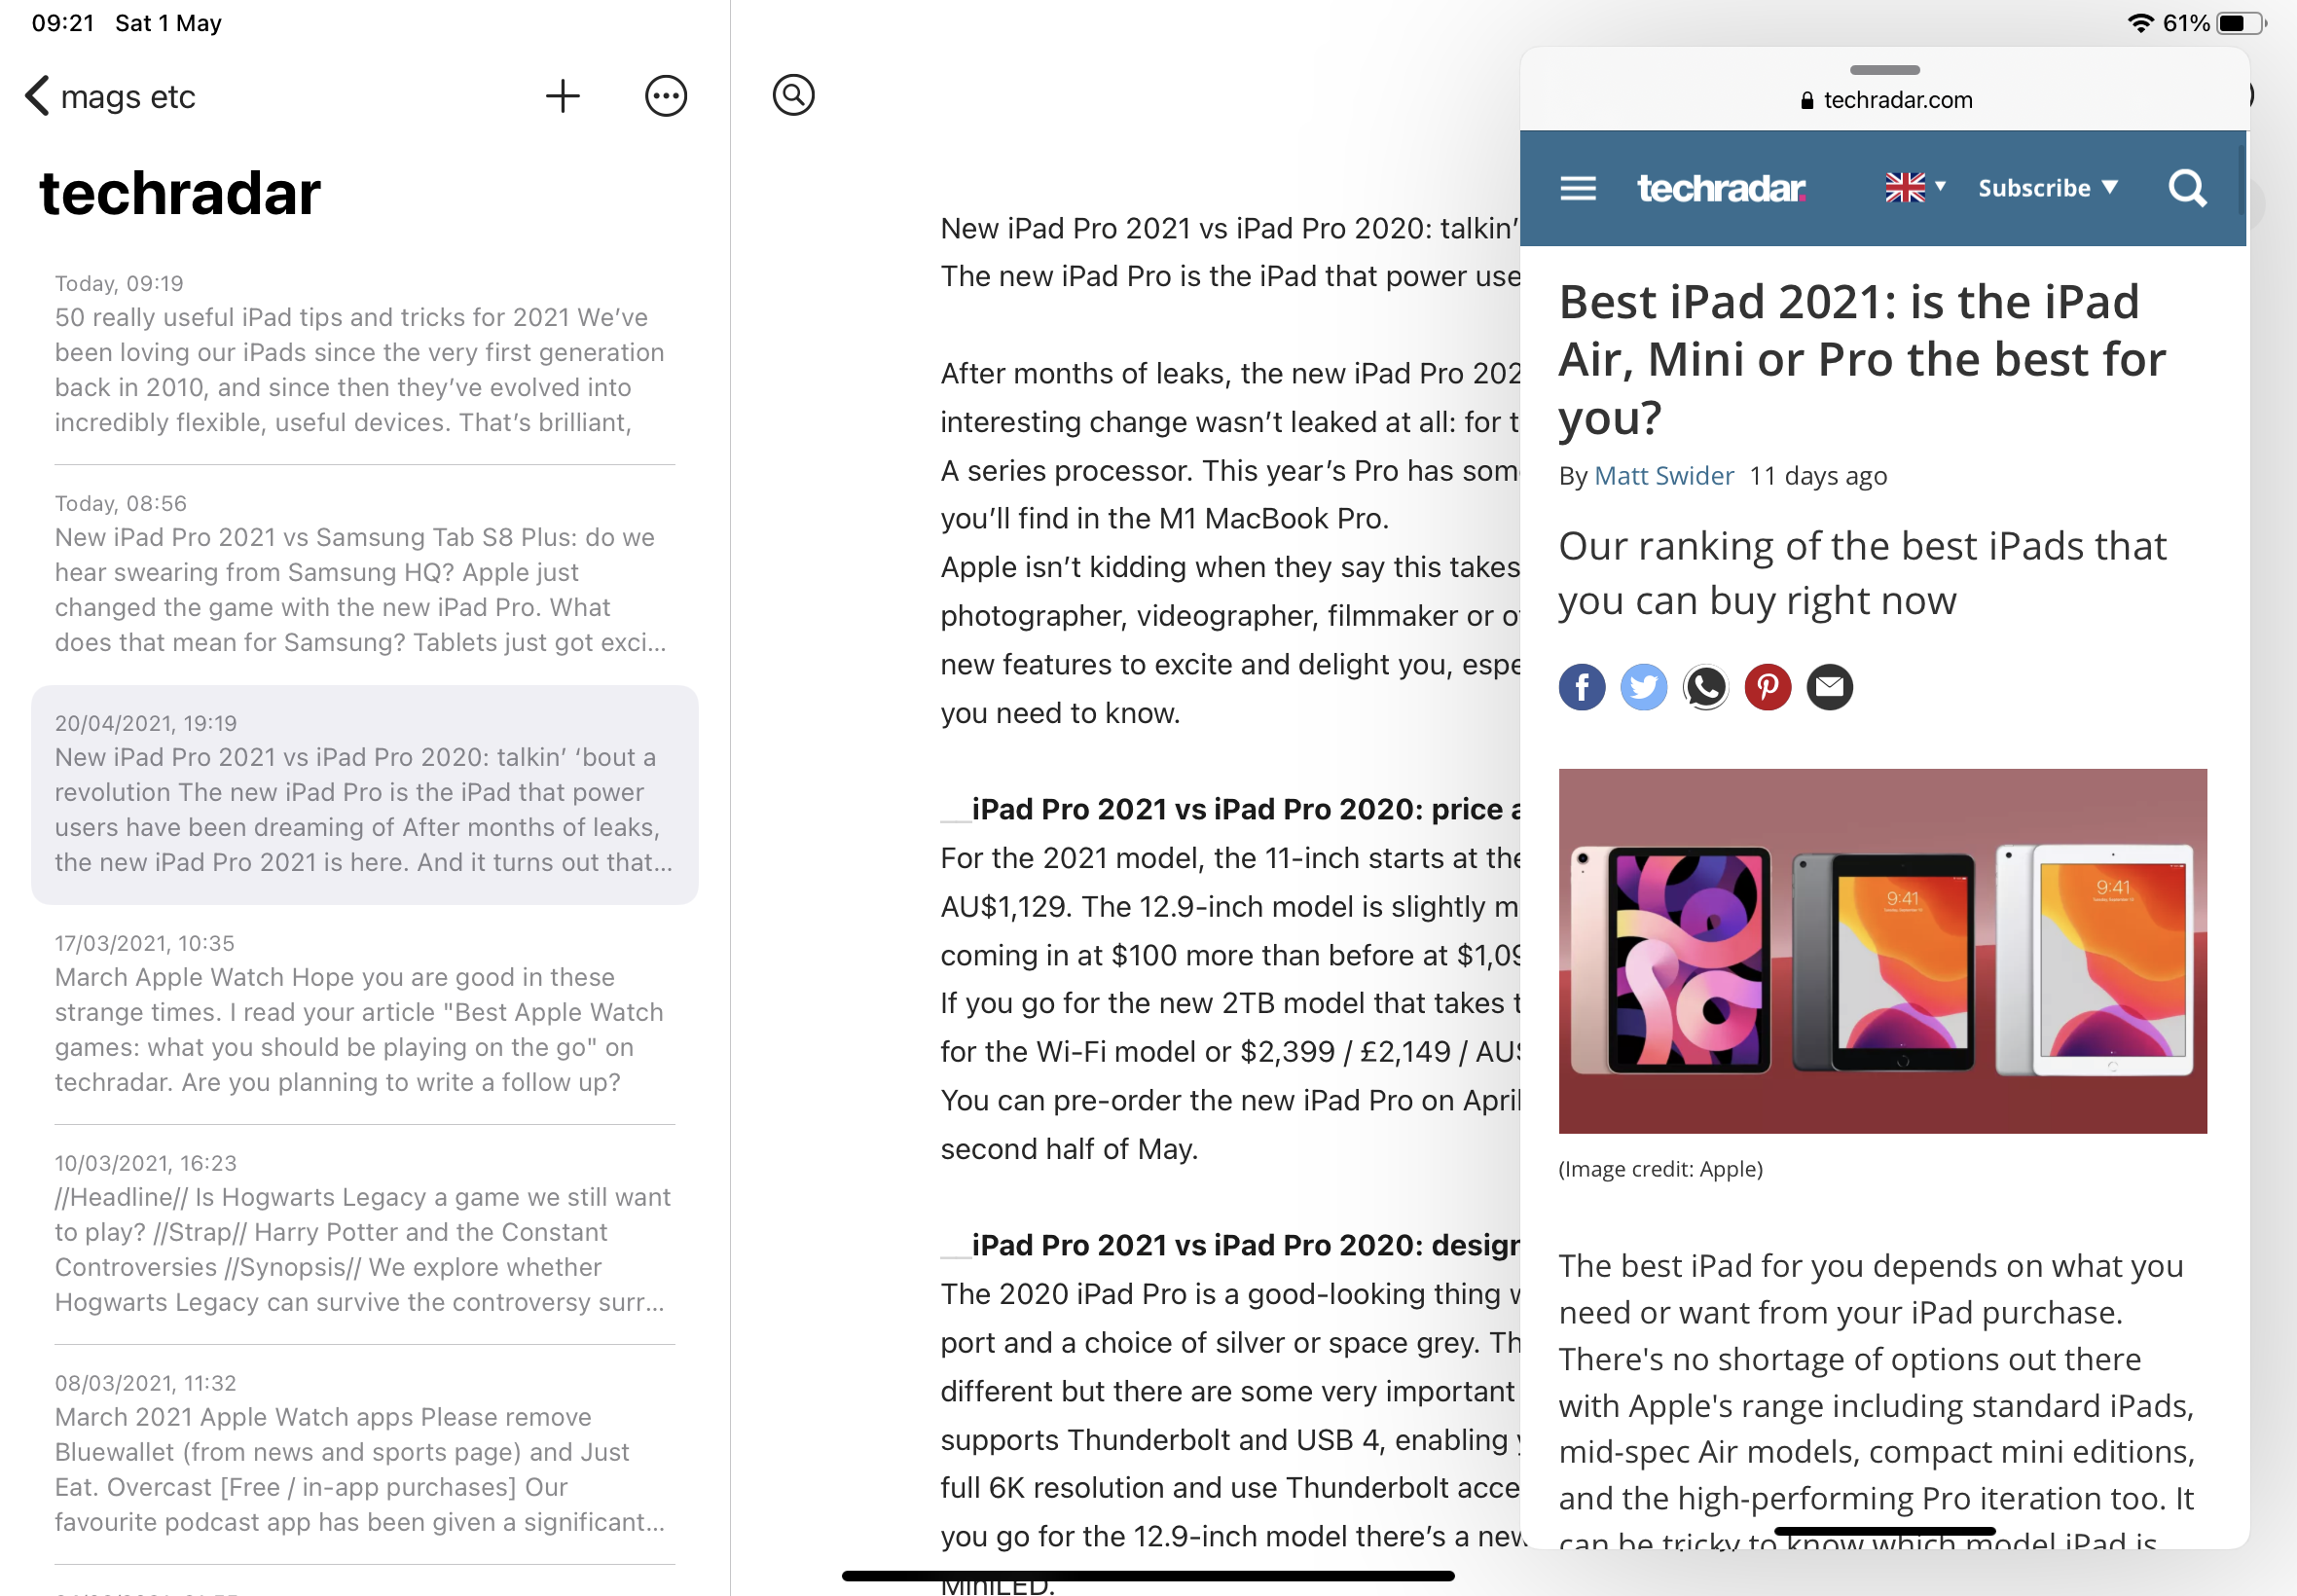
Slide Over works with iPads from the iPad Air / iPad mini 2 onwards, and enables you to quickly use another app without leaving the current one. Your iPad remembers which apps you use in this mode for faster switching. To use it, open the first app and then slide up from the bottom to show the Dock.
Touch and hold the icon for the second app and drag it upwards; it’ll now appear in its own panel. If you’re opening an app when you’re already in Split View - more of that in a moment - slide the app over the divider between the two open apps.
16. Use gestures for multitasking
There are lots of gestures in iPadOS. In an app, pinch with four or five fingers to see the currently running apps; using the same fingers, swipe sideways to switch between open apps. If you find you keep triggering these by mistake you can turn them off in Settings > General > Multitasking.
17. Use two apps at once in Split View
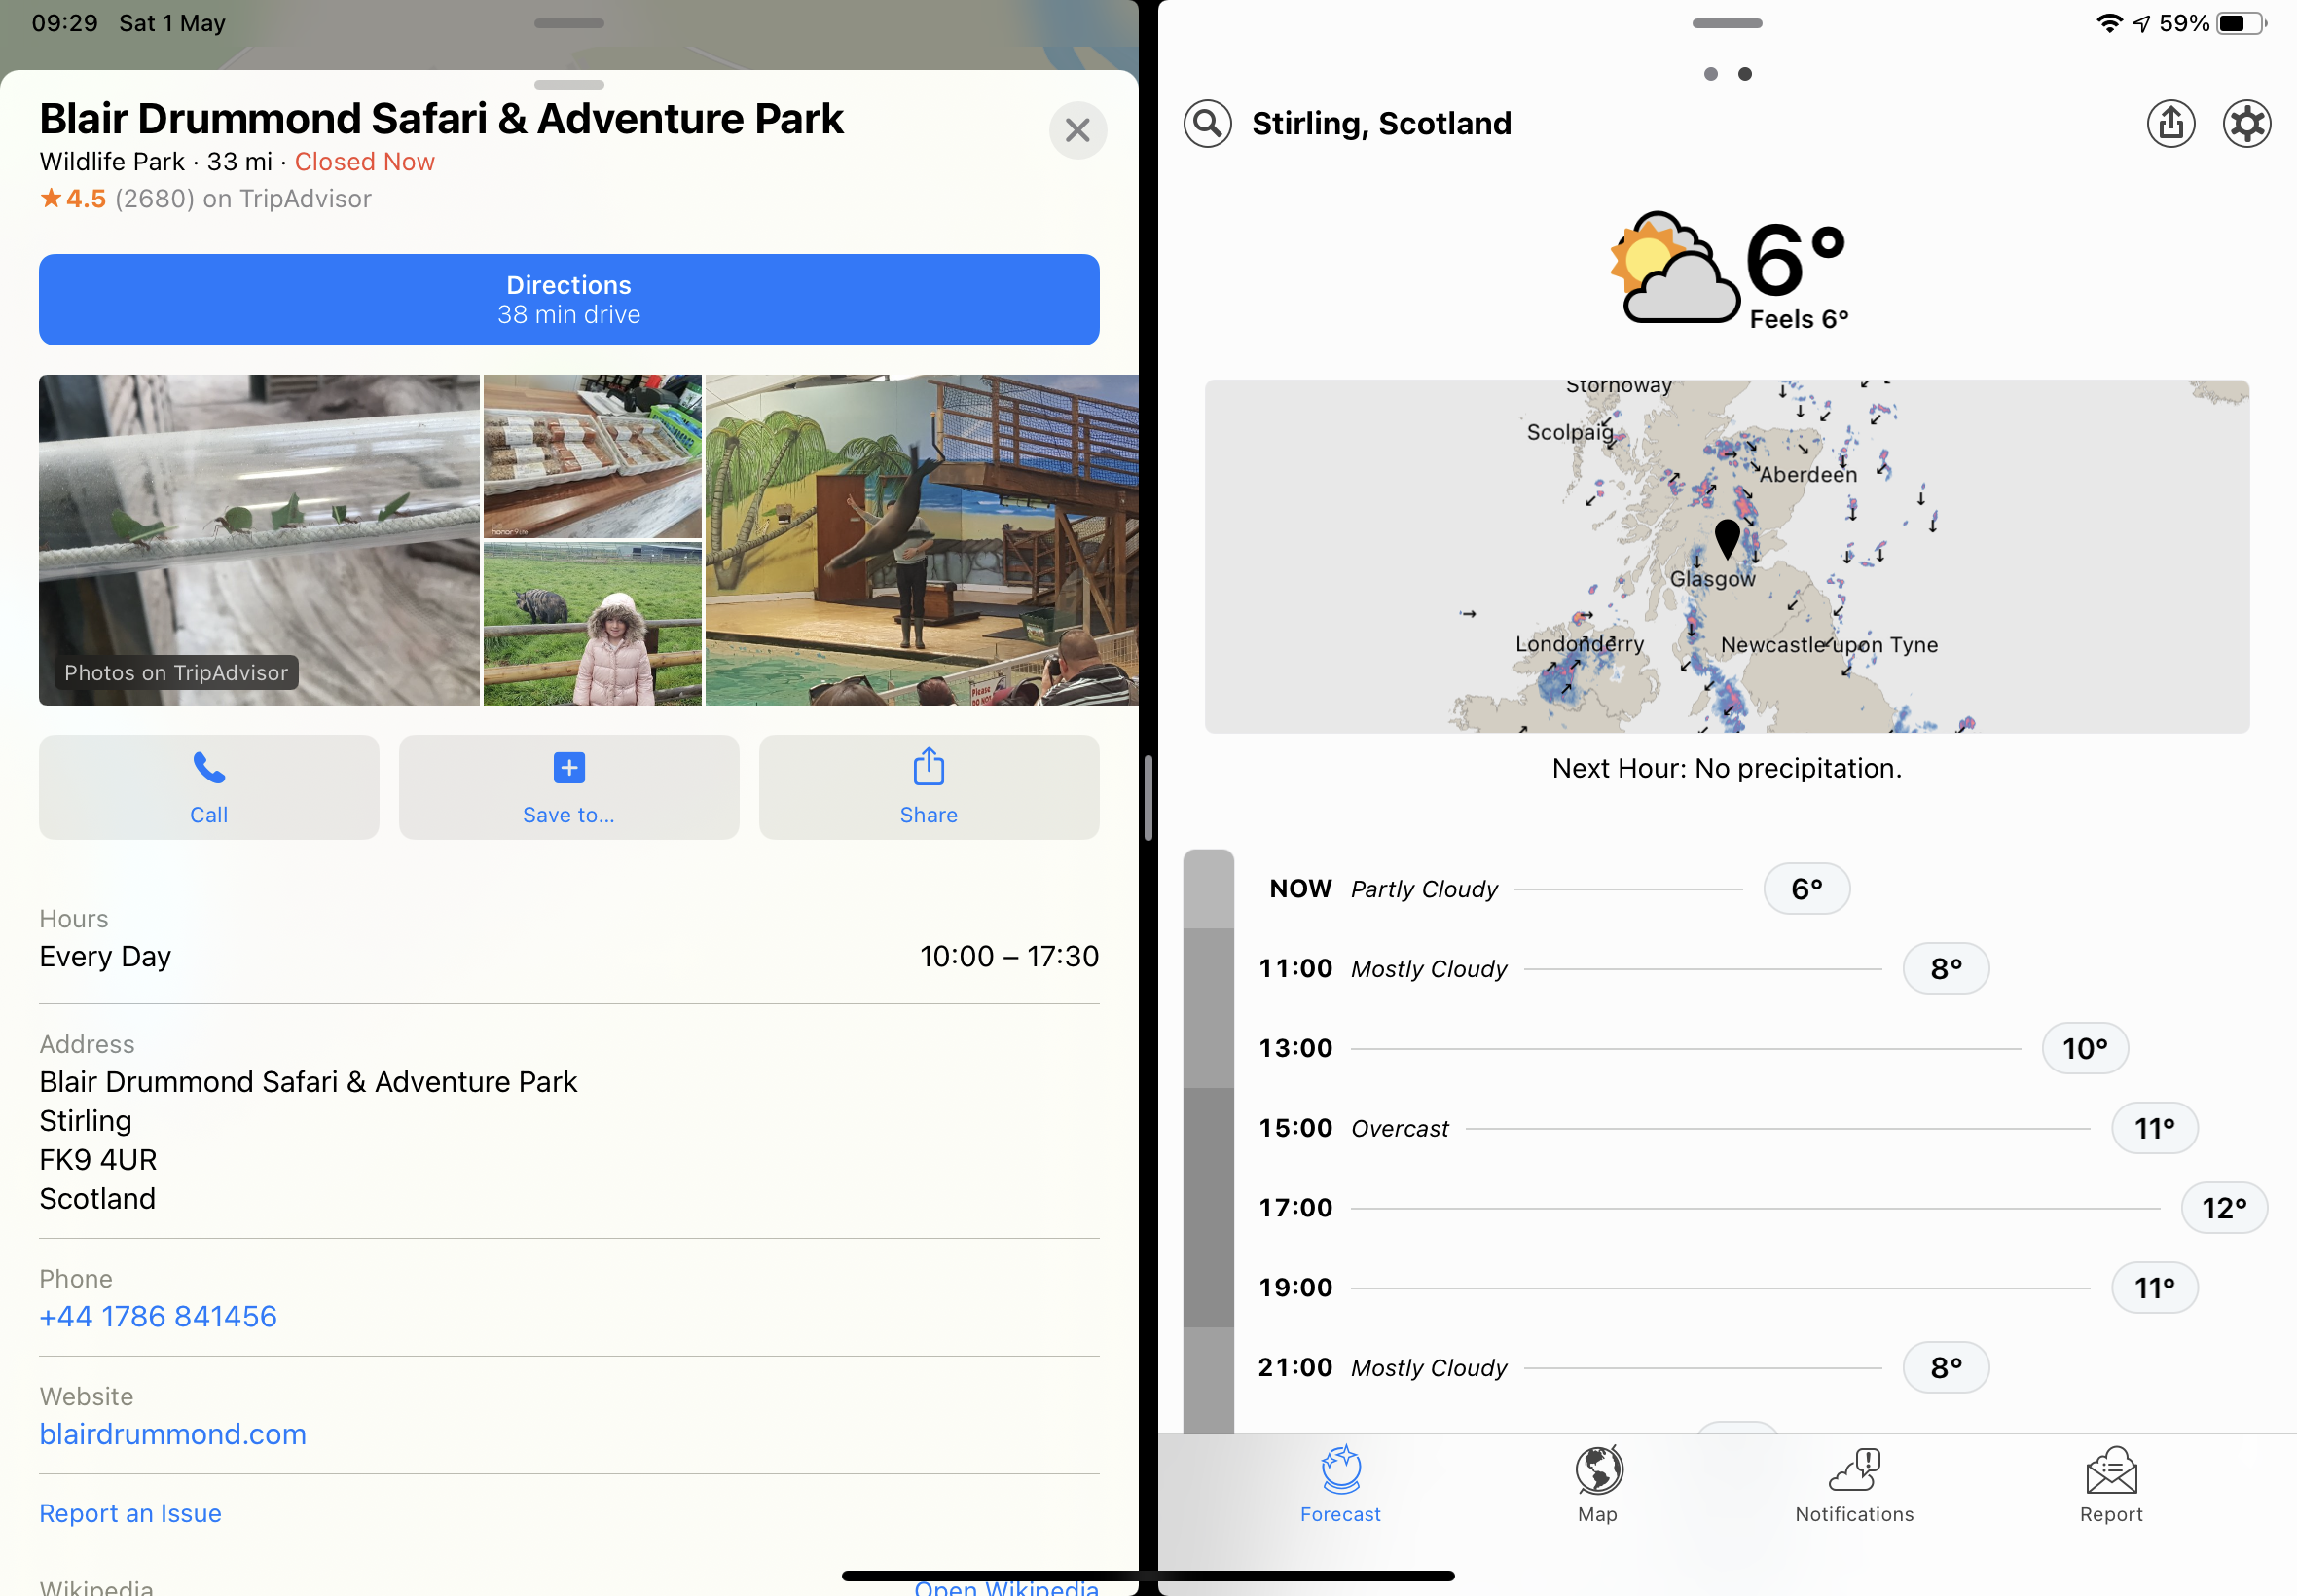
Split View is available on the iPad Air 2, iPad mini 4 and newer iPads and it’s brilliant: you can work in two apps side by side, so for example you might have Pages sitting next to Safari as you research and write.
It works exactly like Slide Over but instead of dragging the second app over the first, drag it from the dock to the very right hand edge of the screen. When you let go you should see your apps running side by side.
If you want to know more about split screens, check out our guide to how to view split screen on iPad.
18. Use Google
Apple would like you to use iCloud for everything, of course, but many of us prefer Gmail and Google Calendar. No worries: Settings > Calendar > Accounts takes you step by step through the process of adding Google Calendar, while Settings > Mail does the same for Gmail.
19. Watch videos while doing something else
When you’re watching a film or having a FaceTime video call in full screen mode you’ll see a little icon of a screen with an arrow in it, so for example if you’re watching a music video in Apple Music it’s up by the close icon at the top left of the window. Tap it and the video scales down, tap it again and the video returns to normal size.
20. Use AirPrint
Printing wirelessly is easy if you’ve got an AirPrint printer: assuming your printer and iPad are both on the same Wi-Fi network it’s just a matter of tapping the Share menu in your app and choosing Print. Your iPad should automatically find the printer.
21. Control what apps do in the dark
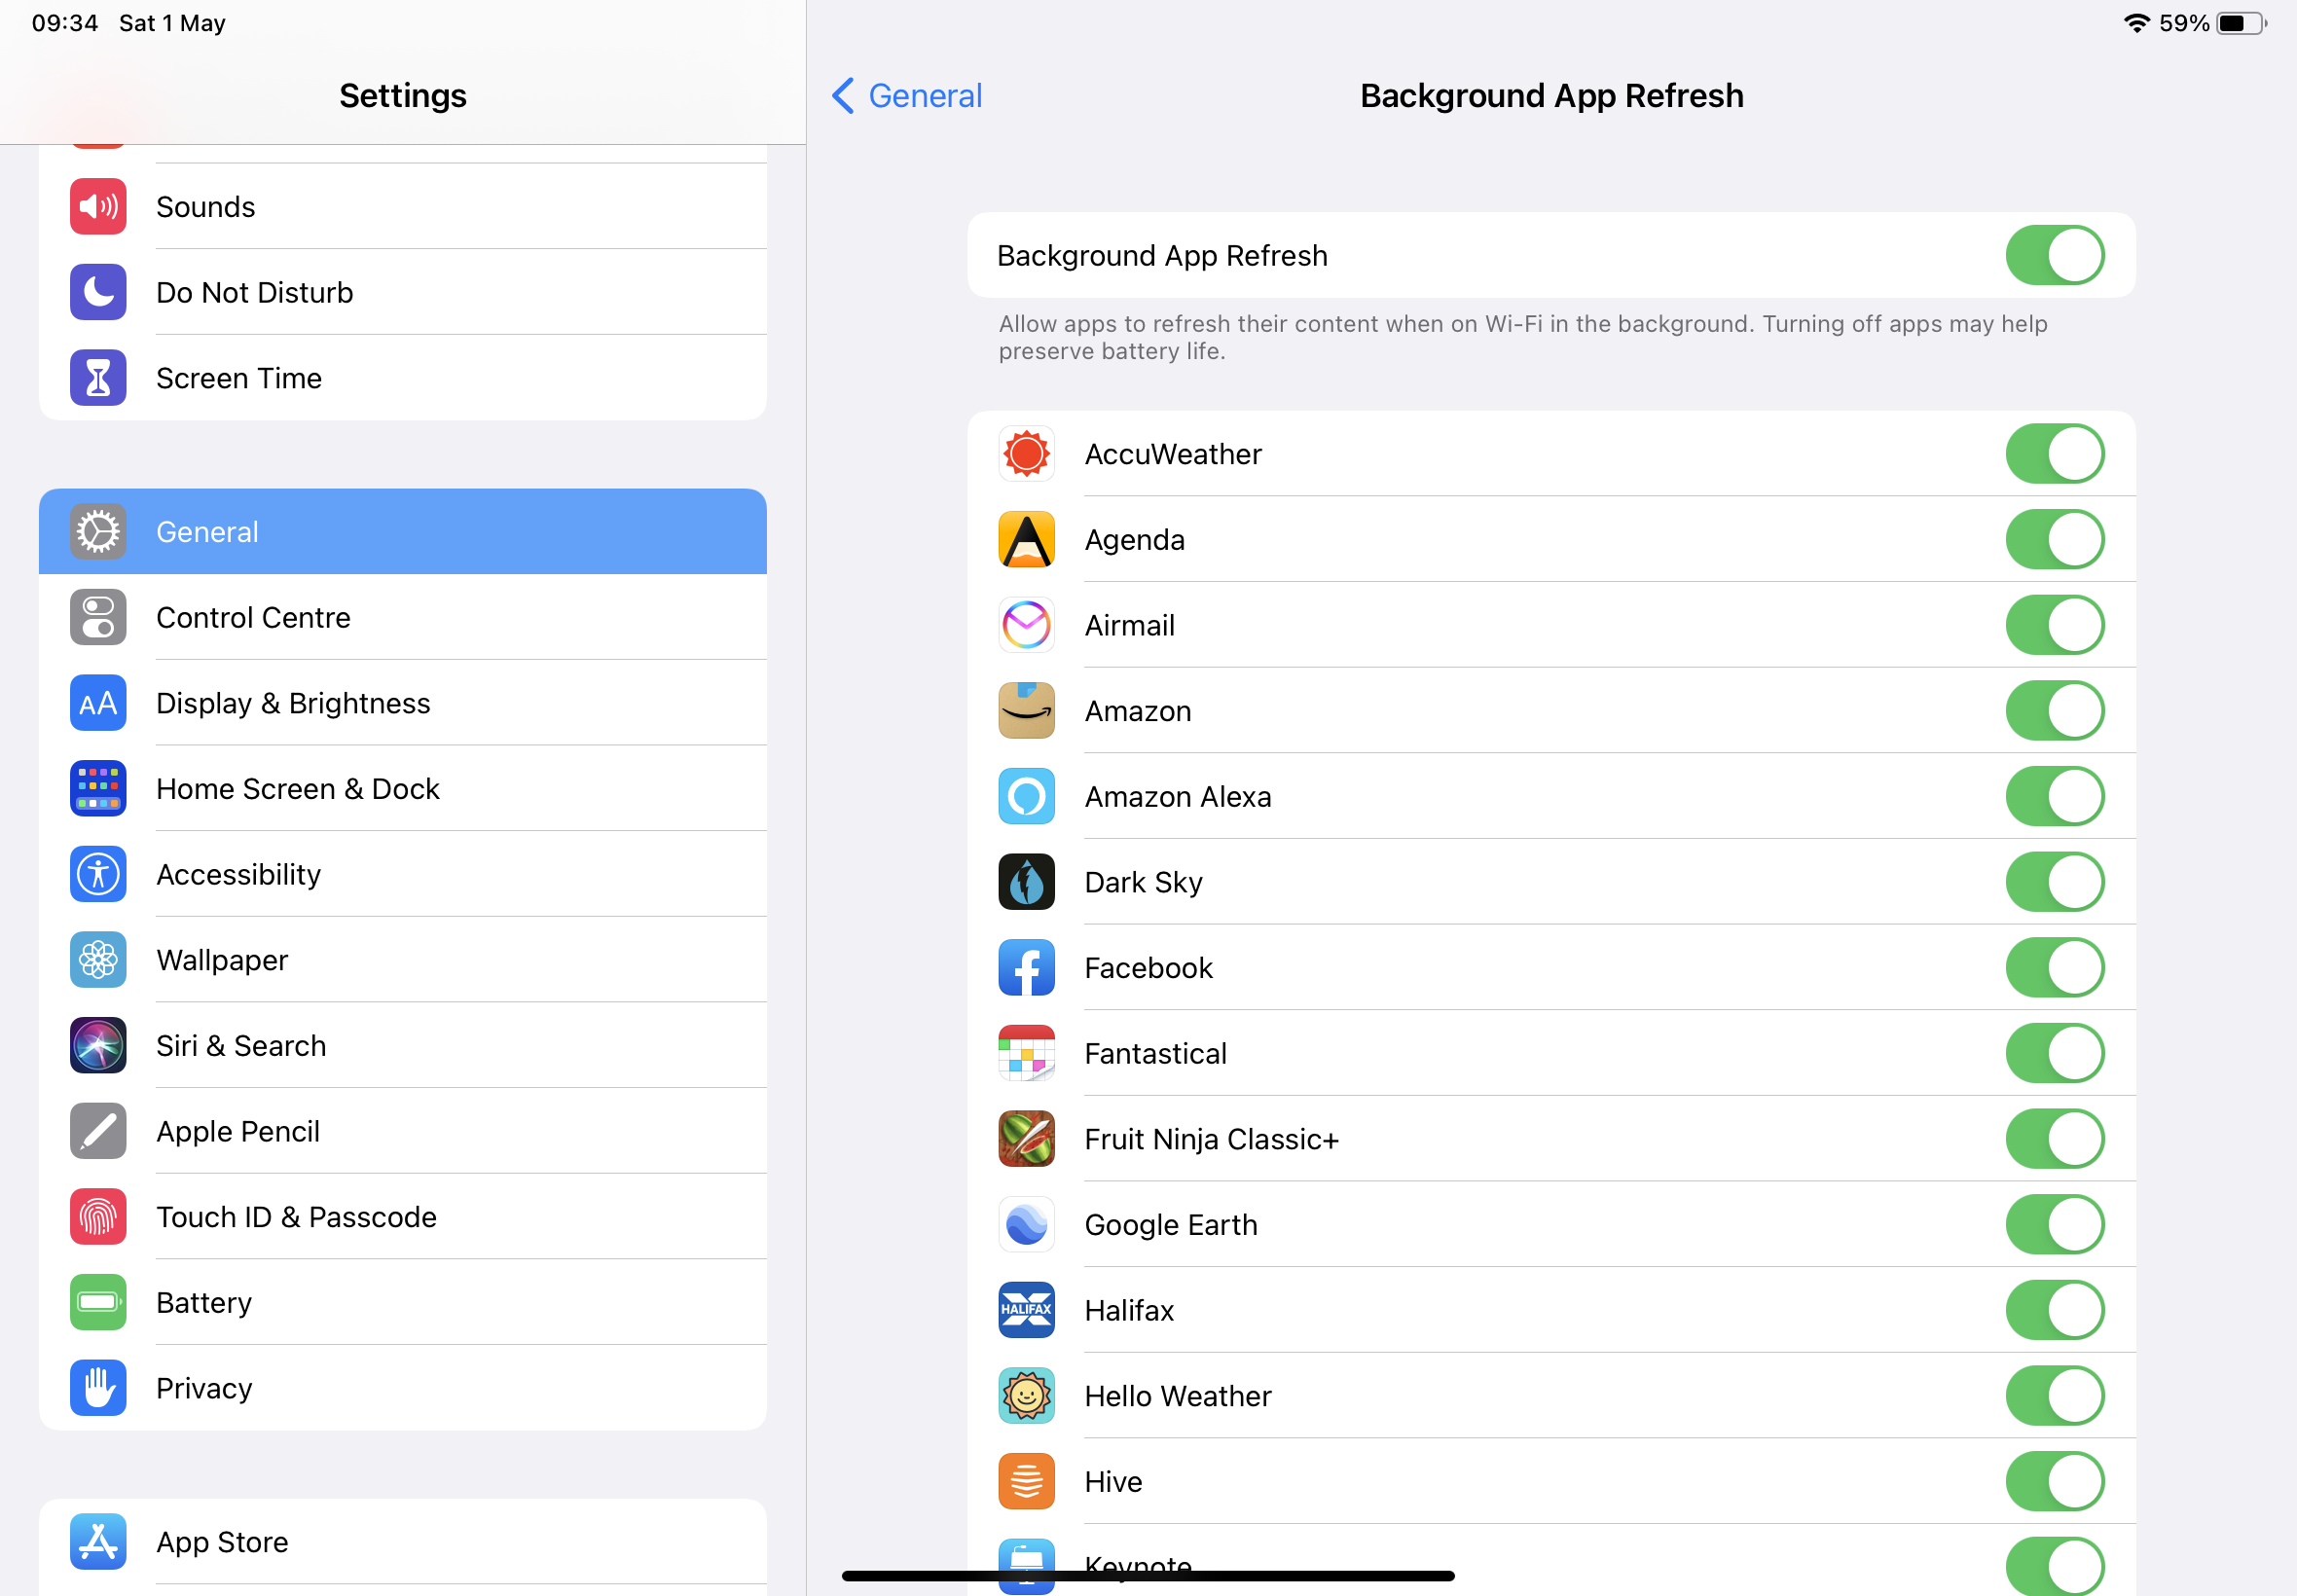
Some apps like to do things in the background, which can be useful: for example it’s handy to have your newspaper ready to read when you turn on your iPad in the morning, or to have the current weather forecast in your widget.
But background refresh could also mean apps using bandwidth and battery for no good reason, which isn’t ideal if you’re on a cellular connection. And as ever, Facebook tends to demand more resources than it really needs. You can control which apps can use background refresh in Settings > General > Background App Refresh.
22. Change the Share menu
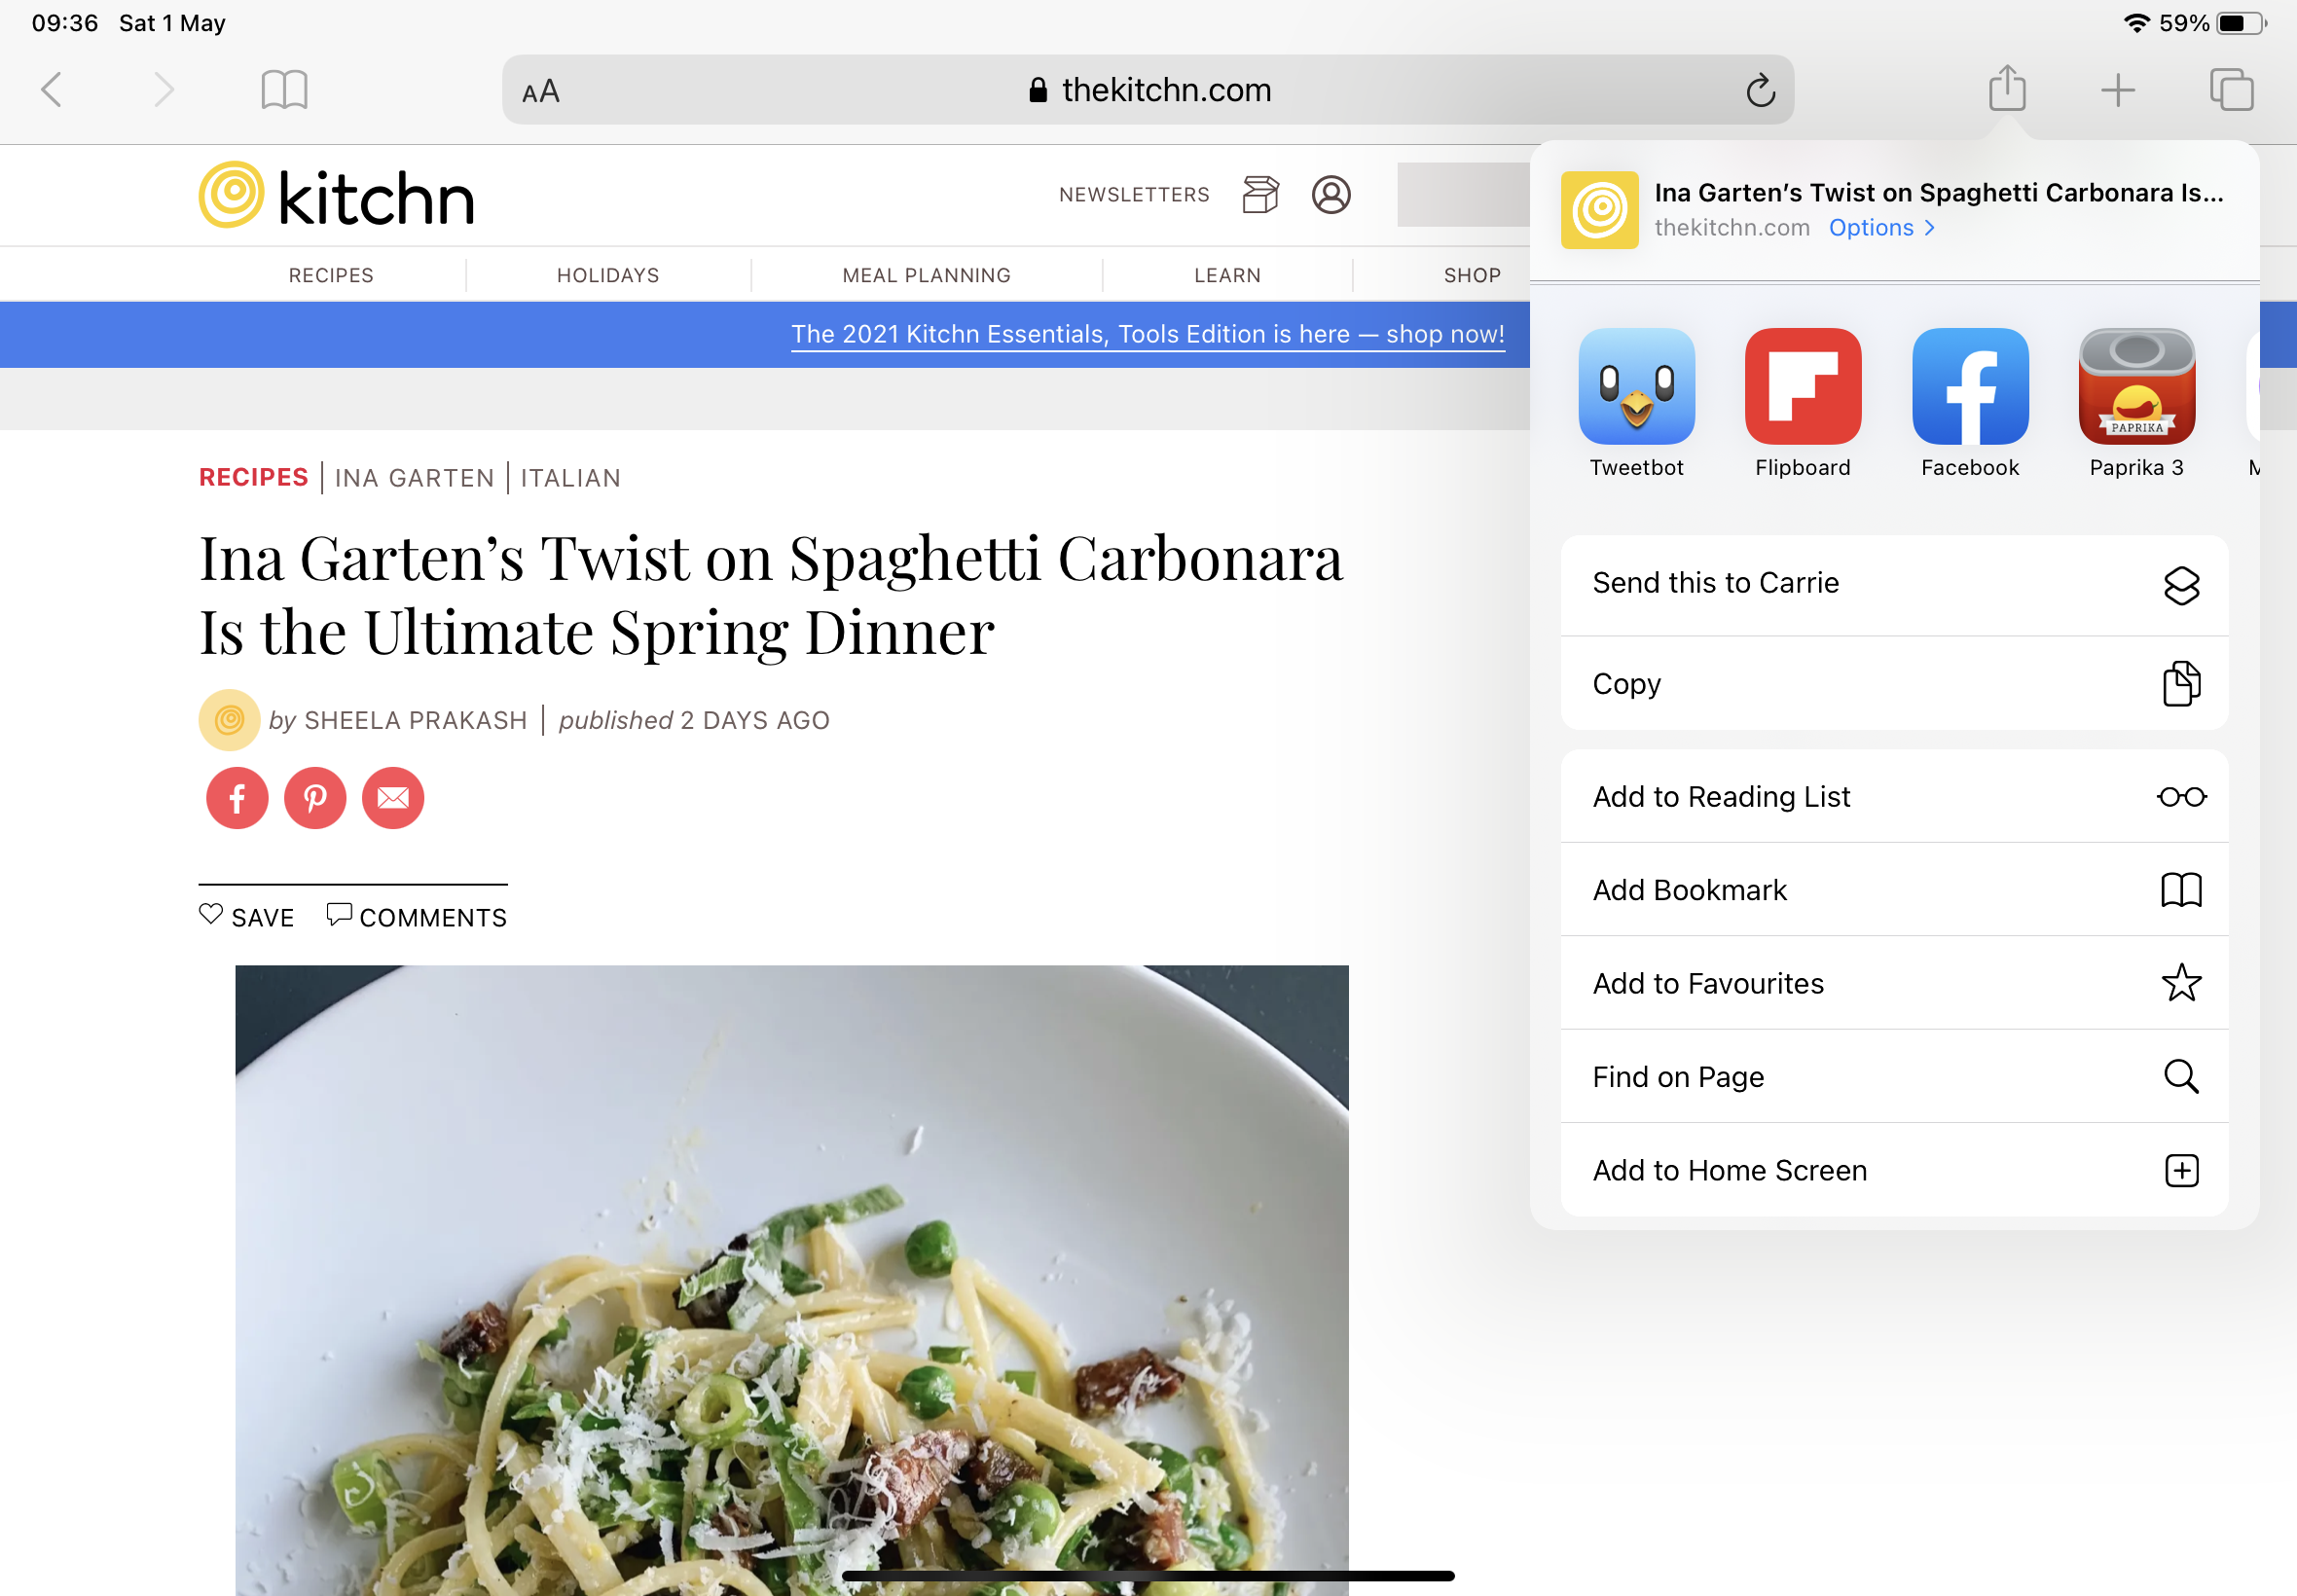
Another of our favorite iPad tips and tricks, the Share button in apps is a brilliant thing, allowing you to send data to printers, email or other apps.
And you can customize it: if you tap on it, scroll right and choose More, you’ll see which features can be turned on or off. One of our favorites is Send to Paprika, which we use to automatically download recipes to the recipe app.
23. Have fun with widgets
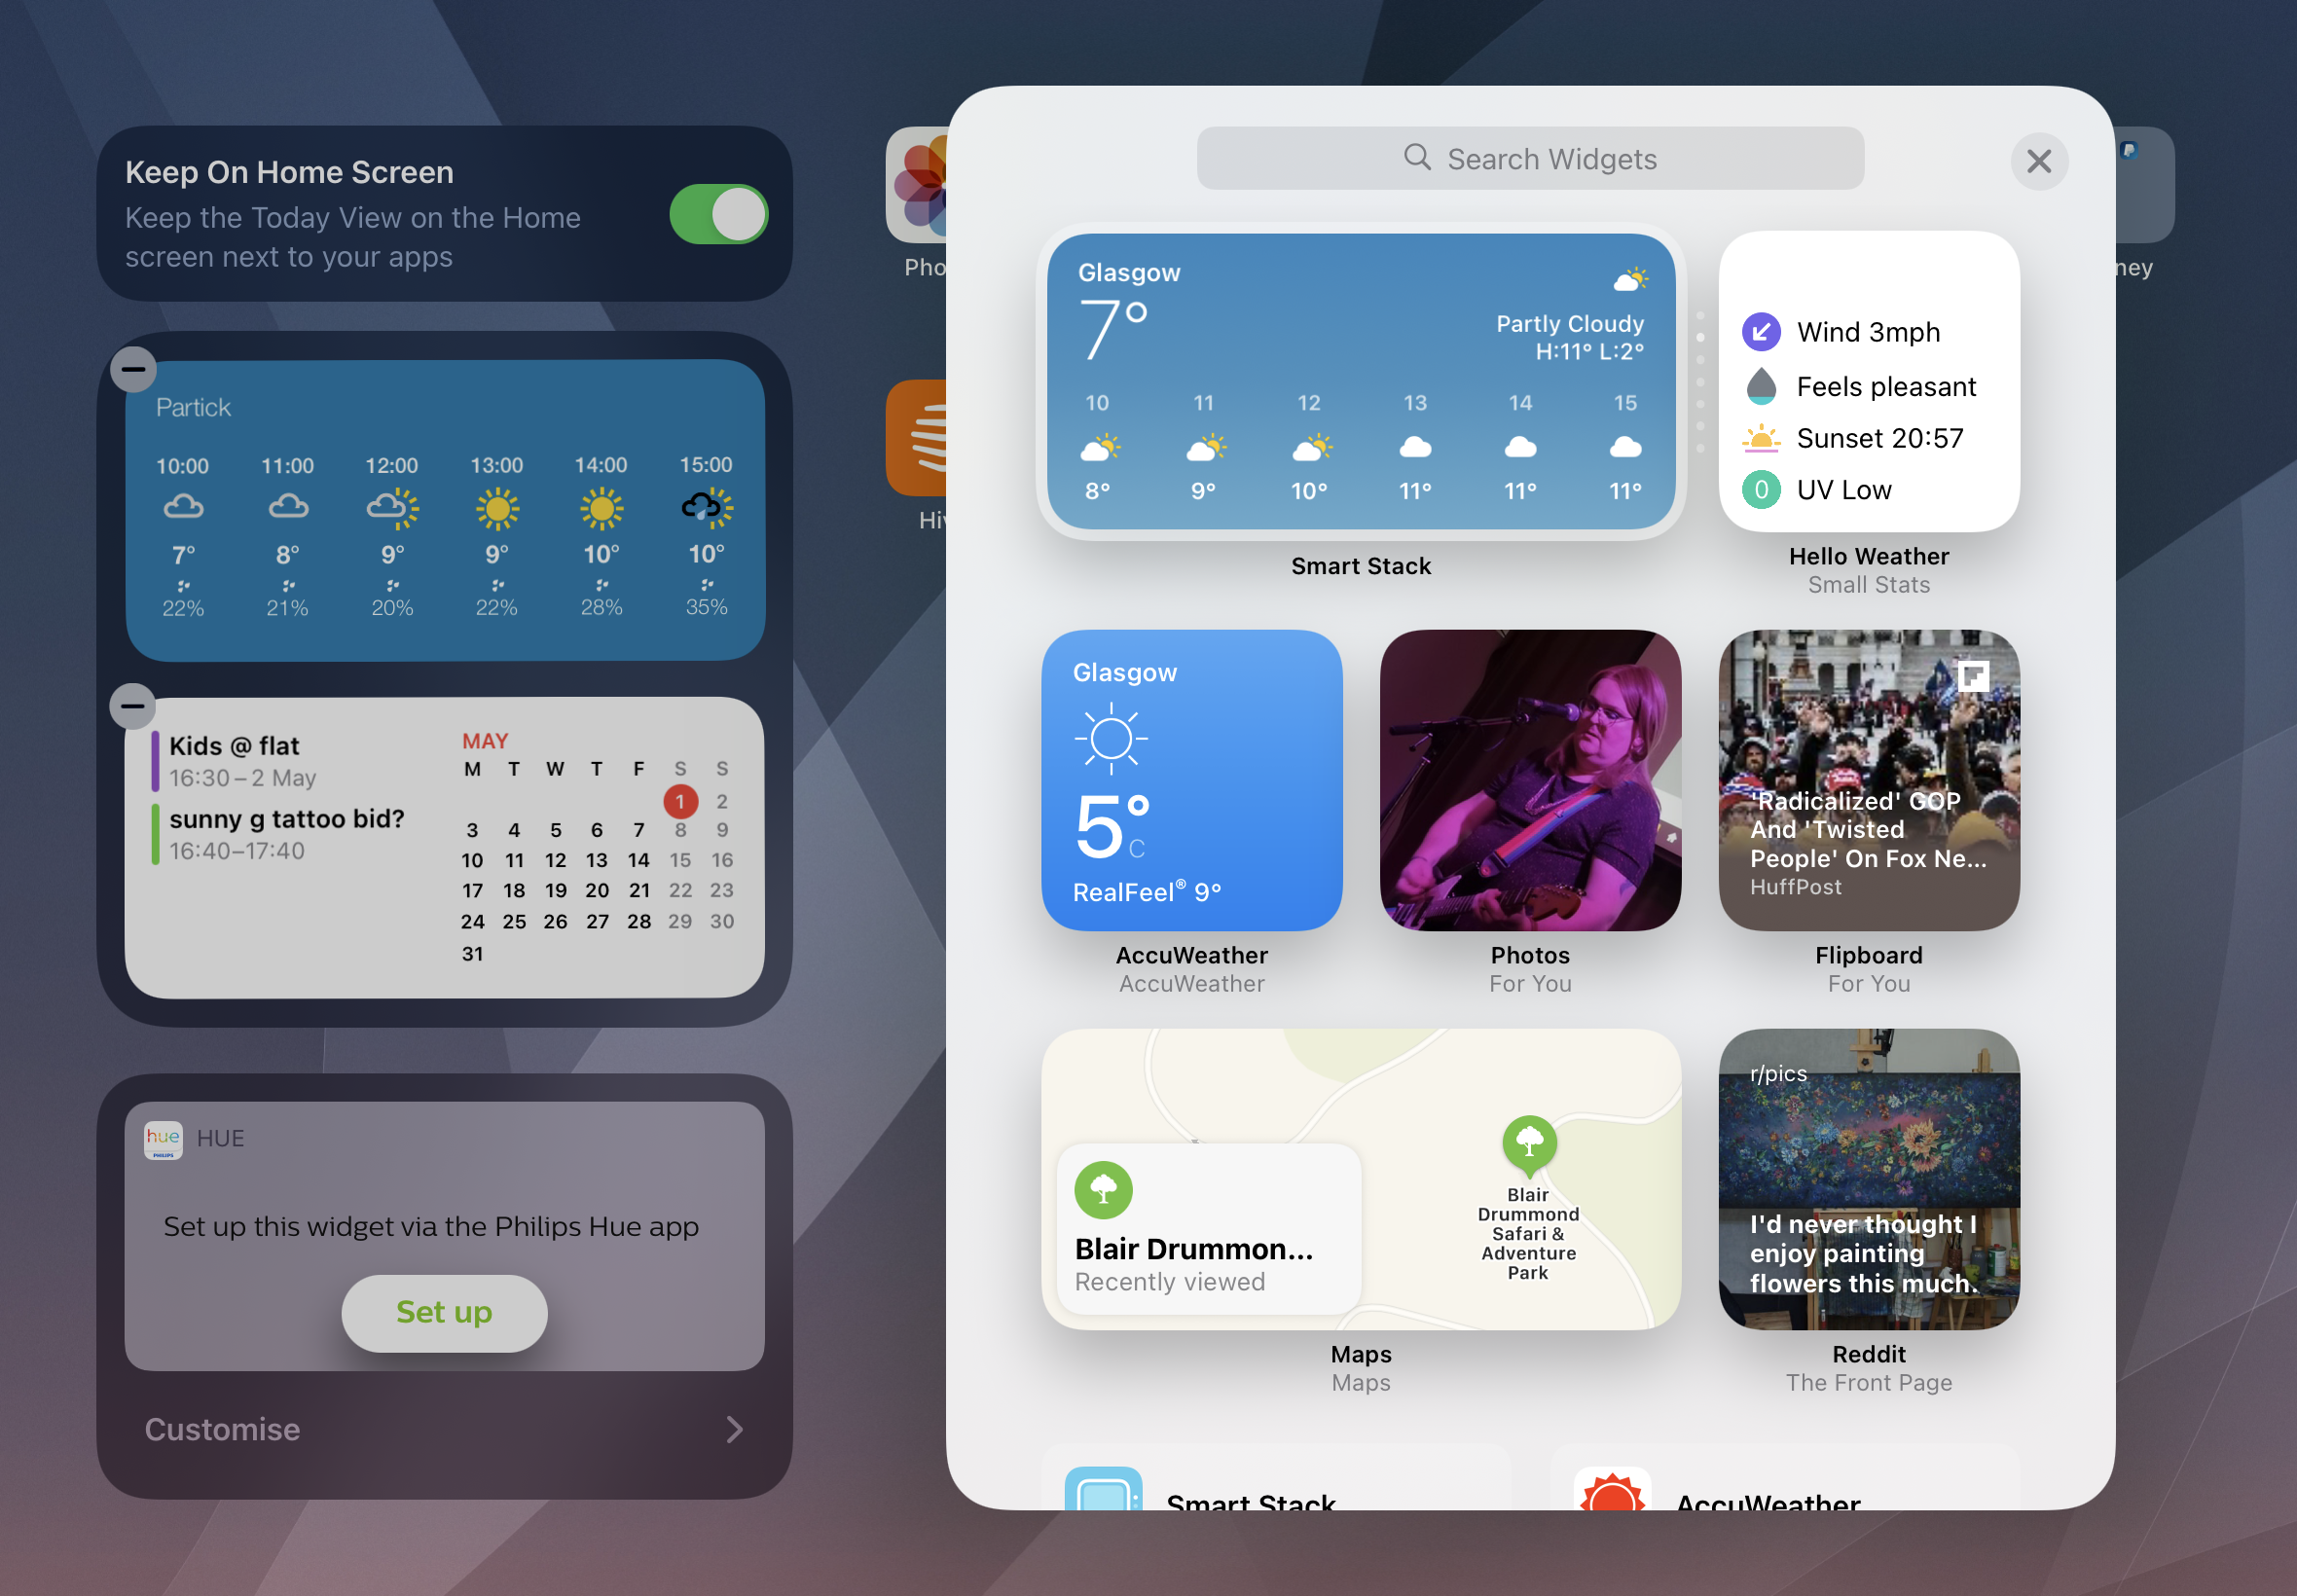
Your iPad Home Screen can include widgets to show calendar items, weather forecasts, news headlines and anything else you fancy.
Press and hold on a blank bit of your first Home Screen and you can add the widgets you’d like your iPad to display. If you change your mind just press and hold again, and you’ll see little circles with minus signs in each widget. Tapping the minus sign removes it from your Home Screen.
24. Manage your storage
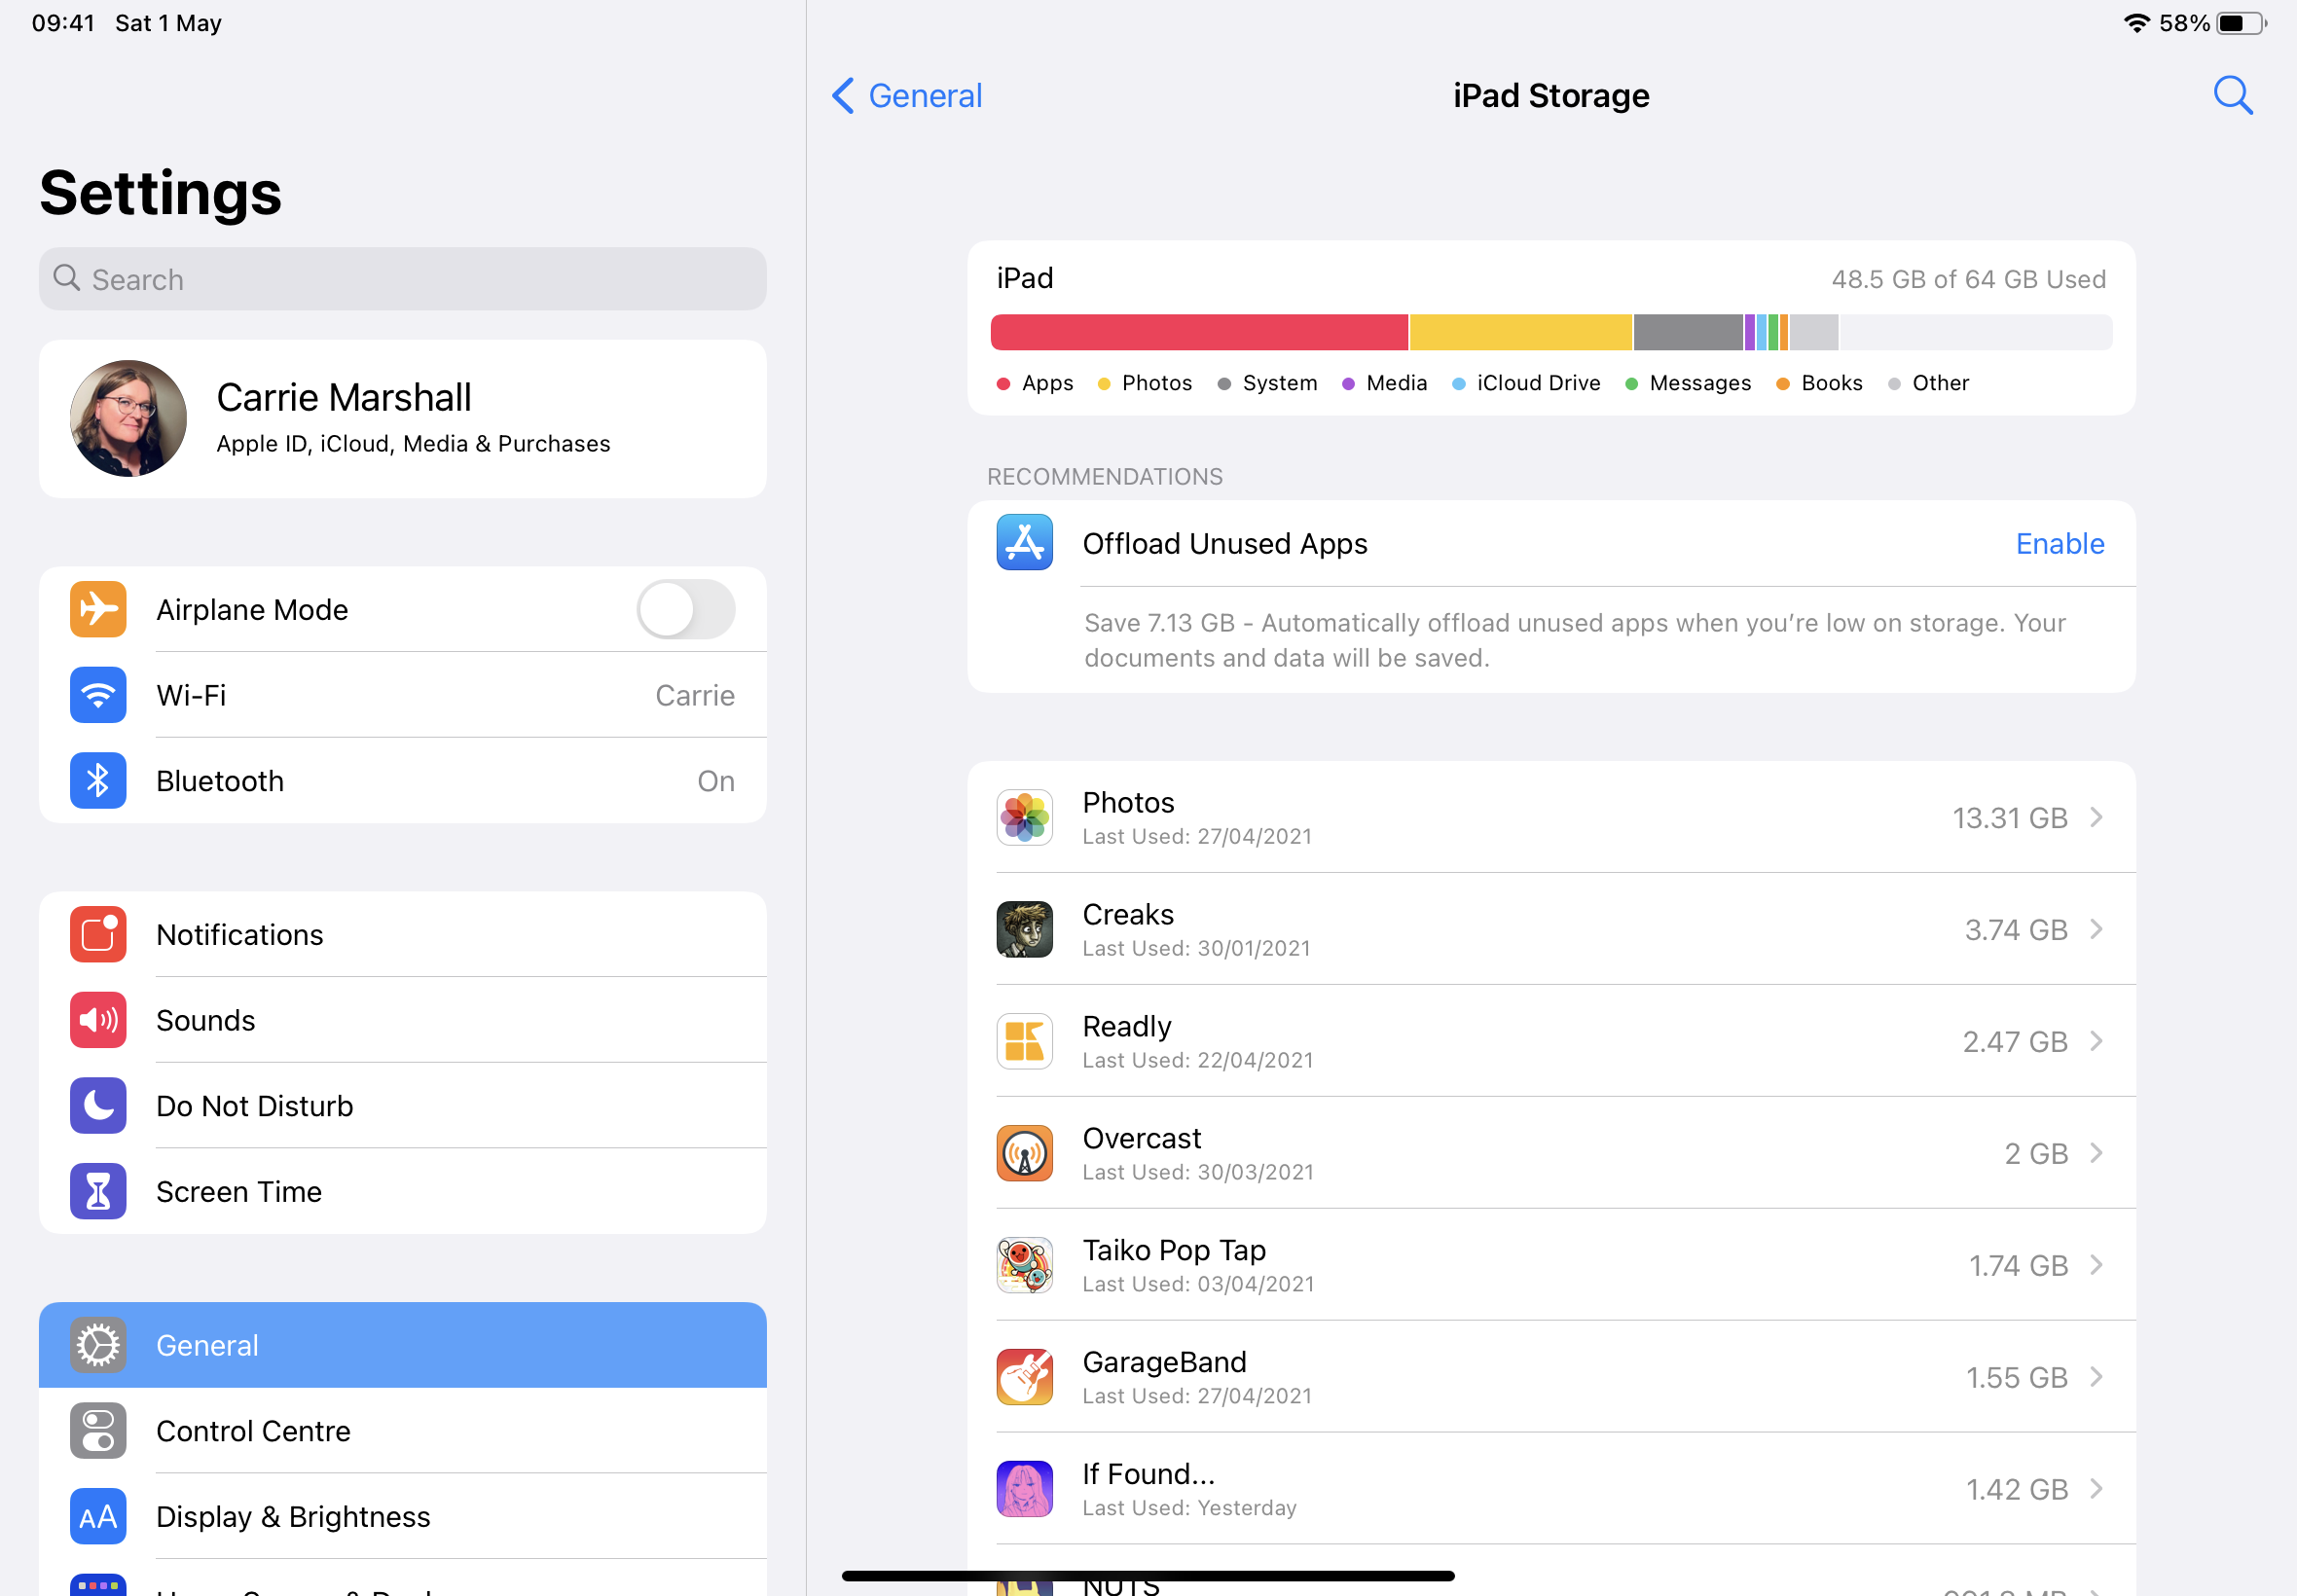
It doesn’t take long to fill up even the most enormous iPad with photos, apps and videos. Your iPad can help with that. Go into Settings > General > iPad Storage and you’ll see what’s taking up space.
You can now make a number of changes, including offloading unused apps. This removes the app from your iPad but keeps its icon and data; when you need it, just tap on it to pick up where you left off. You can also completely delete apps you no longer need.
25. Attach all kinds of things in Mail
To insert things into Mail messages, press and hold in an empty bit of the message and a toolbar appears. To add photo or video from your Photos library, choose Insert Photo or Video; to add files from iCloud Drive, Dropbox or other installed storage apps tap on Add Document. You can also scan a document into Mail from the camera or insert a sketch.
26. Add symbols without stopping
When you’re typing you can add punctuation and symbols without switching from the ABC keyboard. Swipe down on a letter to type the symbol shown at the top, so for example if you want an @ sign you can swipe down on the A key; to get an exclamation mark, swipe down on the comma key. You can also add accents for other languages by long-pressing a key, so for example if you long-press A you’ll see options for Ā, ã, å, æ, â and so on.
27. Make VIPs for Mail
Mail offers a useful feature to tame unnecessary notifications: you can ask it to notify you only when a message comes from a Very Important Person, and to have an inbox folder that only shows messages from those VIPs. To make someone a VIP you need to add them to Contacts first. You’ll then see an Add to VIP option when you tap their name in Mail.
28. Control the kids
iPads have lots of ways to ensure the kids don’t access things you don’t want them to. In Screen Time you can set app, communication and time limits for each child’s Apple ID, and you can use Content & Privacy Restrictions to block content.
29. Lock down an app
For very young children – or nosy adults – you can enable Guided Access, which limits them to the current app and enables you to disable some of its features or parts of the screen.
It’s in Settings > Accessibility > Guided Access. Once it’s enabled, open the app you want to share and then triple-tap the Home button or, on iPads without a Home button, triple-tap the sleep/wake button.
30. Open Safari tabs from your other devices
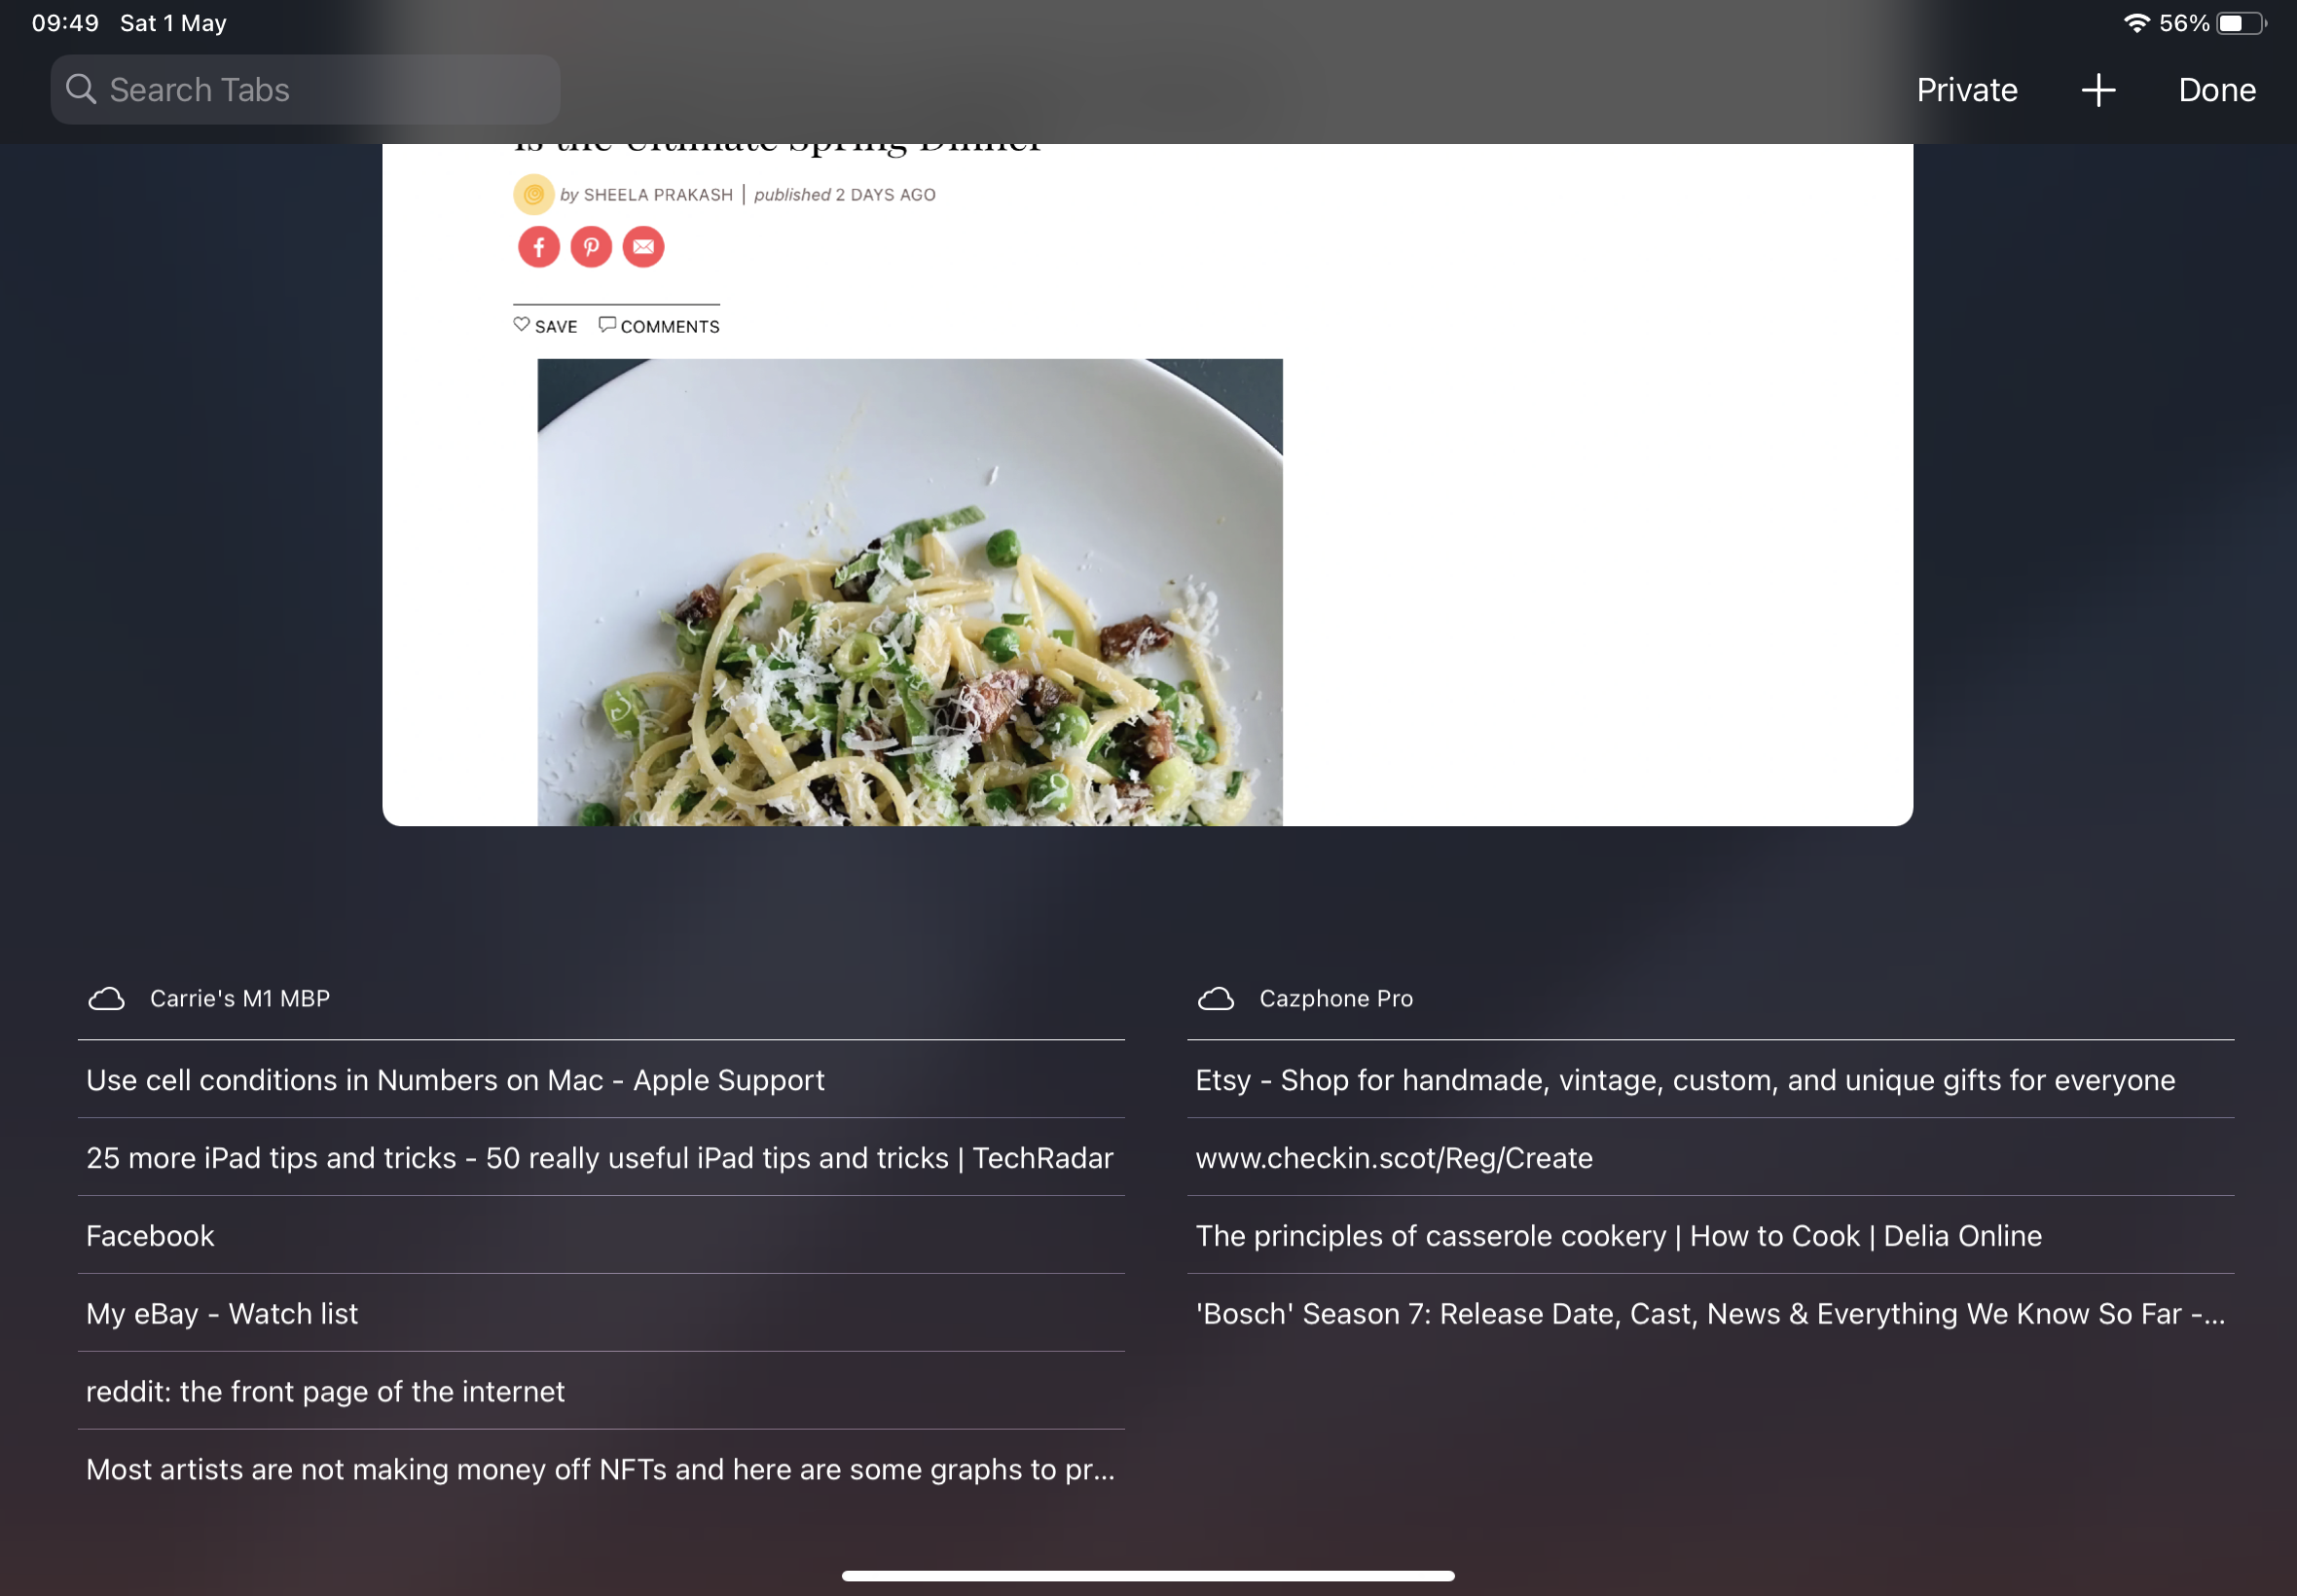
In Safari on your Mac, iPhone or iPad you can share open tabs with your other devices. To do it from a Mac go into System Preferences > iCloud and make sure Safari is switched on; on iOS go into Settings > Your name > iCloud and again, check Safari is switched on.
Now in Safari clicking on the tabs icon - it looks like one square on top of another - brings up not just the tabs on your current device, but on your other device(s) too.
31. Catch the train with Maps
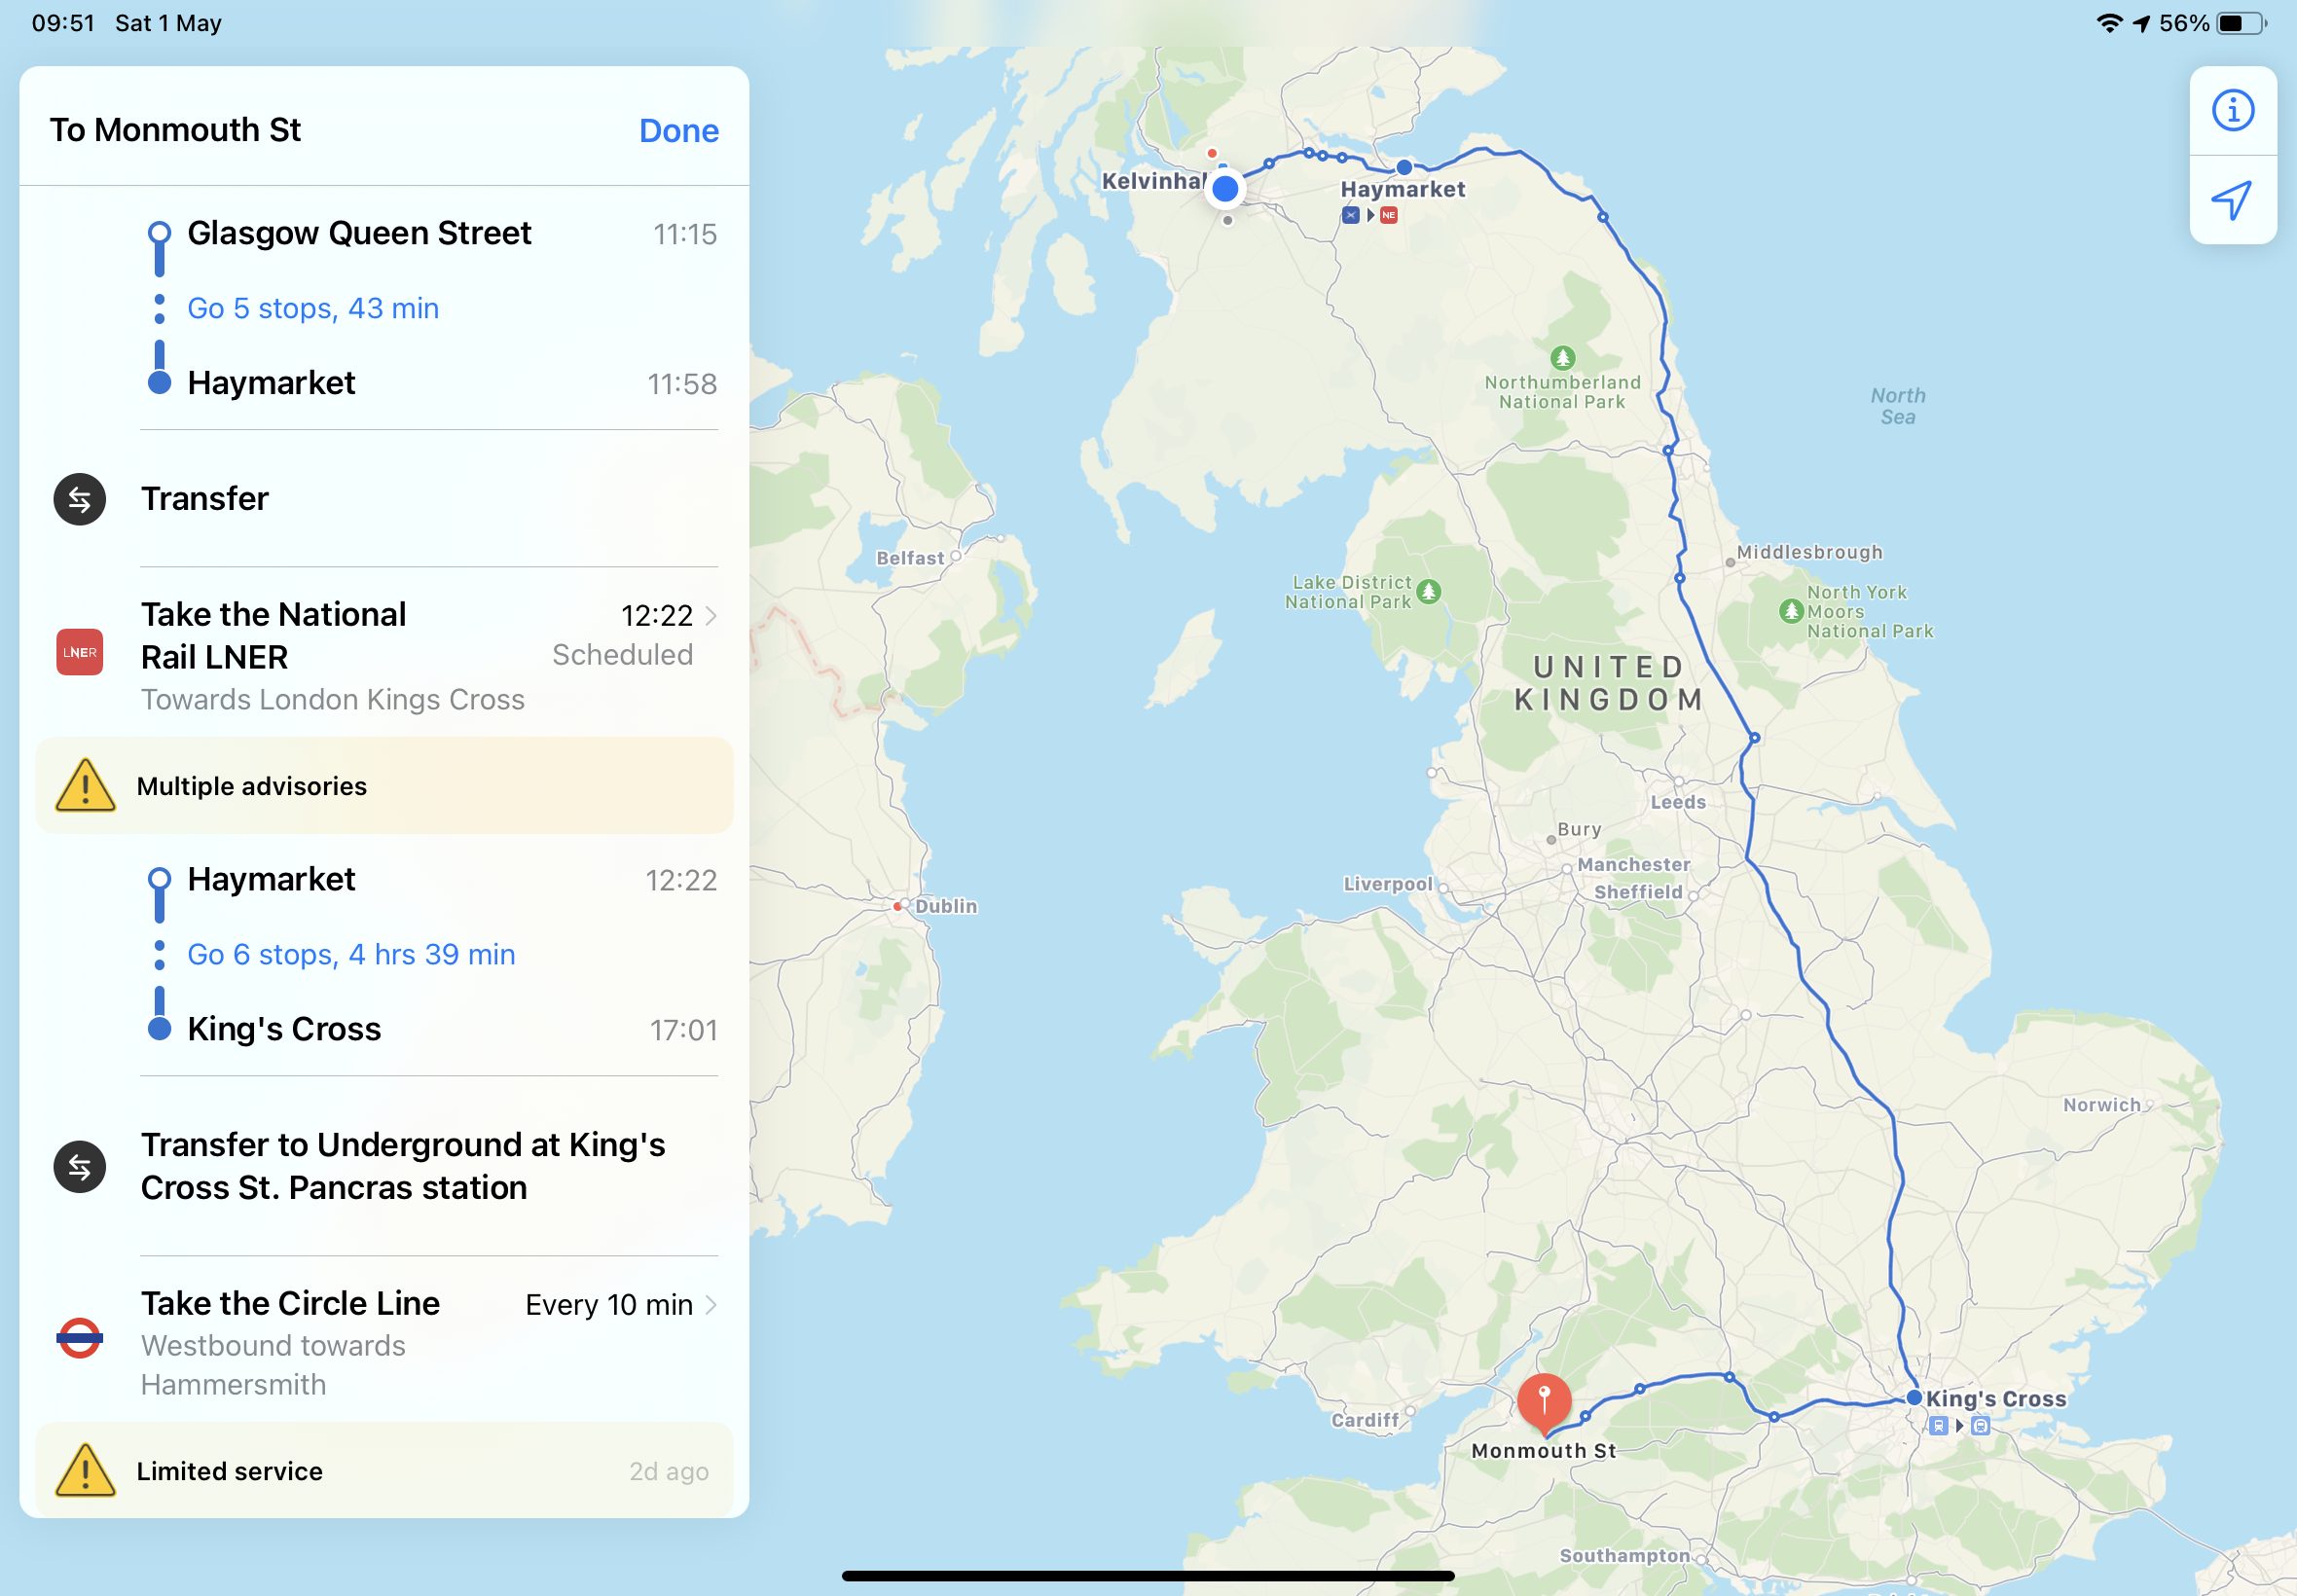
Maps offers real-time public transport information, and when you search for an address you can choose public transport options including underground railways, buses, trains and ferries.
If you choose public transport in the Directions tab you’ll also see advisories of timetable changes and other issues that might affect your trip. In the US, you can also get directions for cyclists that warn of steep hills, stairs and other issues.
32. Find a place to stay or eat
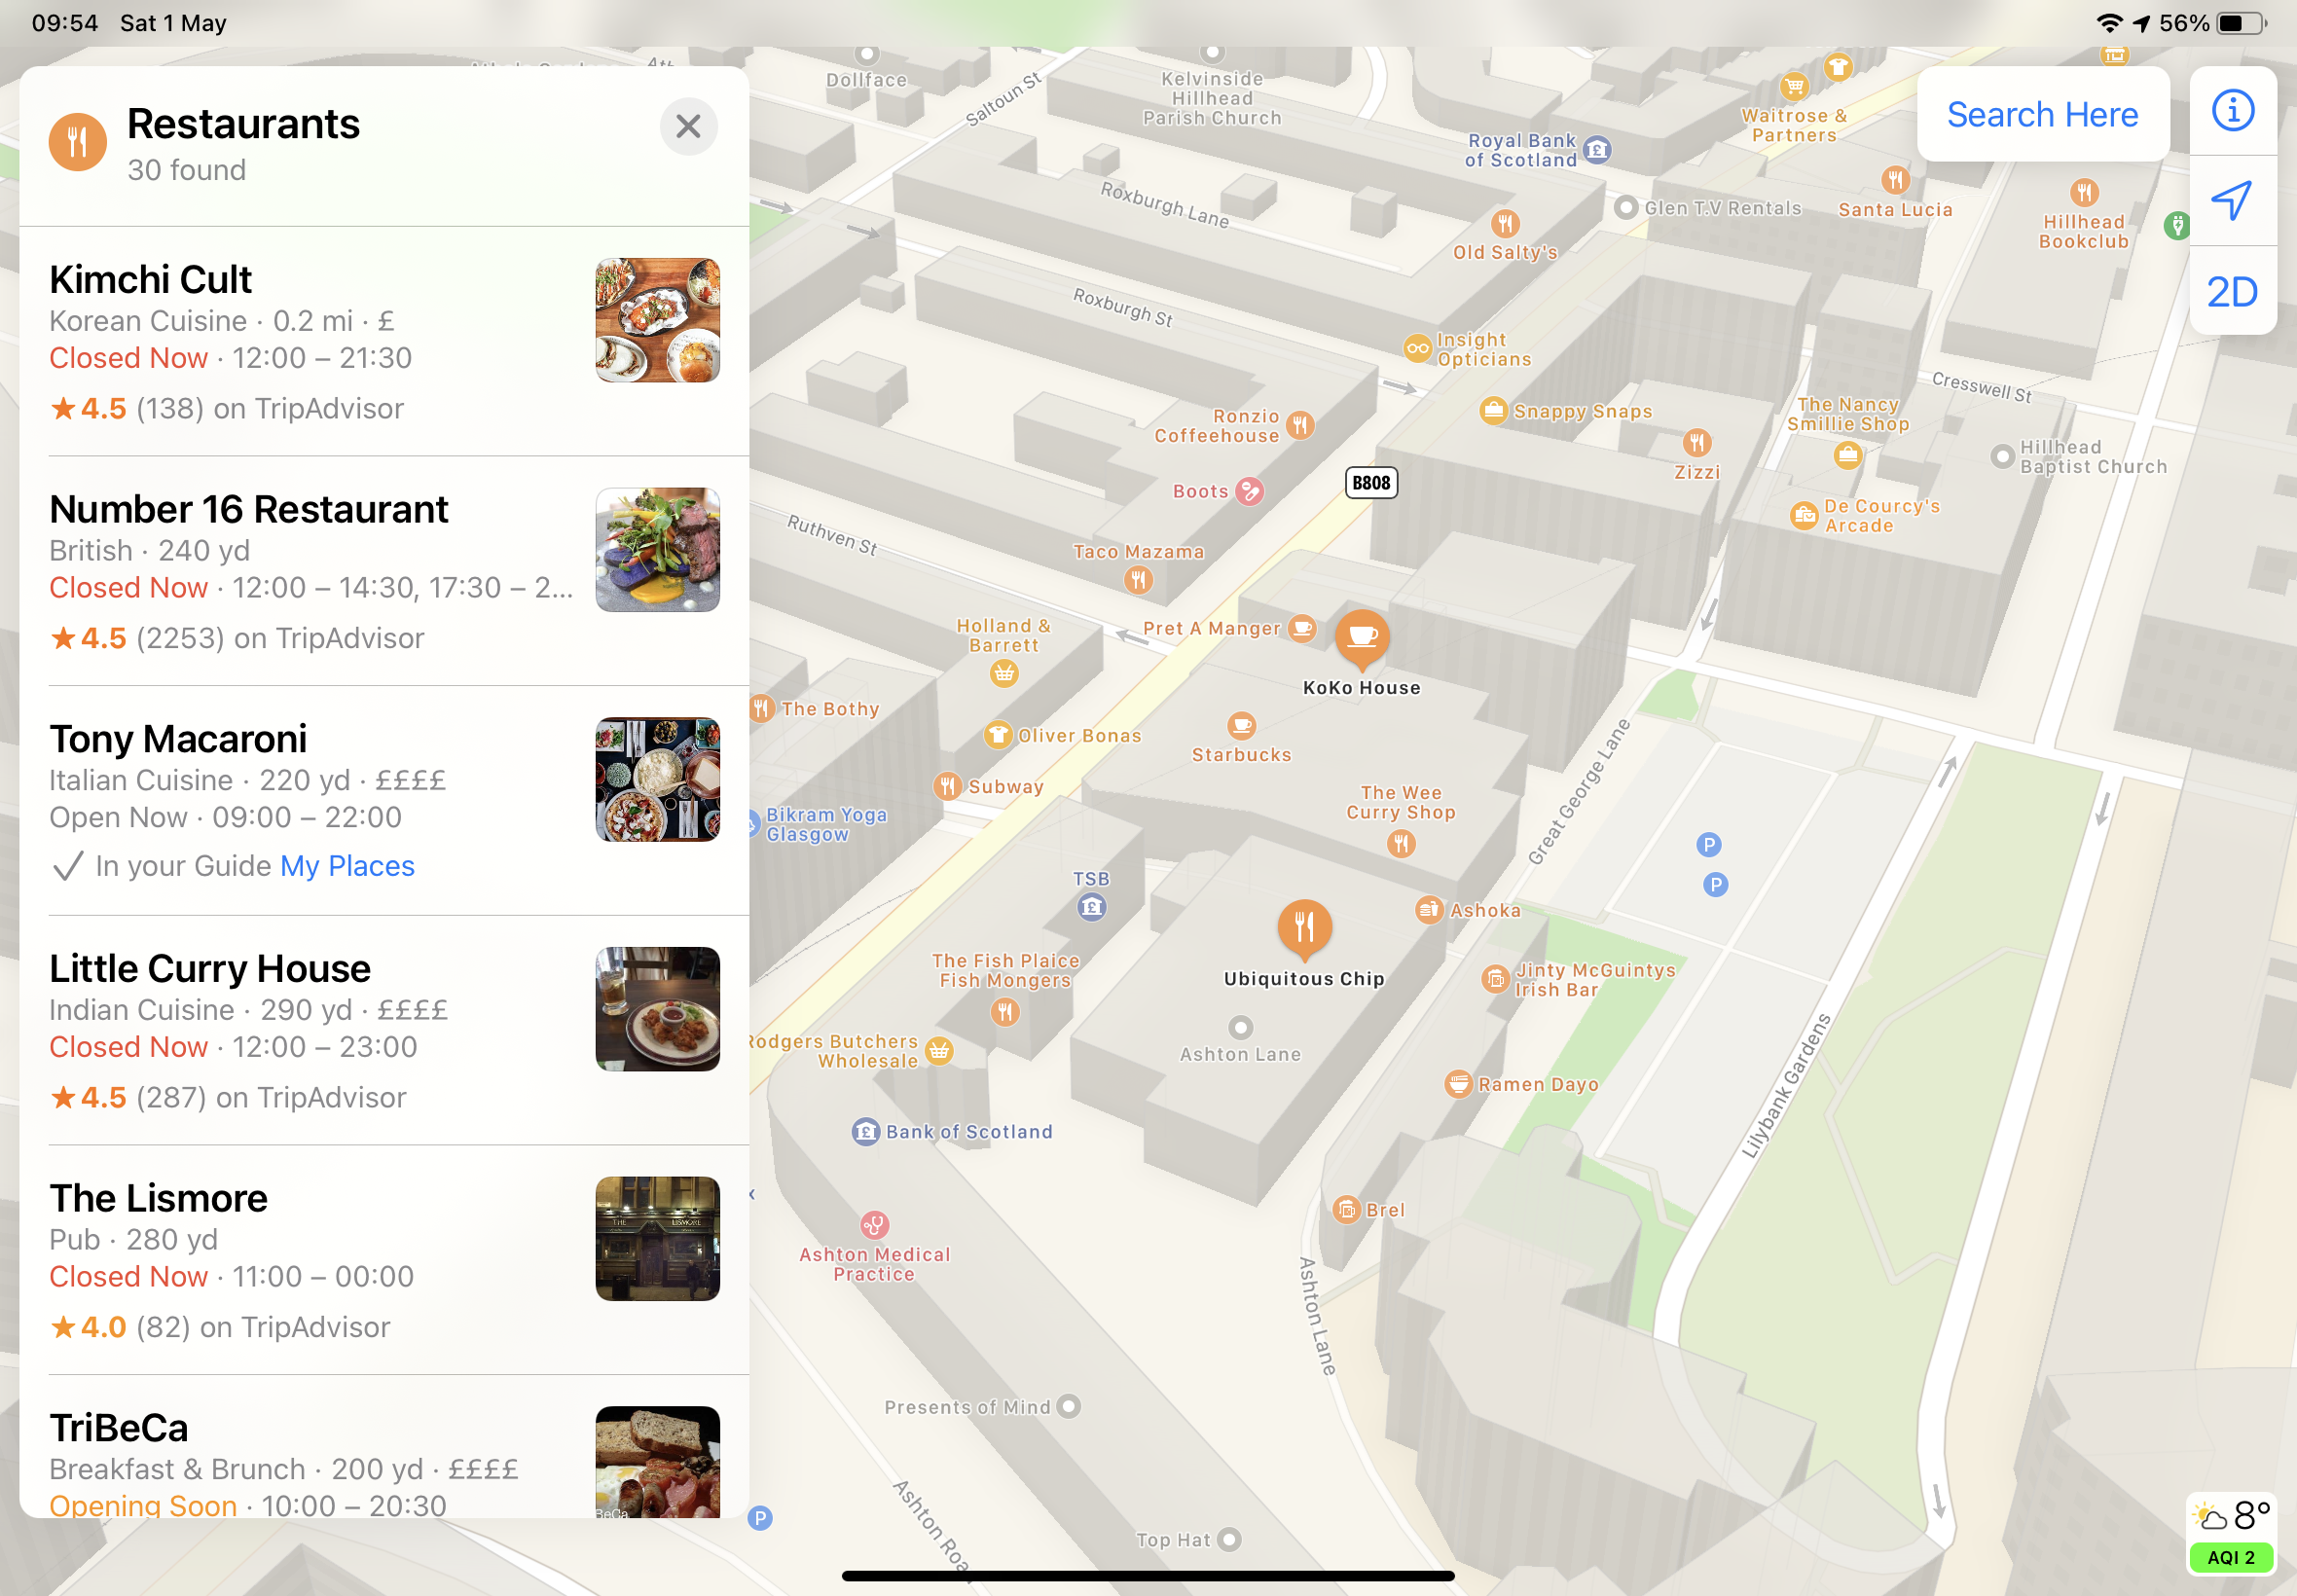
Apple has been beefing up Maps’ capabilities over the years, and it can offer a lot of useful information about places: photos, contact details and TripAdvisor reviews of hotels, whether retailers accept Apple Pay and whether dentists are sadists.
33. Create PDFs and screenshot entire pages
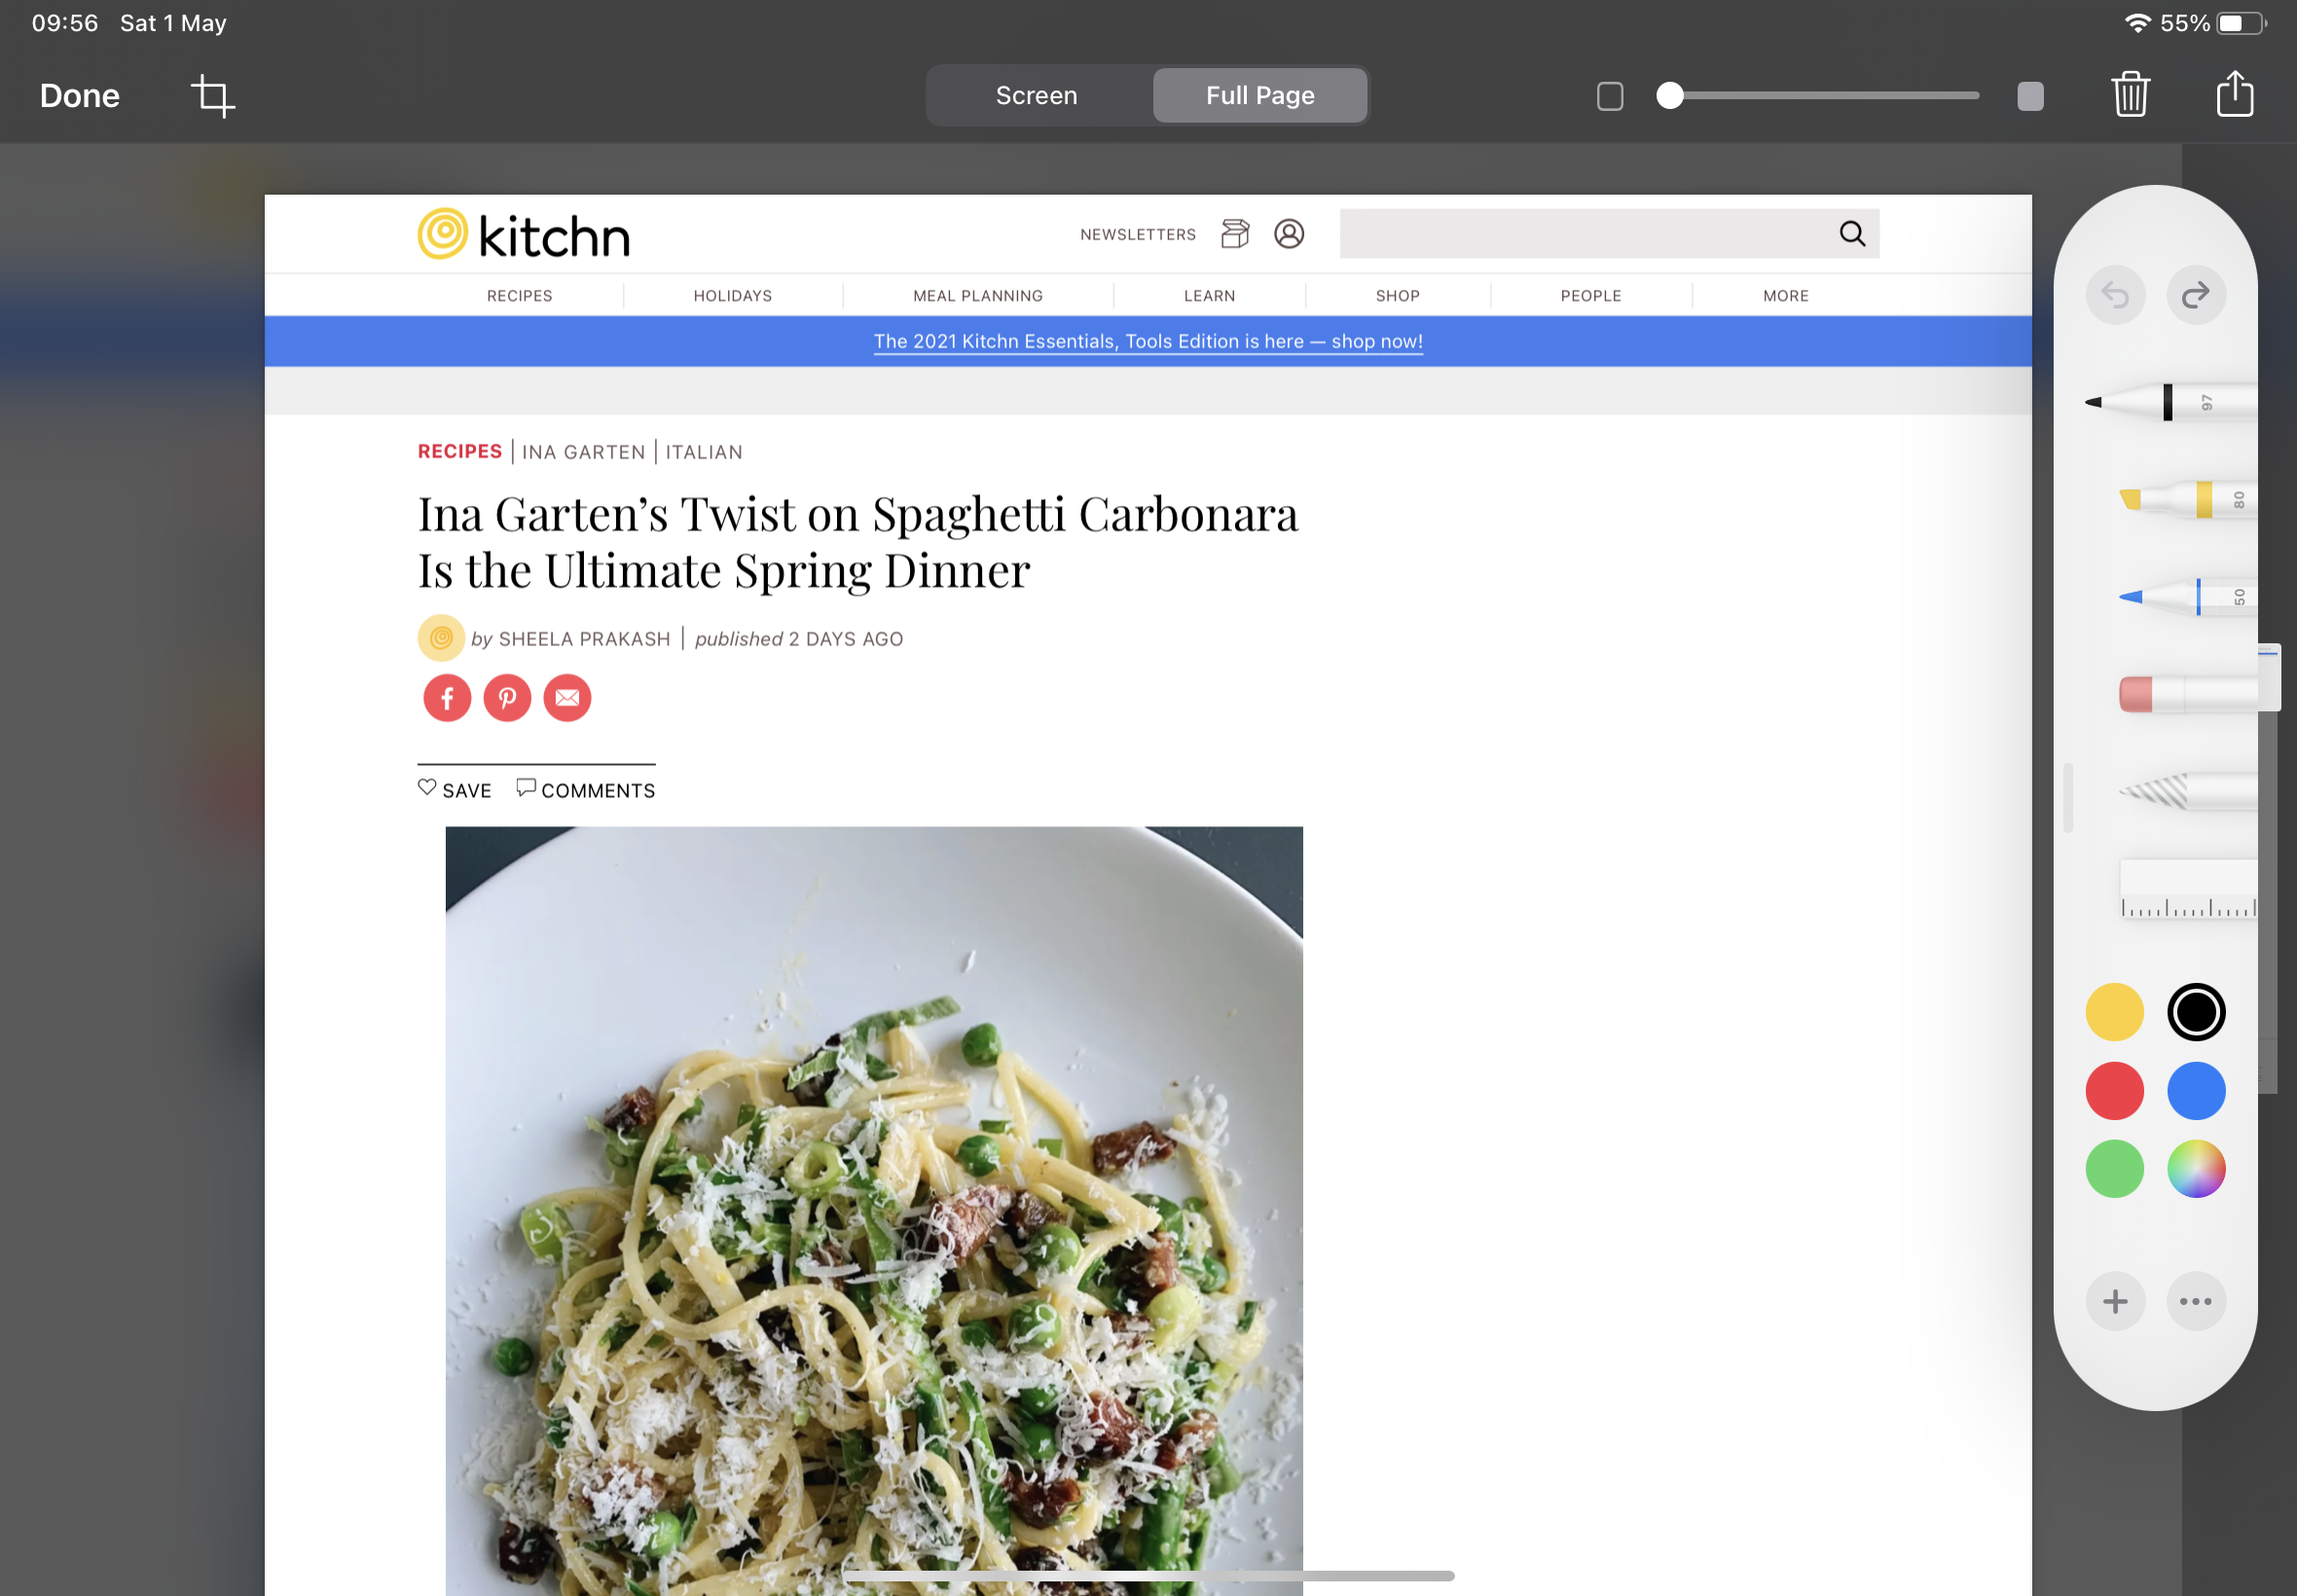
If you’ve found something you’d like to save or share as a PDF, all you need to do is bring up the Share menu in Safari: it includes a Make PDF option. It’s handy for online articles that might not stay available, such as things you’re reading as part of a subscription.
You can also take a screenshot of an entire webpage, not just the bit you’re currently viewing: to do that, take a screenshot as normal (the home and power buttons, or the sleep/wake and volume up buttons) and then tap on the thumbnail to open it in editing mode.
At the top you’ll see an option to grab the entire page, which you can then save or share.
34. Control the camera
Is the camera focusing on the wrong thing or metering light from the wrong bit? No problem: just tap the correct object or area and the camera will refocus and re-meter.
You can also switch Smart HDR mode on or off in Settings > Camera for high dynamic range shots: they’re good for dramatic shots such as foul weather on bright days.
35. Stop the shutter button from moving
By default, the iPad re-orients the screen when you turn it from portrait to landscape, and that means the camera app shutter button moves if you tilt the iPad too far.
You can lock it in place by swiping up Control Center and turning on orientation lock, or you can just use the volume buttons as shutter controls instead.
36. Fix the FaceTime window
You don’t have to leave FaceTime’s picture-in-picture window in its default location. Just tap and drag with your finger to put it wherever you prefer.
37. Take a panorama
Panoramas aren’t just for iPhones. In the camera app tap on the Pano option and you can use your iPad to create a huge panoramic image.
38. Get photos from your camera or card
The iPad doesn’t have an SD card slot, but you can use a Lightning or USB-C to SD Card Reader adapter to transfer images directly from your digital camera’s memory card. You can also get similar adapters that enable you to connect USB devices such as flash drives or musical instruments.
39. Finish web addresses instantly
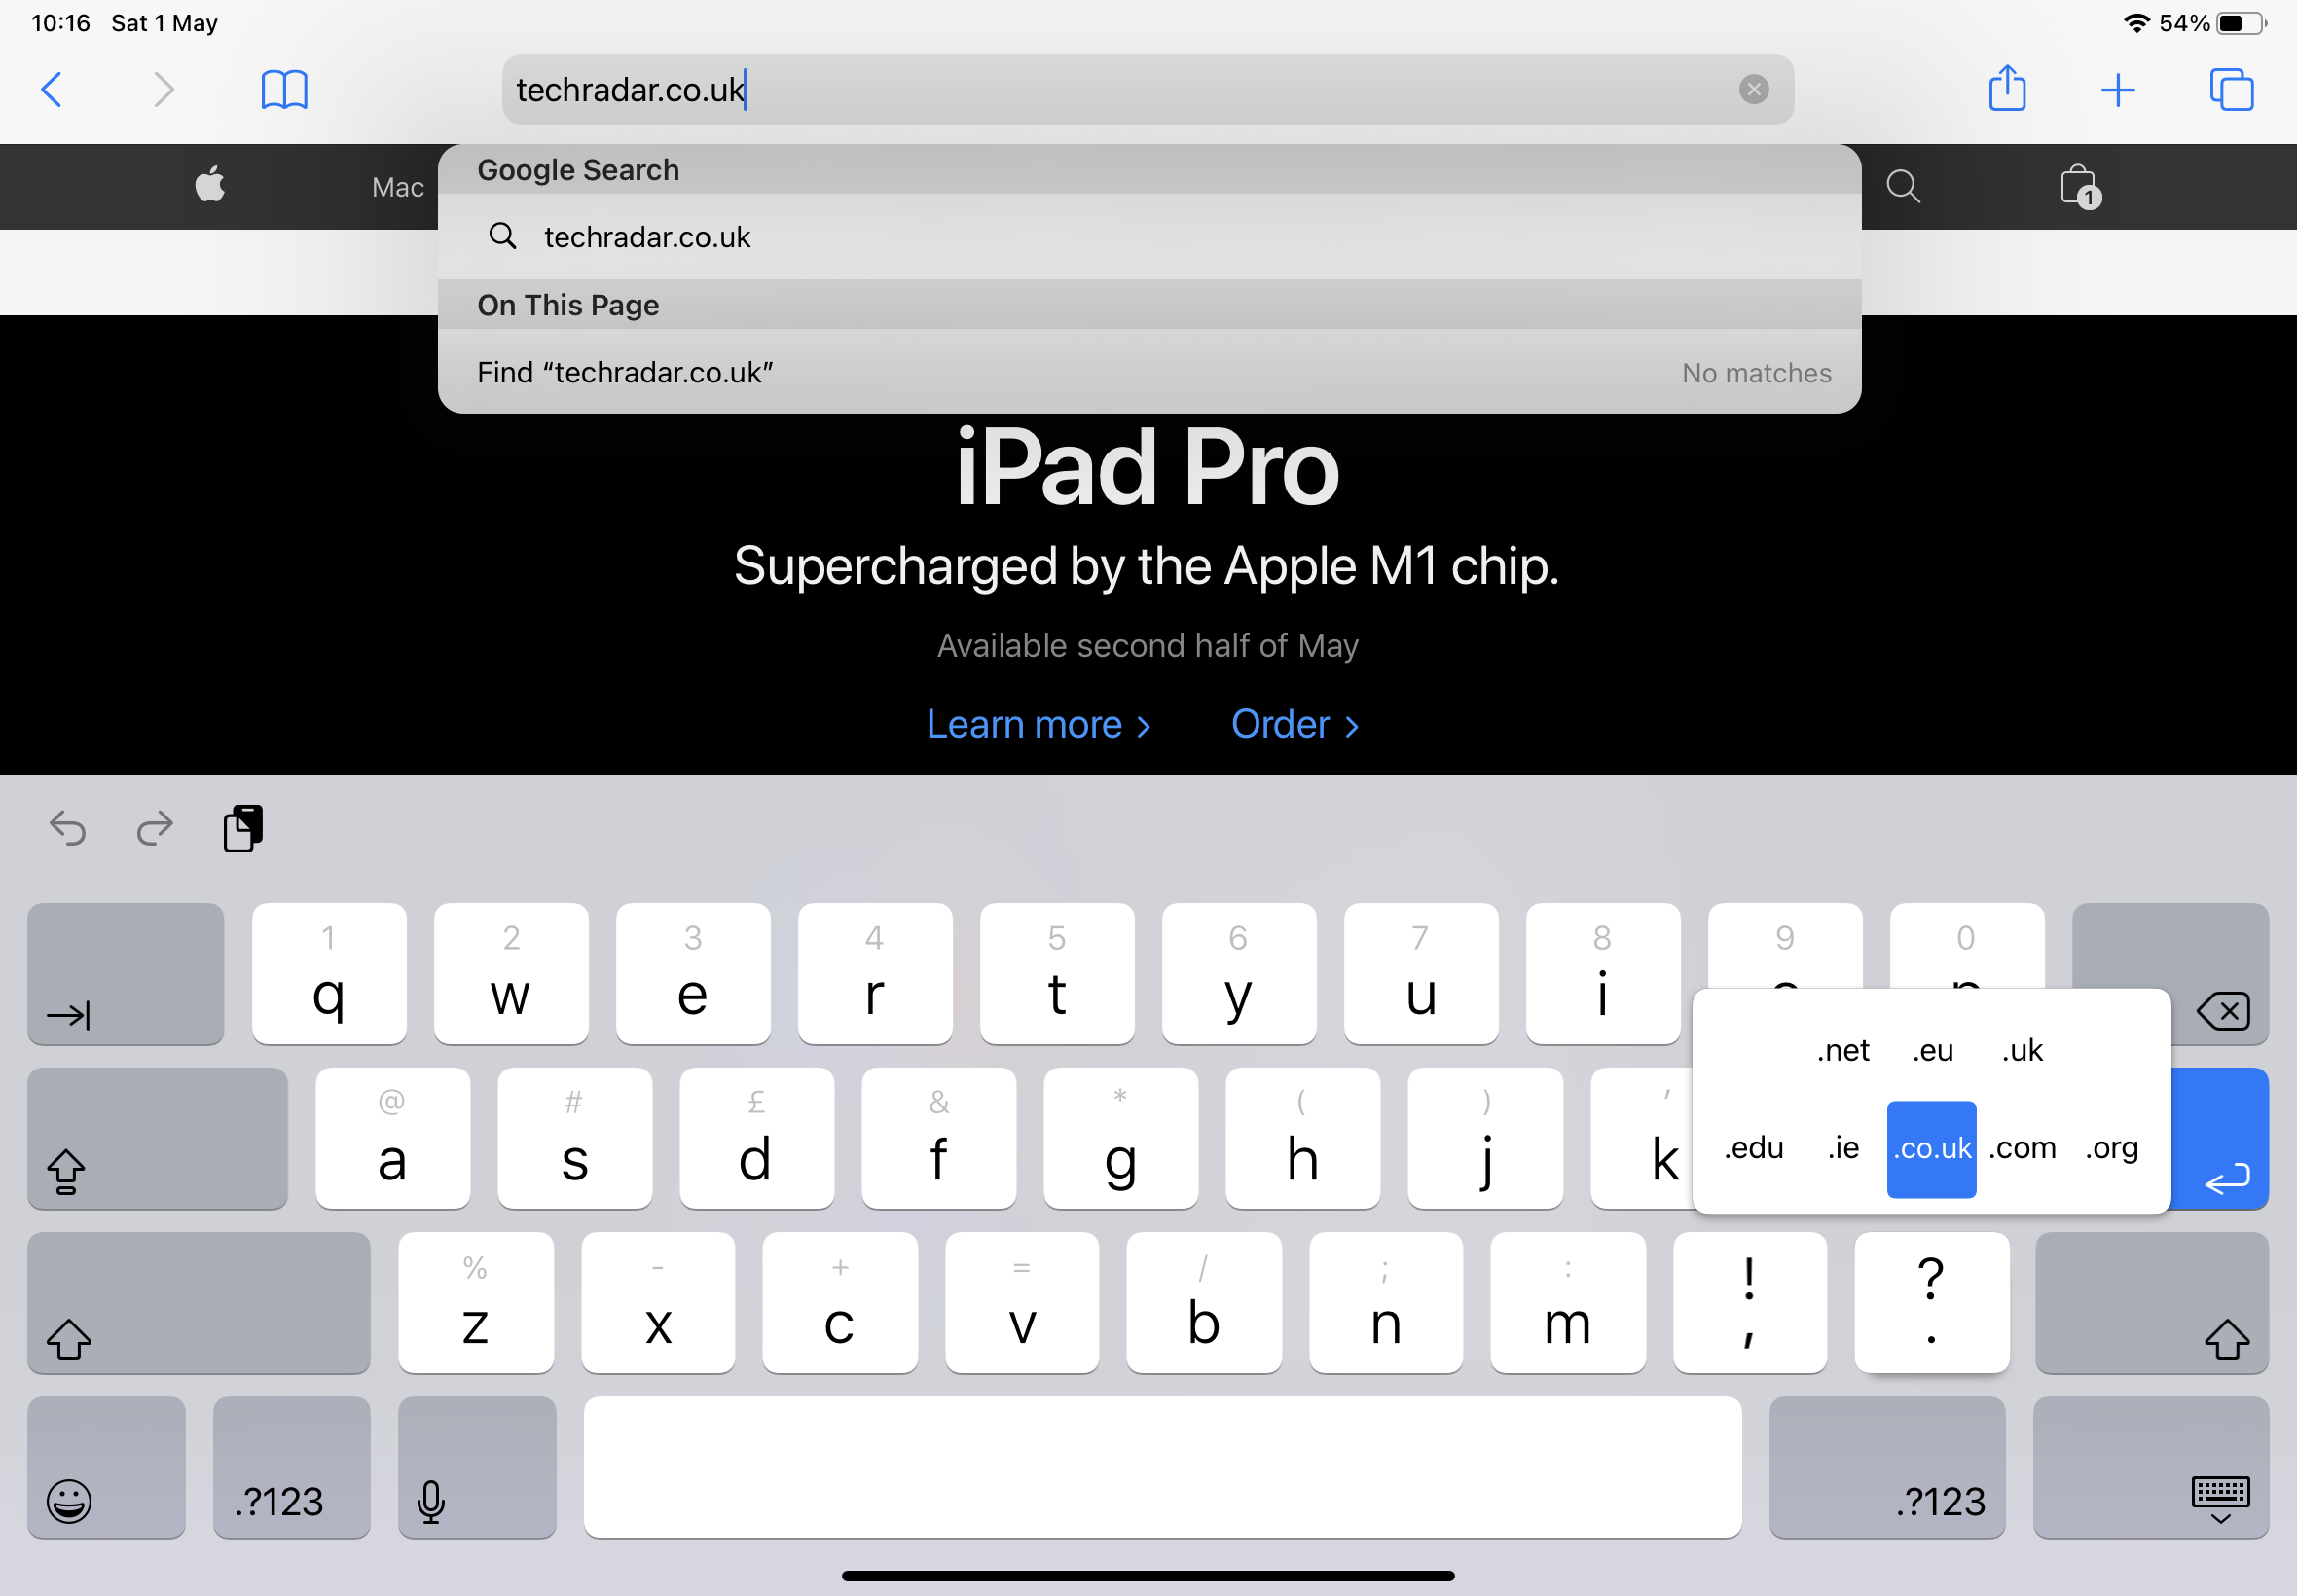
If you’re typing a web address in Safari, press and hold the full stop key to see a selection of domain options including .com, .co.uk and so on. It’s a little touch, we know, but it saves valuable milliseconds you might need later.
40. Jump back to the top
Tapping the title bar of a reading app – whether it’s Safari, a news app or a Twitter app – takes you back to the top of the current page. This works in all kinds of scrolling apps including online shops, messaging apps and more.
41. Save articles to read later
In addition to browser Favorites, Safari also offers a Reading List where you can pin articles you’d like to read later.
If you’ve enabled iCloud for Safari this is synced between your devices, so you might save an article from your work Mac to read on your iPad when you get home. If you want more flexibility and cross-platform support, try the Pocket app instead.
42. Set per-site settings
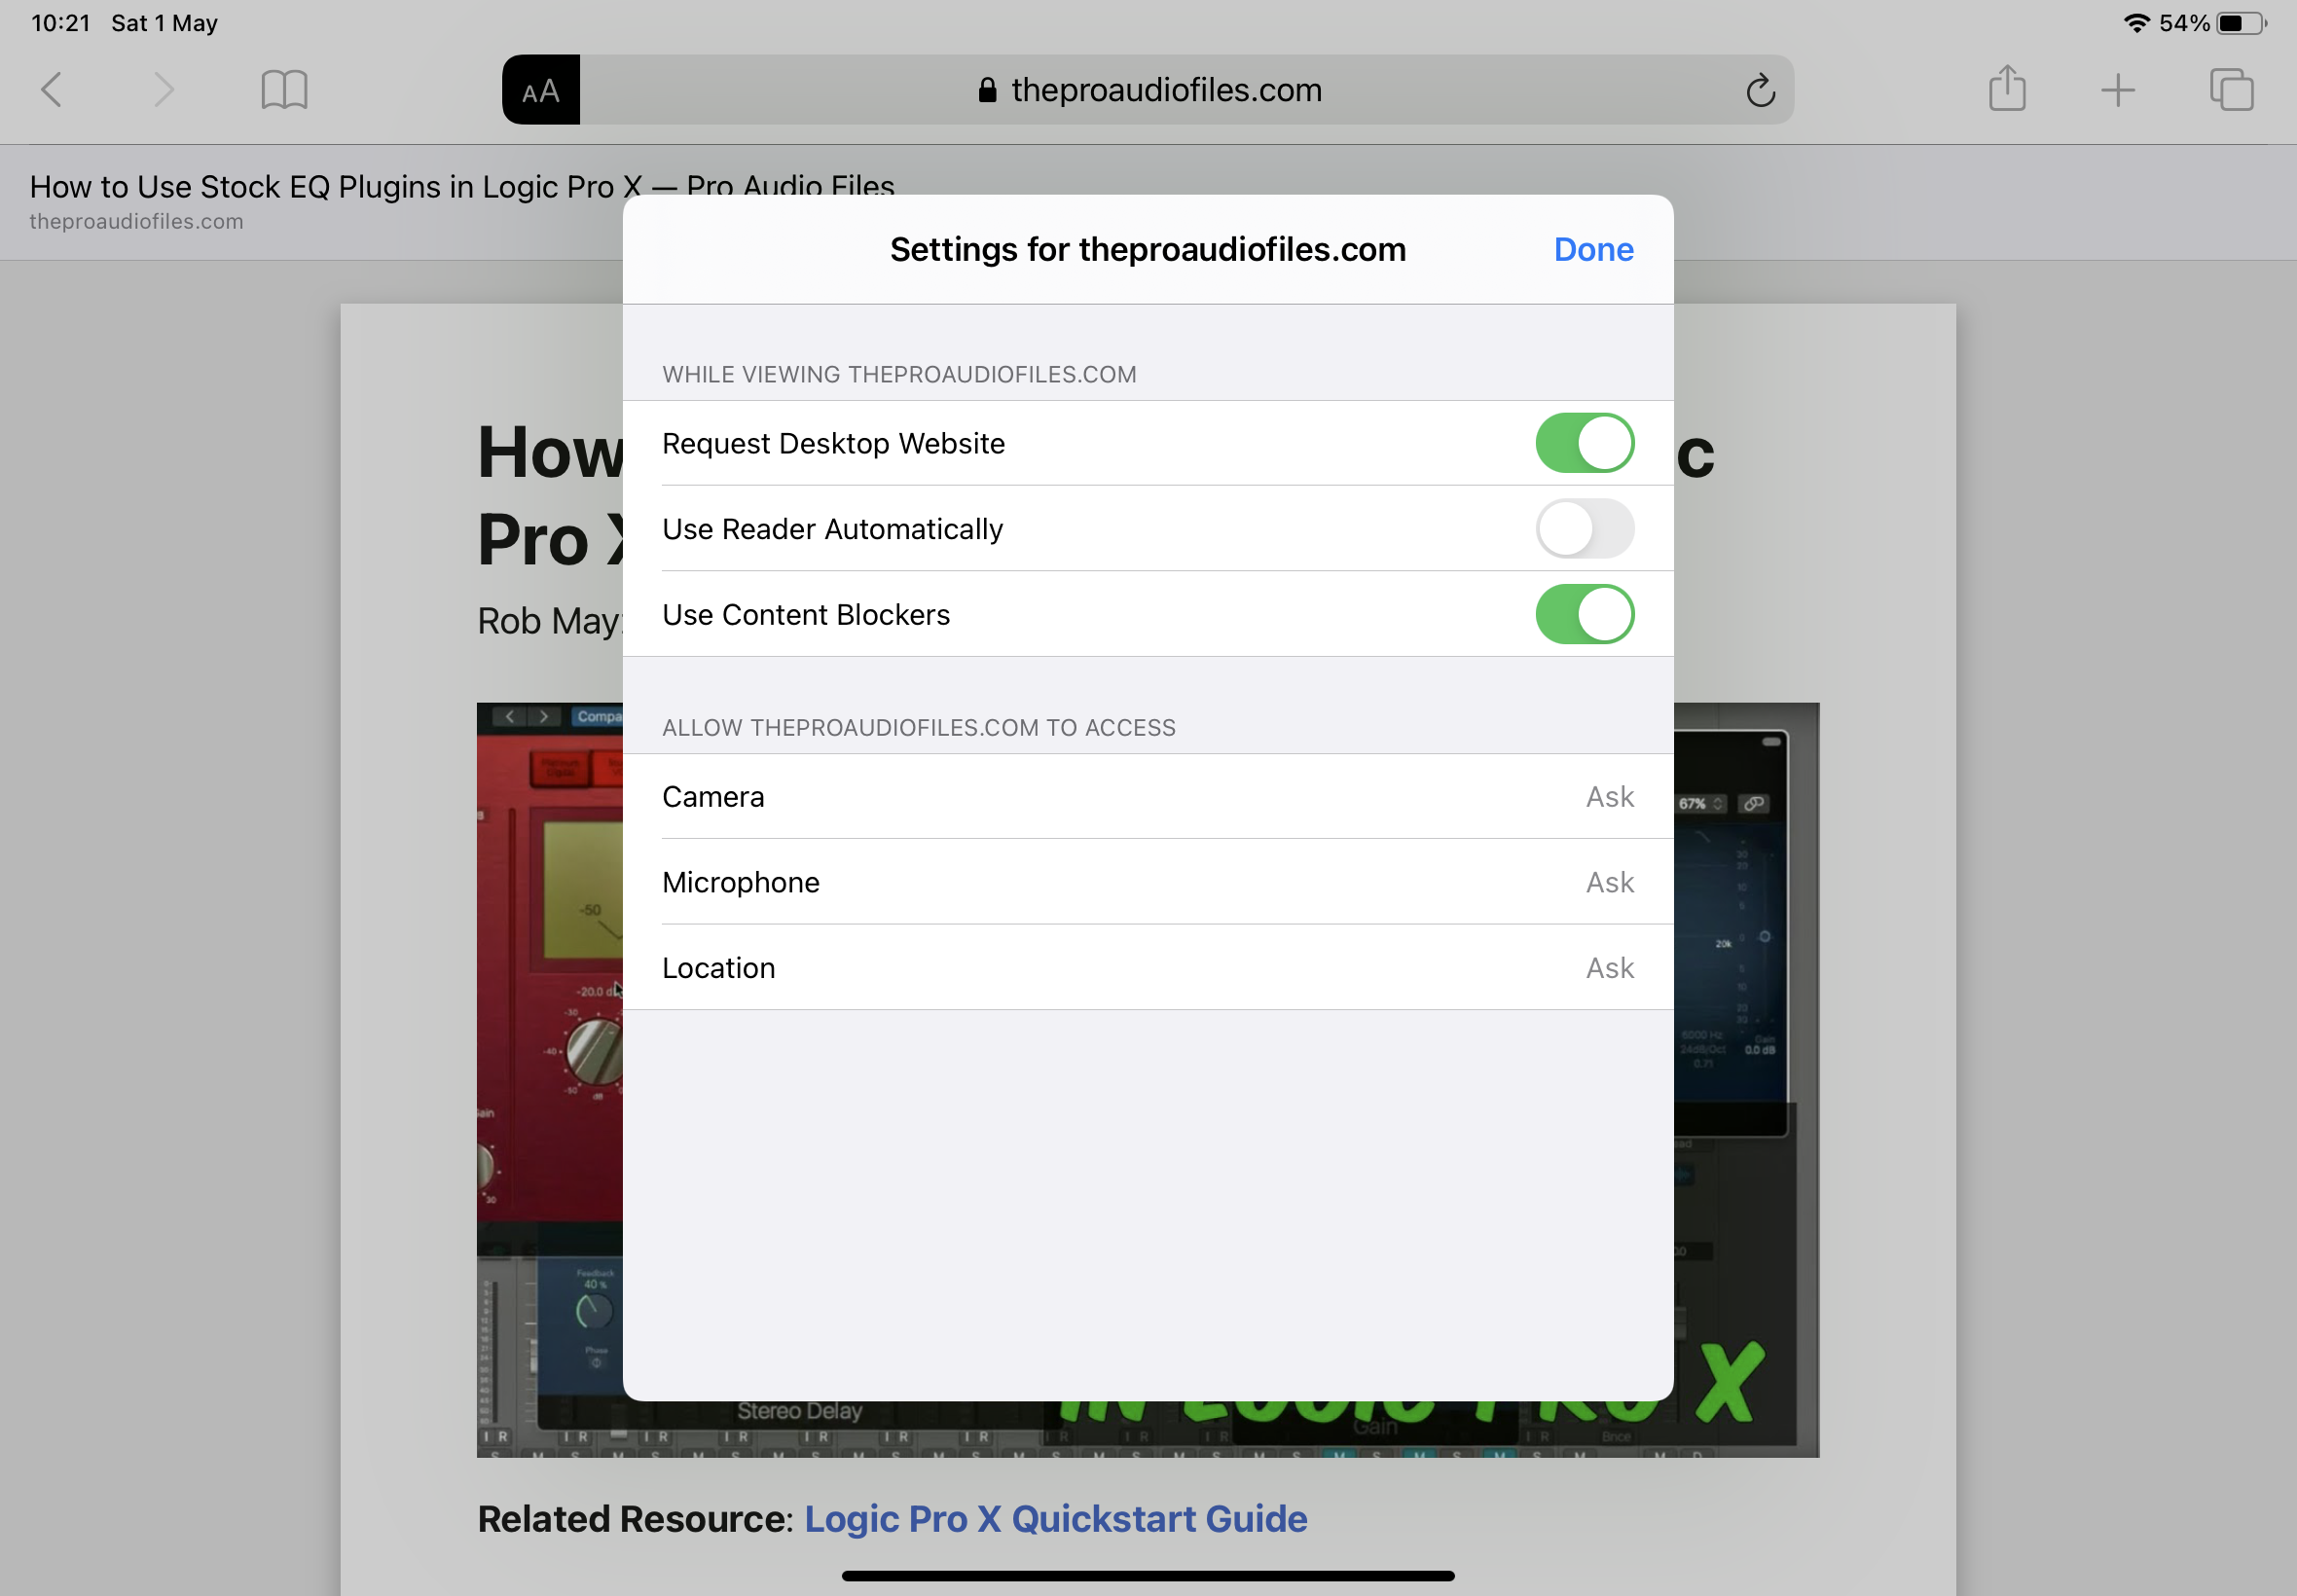
Some sites do a great job of hiding useful content behind bad design or invasive ads. You can change that in several ways. Tapping the AA icon in the Safari address bar switches in to reading mode, which strips out a lot of unnecessary clutter, and if you tap the icon again when you’re actually in reading mode you can adjust the font and color and size.
If you tap on Website Settings you can also specify per-site setting such as whether to use content blockers or request the desktop site rather than the mobile one.
43. Clear your browsing history
You can cover your tracks with Safari in two ways: by bringing up a new private browsing window to surf privately, or by going into Settings > Safari and clearing your browser history.
It’s important to stress that both of these things only affect what’s recorded on your iPad: the sites you visit and their advertising trackers will still know you were there and what you were looking at. If you’re a spy you might need more serious privacy protection.
Apple introduced an important new privacy feature in iPadOS 14.5. Go into Settings > Privacy > Tracking and there’s a toggle, Allow Apps to Request to Track. If you turn this off it prevents apps from tracking you around the internet; if you turn it on you can approve or revoke apps individually once they’ve asked you for permission.
44. Use Split View in Safari
When you long-press a link in Safari you’ll see various options: open, open in the background, open in new window and so on. You can also open the link in Split View to see two pages at once.
To do it, drag the link to the far right of the screen and let go. The screen will now open the link in the right and retain the original page in the left. You can drag the divider in the middle if you want to make one side bigger than the other.
45. Search with two fingers
On the Home Screen, slide down with two fingers to bring up the search box. This will include some Siri suggestions of commonly used options, such as “Send a message to Julie”.
If you type in the search area, your iPad will search Siri’s knowledge base, the appropriate Apple apps for music or movies and will show you some suggested websites too. If you scroll down you can also search in specific apps such as Messages or Mail.
46. Give Siri an accent
You don’t have to stick with Siri’s default voice if you don’t want to. Depending on where you live you can choose between multiple options, so for example in the UK we have a choice of male and female voices with US, Indian, Irish, South African, Australian or British accents. You’ll find the options in Settings > Siri & Search.
47. Make your iPad quieter
Some apps are awfully keen on playing sounds whenever you do anything, but you don’t have to put up with that if you don’t want to.
Go into Settings > Sounds to turn off specific sounds such as posting a tweet or a Facebook post, and use Settings > Notifications to make app-specific changes. You can also use Settings > Sound to reduce the volume of loud sounds when you’re listening on headphones.
48. Make your iPad more accessible
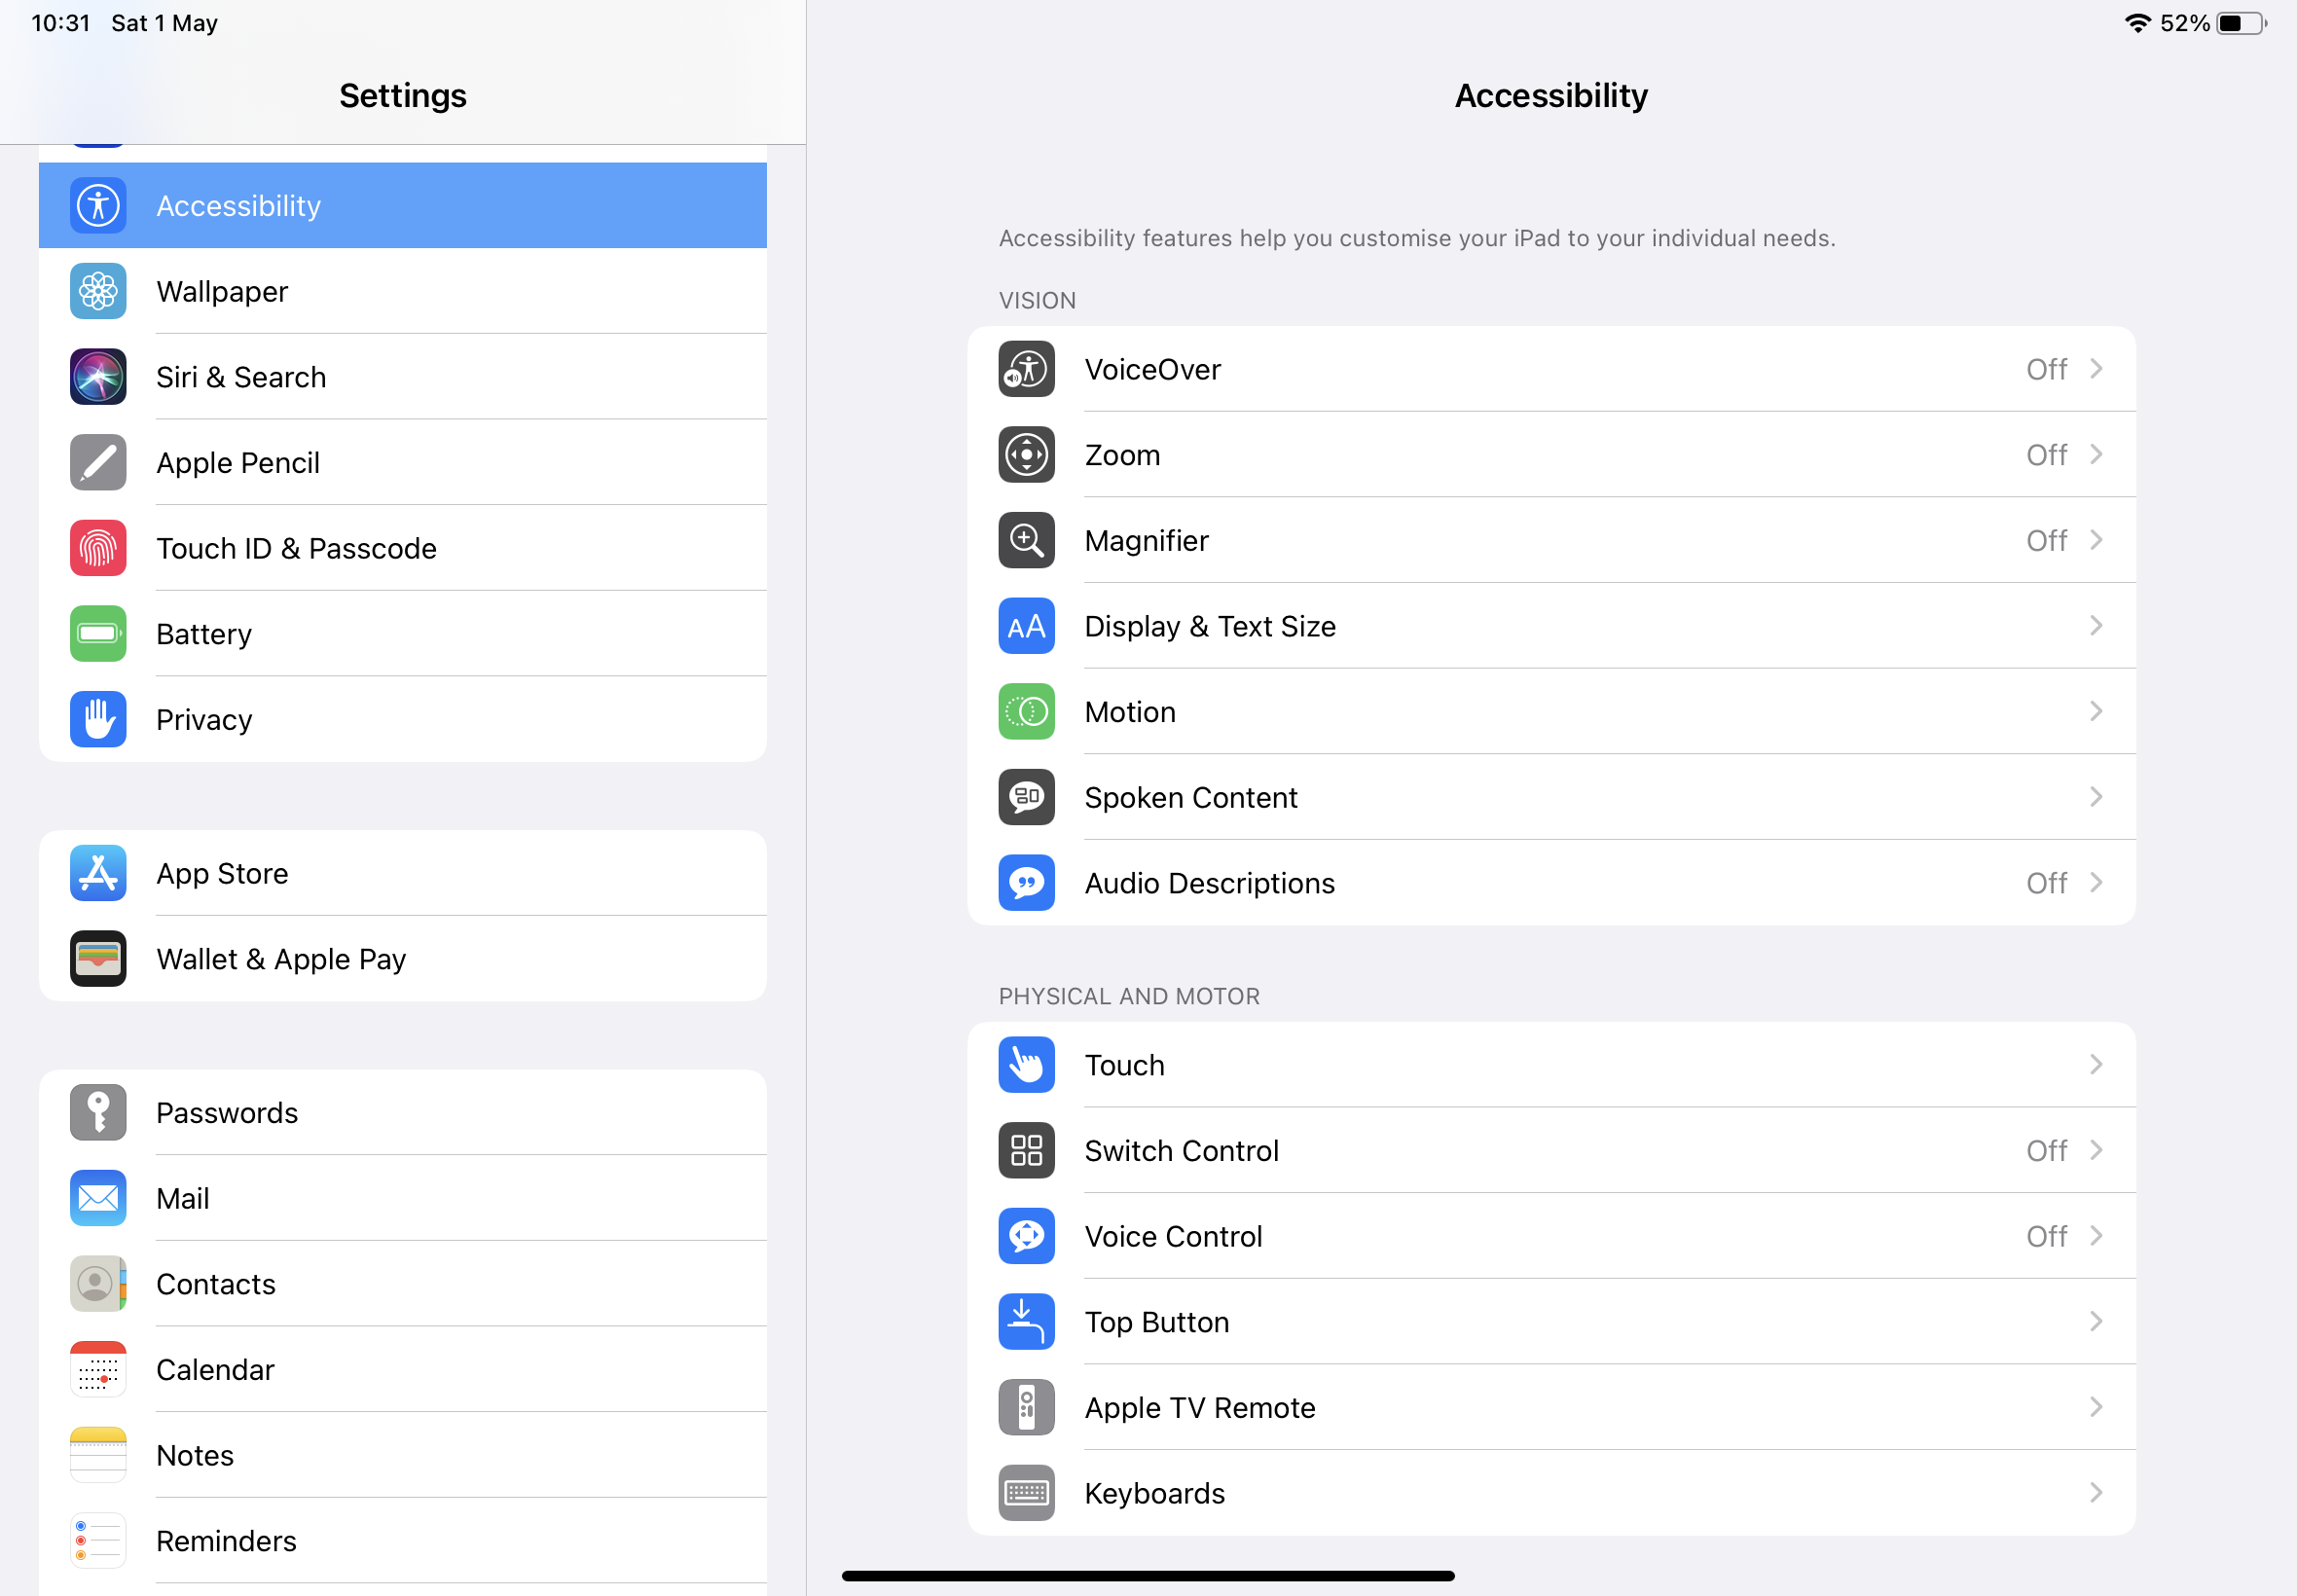
Some features are a problem for some users. For example, animation can make some people feel ill, while other users may have motion difficulties or vision issues.
There are lots of options in Settings > Accessibility to make the iPad more usable, including changes to the way it displays text and its support for assistive devices.
49. Use punctuation when you dictate into apps
Apple’s voice recognition can understand punctuation, which can make your dictated texts and emails much easier to read. It’s just a matter of saying what mark you want, such as “Send David a message hi exclamation mark what’s up question mark”.
50. Get Siri to sing
Bring up Siri and tell him or her: “I see a little silhouetto of a man”, or ask what zero divided by zero is. There are stacks of Siri Easter eggs like these.
Writer, broadcaster, musician and kitchen gadget obsessive Carrie Marshall has been writing about tech since 1998, contributing sage advice and odd opinions to all kinds of magazines and websites as well as writing more than a dozen books. Her memoir, Carrie Kills A Man, is on sale now and her next book, about pop music, is out in 2025. She is the singer in Glaswegian rock band Unquiet Mind.
