WhatsApp 2.18 update brings stickers in chat, here's how to customise your own
You can make your own stickers

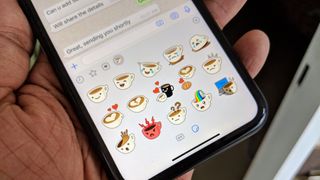
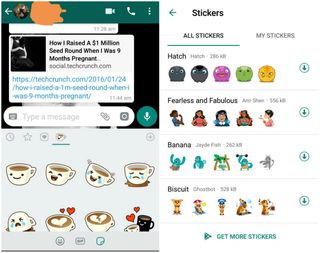
Facebook-owned instant messaging platform, WhatsApp, now has a Stickers feature in its new version. Version 2.18 shows a third icon next to the emoji and GIF menus; that’s your new sticker library.
The app comes pre-loaded with ‘Cuppy’ stickers- true to the name, it’s a teacup frozen in a number of strong emotions. At the top right corner of the window is a ‘+’ icon, which takes you to a library of sticker series that you can pick and choose from.

If you’re particularly finicky about the quality of your picture-reply (and for some reason gifs and memes don’t cut it), you can scroll to the bottom of the page and… get even more stickers. That option takes you to the Play Store/App Store; specifically to a page full of search results for ‘WAStickerApps’. Most of these are free, fun, and pretty creative, actually!

How to make your own WhatsApp stickers?
You can even create your own stickers using just your phone. It’s an easy process; all you need is a working internet connection.
Step 1: Make the goofy/exasperated/grossed-out/crazy face you want, and take a few selfies. Make sure you take at least three, though, as Sticker packs on WhatsApp have a minimum requirement of three images.
Step 2: Download any background eraser app from the store. I’m going with the one from MediaCoding.inc because… no reason, really. It’s the first one I saw.
Step 3: Erase the background from your new selfies, and save them. Take a quick trip to the gallery folder to check that they’re saved as .png files- that’s important. WhatsApp stickers only allow for that file type.
Get the best Black Friday deals direct to your inbox, plus news, reviews, and more.
Sign up to be the first to know about unmissable Black Friday deals on top tech, plus get all your favorite TechRadar content.
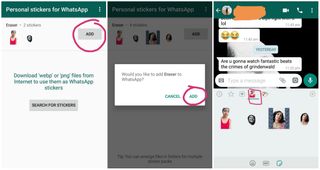
Step 4: Now, go back to the Play Store (or App Store, I don’t judge), and download the ‘Personal Stickers for WhatsApp’ app. It’s by a developer called Stukalov.
Step 5: When you open the app, it’ll automatically detects the files you’ve created, and you’ll have to add it by tapping the button to the right saying ‘Add’.
Step 6: Tap Add on the dialog box that pops up as well.
Now swipe over to WhatsApp and open your Stickers. You should see a new little library right next to Cuppy.
So there you have it- the definitive eight-step method to sticker creation for WhatsApp. These days, with smartphones and the internet, everyone’s a creator. Enjoy!
