How to build a website using Squarespace
Squarespace offers everything you need to grow online

Squarespace is a great platform for novice and seasoned designers because it offers creative tools that anyone can use to create a website.
Don’t worry if you think you don't have the design and web developing skills necessary as Squarespace lets you create a professional quality website within just minutes with excellently designed templates, advanced design tools that are easy to use, and app integrations. If you’re dreaming of an absolutely stunning website that will start converting soon, you’re in the right place.
Building your website using Squarespace only involves nine easy steps. These steps do not require expertise in design or web development but will result in a stunning and functional website that can make wonders for your business venture.
Here are the nine easy steps:
- We've put together a list of the best website builder software around
- These are the best web hosting services for your website
- Also check out our roundup of the best web design software

1. Sign up with Squarespace
Start by selecting a plan based on your individual needs. These range from $16 to $52 a month, although you can save money on your initial sign up period by using one of our top Squarespace promo codes.
Once signed up, log on to Squarespace and click on Get Started. You’ll find this on the top right corner of the page.
2. Answer a few questions
This will enable Squarespace to determine your site’s needs. It’s as easy as clicking on your choices. The first question Squarespace throws at you is to tell it what your site is about. You can choose from the following options: Fitness, Technology, Art, Magazine, Interior Design, Consulting, Gaming, Food, Music, Photography, Restaurants, Fashion, Health, Travel and others.
You will also have to describe your site briefly to give Squarespace a better idea of how you want your website to end up looking like, and what other features might be applicable to offer you as you build your site.
Are you a pro? Subscribe to our newsletter
Sign up to the TechRadar Pro newsletter to get all the top news, opinion, features and guidance your business needs to succeed!
Next, Squarespace is going to ask you what your top goals are. You will see a selection where you can select all that will apply to your site. This includes selling products, marketing your business, collecting donations, building a community, showcasing your work, publishing a blog, etc. Once done, click on Next.
Squarespace will also ask you where you are in the process. Are you still collecting inspiration, formalizing an idea, turning a project/hobby into a business, growing a business that already exists, or replacing an existing site with one from Squarespace? Select which one applies and click on Finish, or simply skip this last question.

3. Choose your design
You’ll notice as soon as you click on Get Started that you’ll be redirected to Squarespace's templates where you’ll be able to start designing.
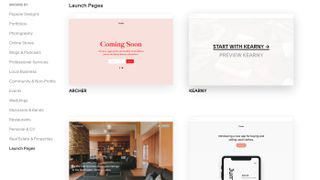
You can easily browse the templates by category: popular designs, portfolios, photography, online stores, blogs, professional services, local business, events, weddings, restaurants, real estate, launch pages, etc. By default, Squarespace will show the popular designs. These designs can be previewed before choosing which helps a great deal as you'll be able to get a feel of what the template looks like. Once you’ve found which template you’re comfortable with, you can move forward with your design. Keep in mind that everything in the template is customizable.
When you click on Preview to get a better look at a template’s design and decide to move forward with it, just click on Start with this design on the top right corner of your screen. If you want to look further into the design, you have the option to view the demo site. If you want to go back and choose a different template, click on Back, and to start without a preview, simply hover your mouse over the template and click on “Start with *name of template*.” Your design of choice will be imported to your site.
If you choose to continue with the design, after clicking on “START WITH THIS DESIGN”, you will be asked to create an account (if you don’t already have one.)
4. Create a logo and choose fonts
Once you make it to this step, Squarespace will be working alongside you in building your website. This means you can make sure that the crucial parts of your website will not be overlooked.
Squarespace will first ask you what you want your site to be called before you can start customizing the template. You have the option to start with logos, fonts and colors or to go directly to the editor and start editing your site. You can go back to the logos and fonts as you continue editing.
It’s time for you to get your logo added to your site. Don’t worry if you don’t have a logo yet, Squarespace has a logo maker tool you can utilize if you don’t have logo design expertise.
Once you add your logo, it will be visible on your canvas as you proceed to edit. Click on Next for the fonts.
As you go through each font and color, Squarespace will give you a preview and even suggested font and color pairs that will look good on your site. This feature helps save you time in mixing and matching fonts to achieve a desired outcome. Squarespace also makes it easier by grouping color palettes according to use. If you wish to make it even more personalized, you can choose to create your own palette.

5. Make your site your own, starting with the Home Page
Click on the Edit button and you’re all set. Any element you see on the canvas can be customized to make it your own. The areas you can edit are: the heading, the menu and the text. Start wherever you’re comfortable.
The menu bar will allow you to edit the header, the logo, and even the text. Click on any element you want to edit to modify it. You can also delete any element you want to remove. It’s as easy as clicking on it, finding the trash bin icon, and clicking on it.
You can also add sections to any page by clicking on the plus sign at the bottom of every page. When you click on the plus sign, you can have a list of choices for the section: headlines, images, text, videos, quote, etc. Alternatively, you can add a blank section should you wish to customize the section by adding elements to it yourself. Clicking on any option will add it to the page.
6. Optimize your site for mobile
Every new website owner is concerned about the mobile version of their site, and rightfully so. Half of users worldwide access websites on their mobile devices. This accounts for almost 52% of the global web traffic. Ignoring this fact can lead to detrimental repercussions in the growth of your website.
Optimizing your website for mobile access isn’t as time-consuming and complicated as it used to be. Optimizing the mobile experience of your site can be done in a few easy steps - just click on the mobile phone icon and edit the pages from there. Mobile optimization should only take you a few minutes.

7. Create your sub-pages
Now that your homepage is finished, you’re ready to add and edit your sub-pages. These are the About page, the Contact page, or the Blogs, and many others.
Adding pages is easy- just go to the dashboard and click on Pages and then the plus sign. From there you will be shown the options to add a blank page or use a designer layout. If you’re not as comfortable starting from scratch just yet, you can just use a layout.
Once you choose a layout to use, it will instantly be imported to your canvas. From there, you can make the necessary edits.
8. Edit your Main Menu
Your pages will likely appear on the menu in the order that you created them. Customizing the order that they appear in your menu is easy as clicking on a page, dragging it to the position you want, and letting it go. You can choose to reorganize your pages, or you can keep them where they are. Either way, editing the main menu is super easy.

9. Add your blog
Blogs are essential in email marketing, social media promotion, and basically in driving search traffic to your website. Now that your site is fully functional and ended up stunning thanks to Squarespace’s help, you’re ready to add your blogs.
To add a blog page, go to the menu and add a page. Instead of adding a blank page or a layout, click on Blog under Collections. As with adding a page, clicking on this will give you a selection of layouts that you can choose from. The blog page consists of content pieces so you can add a blog to each. Squarespace anticipates the need for every site to have several blog posts, and this type of layout makes it easy for you to customize it.
Creating an online presence
Your website is your main tool in marketing your business with an online presence. It provides you with a chance to reach out to as many people as you want to, and the potential to see your business grow in the process. It also gives your potential customers a platform where they can purchase your goods or pieces.
How your website presents your brand is important in making an impression to your viewers, and ultimately to the sales and/or conversion of your site. Easy to use website builders have proven to be most useful and helpful to all entrepreneurs seeking the online presence they need.
- We've also highlighted the best website builder
Anna is a freelance copywriter with extensive knowledge on the technology sector. She writes about a variety of topics for TechRadar including web hosting, website builders and cybersecurity. She also has a knack for writing deals, guides and versus articles.
Most Popular


