How to master Photoshop's impressive new Sky Replacement tool
Our step-by-step guide to better skies
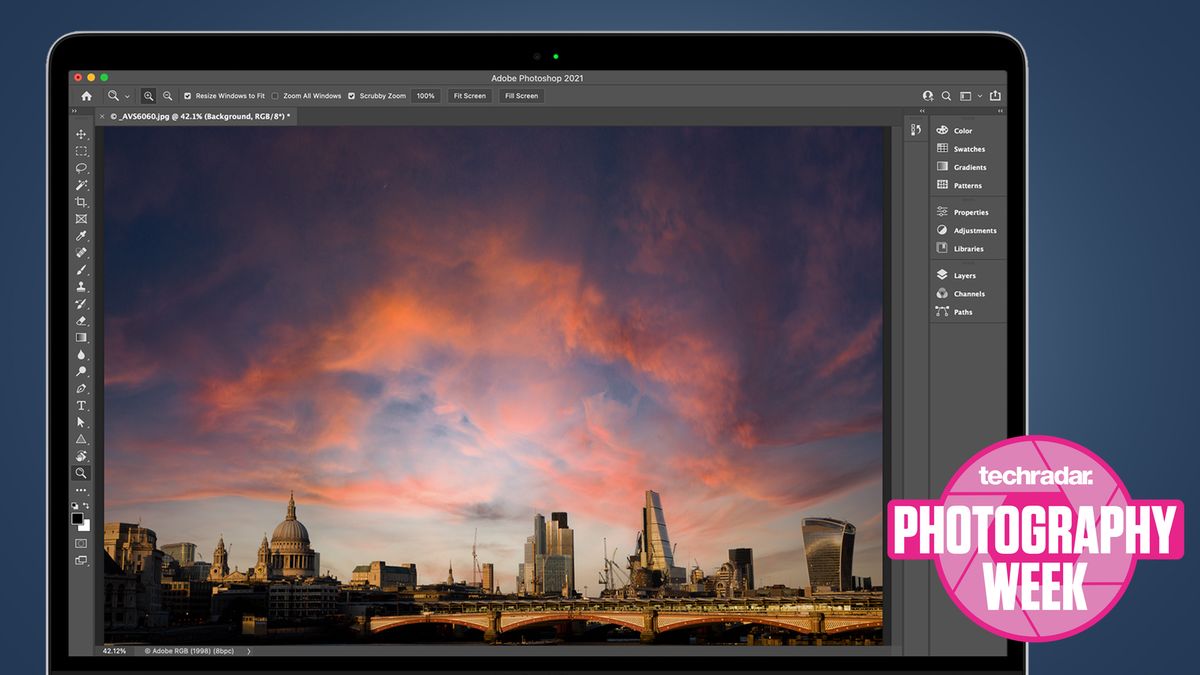
As you'd expect from something that's powered by AI and machine learning, Photoshop's 'Sky Replacement' tool is evolving fast – less than a year after its debut, the feature has just received a big update in Photoshop's August refresh.
But what exactly is the 'Sky Replacement' tool and how good is it? Well, if grey skies and dim mid-winter light sound familiar, you'll know it's not always easy to get the shot you've imagined in your sun-drenched mind.
Getting to a location in blazing sunshine only to find the weather steadily worsens as soon as you get your camera on a tripod – all of these scenarios are standard fare for photographers in countries all over the world. Ever been to Iceland? We rest our case.
If your landscape pictures lack a bit of pizazz, you have two options – wait patiently for the weather to start cooperating, or take Photoshop up on its unlikely-sounding offer of instantly and photo-realistically taking your gunmetal grey skies and replacing them with something a bit jazzier.
Replacing skies in photos has been possible with Photoshop since the software’s earliest days – mask out the sky, tap delete, drop in a new, better-looking one. But the current version of Photoshop, and its refreshed 'Sky Replacement' tool, is altogether more capable. Not only will it detect – accurately, too – where the sky is in your image, but it will precisely and automatically mask it out and offer you a replacement.
That’s not all – it will also adjust the color balance in your image to match the new sky. An image shot under rain clouds will just look plain weird if you drop in a stunning sunset but don’t make any adjustments to the original image’s white balance or hues.
So, without further ado, here’s how it works – and, importantly, how to master it.
Get daily insight, inspiration and deals in your inbox
Sign up for breaking news, reviews, opinion, top tech deals, and more.
- These are the world's best photo editors
1. Pick the right image

Not every image in your collection will be a great candidate for the Sky Replacement tool. In particular, make sure your image is well-exposed. Photoshop is going to make an effort to change the color balance of your frame, but if the foreground – everything except the sky – has under-exposed shadows or over-exposed highlights, it’s going to struggle.
Some pictures won’t work at all – most of the options in Photoshop’s replacement sky library are designed to be used with photos taken from a perspective that, broadly speaking, is shot perpendicular to the horizon.
So if you’ve got a bird shot, for example, that was taken while angling your camera into the sky, you can be sure it’s going to either look pretty weird, or require a lot of finagling before you have a presentable shot.
You should also make sure your foreground subject is large – Sky Replacement works great with urban landscapes as well as classically-composed rural landscapes, but if you’ve got something smallish in the frame (a person standing on a hill, for example) you might find you get unpredictable results.
- Read our in-depth Adobe Photoshop CC (2021) review
2. Find the Sky Replacement tool
The good news is that previewing how your photo will look with a Sky Replacement is easy, so you can always open an image and give it a whirl without committing lots of time and energy. The Sky Replacement tool lives under the 'Edit' menu.
It’s worth thinking about your editing environment – subtle results are often the best-looking, so the more carefully set up your monitor is, and the more ambient light around it, the more accurately you’ll be able to work. This is particularly crucial if you’re planning to print anything.
The way the Sky Replacement tool changes your image is pretty clever – it leaves your original image intact as a locked background layer, then applies a series of masked layers that change the lighting and color of your original, as well as masking the sky in the background.
As long as you save your image as a native PSD, you can exit Photoshop and edit these layers again – although you won’t be able to make changes to your new sky without repeating the process of working through the Sky Replacement dialogue box.
- Photoshop vs Lightroom: which is the best?
3. Choose a sky
Now it's time for the fun bit. Once you’ve clicked Sky Replacement, you’ll see the relevant dialogue box pop up.

At its heart this is pretty easy to use. Click the Sky drop-down box at the top and you’ll see options – lots of them. Fortunately, the selection of skies is grouped thematically – so “Blue Skies” for cheering the weather up, “Spectacular” for adding a bit of punch, and “Sunset” for those images you just couldn’t be bothered to wait around for.
It pays, of course, to try different options. The latest version of Photoshop gives you even more choice thanks to a new menu in the Sky Preset fly-out menu, which takes you to the Adobe Discover site with more options.
Remember, the Sky Replacement tool doesn’t just try to figure out where your horizon is and delete it – it’s also subtly changing the color balance in your image. Different images will want different skies, so even if you don’t want to get stuck in with the sliders and options below, you still might need to kiss a few frogs before you land on the perfect alternative to your original shot.
At its simplest, the Sky Replacement tool requires two clicks – one to load it from the Edit menu, and another to accept the default choice when you click OK. You need to be careful making swinging changes – in the above right image, the dramatic grey clouds don’t really match the azure blue water at the bottom of the image, betraying the edit we’ve made.
- Lightroom vs Capture One: which is the best photo editor for you?
4. Make some tweaks
You can certainly fine-tune your replacement sky, though. The edits start with you simply clicking on your new sky layer – once you’ve grabbed it with your mouse pointer you can pull it around, allowing you to place any points of interest exactly where you want them.
If you make changes this way, keep the scale slider in mind – this allows you to make the sky layer either bigger or smaller, letting you make sure the sky covers your frame from edge to edge.
Photoshop generally does a pretty nice job of adjusting the brightness of your original image, but the dialogue box gives you options for fine tuning. Under sky adjustments, you can tweak the exposure of your sky up or down, as well as warming up or cooling down the color temperature to match your original image.

Under foreground adjustments you get a similar pair of sliders. Our suggestion is using both at once, and trying to get them to “meet in the middle” to produce a photo-realistic effect. You’ll stand a better chance of getting things exactly right if your original image is technically good – not over- or under-exposed and the correct white balance, for instance.
You can also fine-tune the area of your image where the skyline meets the new sky. For this, click on the magnifying glass on the Sky Replacement dialogue box, or use CMD+ to zoom in. Work at 100% or even 200% and carefully scan along the skyline to see if there are choppy-looking bits Photoshop has got wrong.
In our experience, the Sky Replacement tool does a remarkably accurate job, but if you find something iffy-looking, press B to select the Sky Brush and paint in more sky by clicking and dragging.
5. Finishing touches
Happy with your new image? You need to make one more choice before you go – whether you want your effect applied to a single new layer or as a series of adjustment masks and adjustment layers, in the 'Output To' drop-down box. Whichever you choose, your original image will be preserved as a locked background layer. If you think you might want to come back to the image and edit the sky more later, choose New Layers.

Once you’ve done that, the new layer called Sky has the new sky in it, and can be transformed, enlarged, reduced and so on the same way you would any other layer in Photoshop. It also has the cutout mask of your skyline. Again, this can be edited the same way as any more masks.
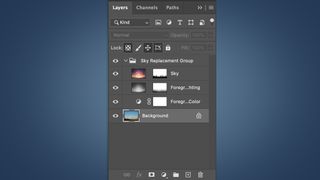
The layer called Foreground Lighting is a blended layer that changes how bright your original foreground image is, while the Foreground Color layer is the one that attempts to match your chosen sky with your foreground. Again, all of these layers can be edited like any other Photoshop layer, including their opacity, blending mode and so on.
There’s heaps of editing you can still do to get things looking perfect. Just about the only thing you can’t do is return to the Replacement Sky dialogue box and change the original effect – but with your original image still intact, you can always duplicate it (CMD-J), group the rest of the replacement sky and hide it, and start all over again.
- These are the best photo editing apps you can download right now
Dave is a professional photographer whose work has appeared everywhere from National Geographic to the Guardian. Along the way he’s been commissioned to shoot zoo animals, luxury tech, the occasional car, countless headshots and the Northern Lights. As a videographer he’s filmed gorillas, talking heads, corporate events and the occasional penguin. He loves a good gadget but his favourite bit of kit (at the moment) is a Canon EOS T80 35mm film camera he picked up on eBay for £18.
